

Function Application by Identity Authentication Method
- 🪪 ID document: ID photo-based
- 🧠 Knowledge-based: User input information-based
Use Cases
Financial Institution Automated KYC System
Financial Institution Automated KYC System
Banks can optimize automatic processing rates by adjusting ARGOS score thresholds, provide 24-hour unmanned KYC services by activating automated processing only option, accept only reliable IDs with ID recognition guarantee mode, and comply with legal requirements by setting age limits.
Global Service Regional Customized Operations
Global Service Regional Customized Operations
Platforms providing international services can manage service restrictions for specific regions through blacklist country settings and improve user convenience with universal ID support. Various countries’ IDs can be automatically recognized to improve user experience.
Age-Restricted Service Compliance Management
Age-Restricted Service Compliance Management
In alcohol or adult content services, legal requirements can be complied with through age limit functions. Users below the set age are automatically rejected, ensuring regulatory compliance.
Fine-grained KYC adjustment with custom policies
Fine-grained KYC adjustment with custom policies
With custom policy rules, you can cap ARGOS Score when low OCR confidence is detected, apply score penalties when users edit specific fields, or automatically override KYC status to rejected when forgery warnings occur — enabling business-specific verification logic.
ARGOS Score Threshold
Set the ARGOS score criteria to use for KYC verification. You can select the threshold for ARGOS score that determines automatic processing rate from a dropdown.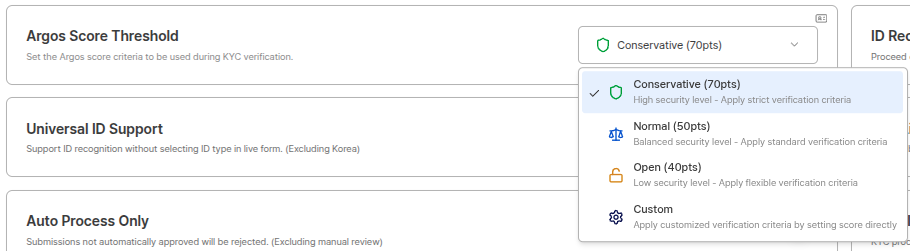
ARGOS Score Threshold Settings
- Conservative (70 points)
- Standard (50 points)
- Open (40 points)
- Through custom settings, you can set the ARGOS score threshold to 99, then use the client API option in Project Settings > System Operation > Reviewer Settings to enable customers to review directly.
ARGOS Score Threshold Selection Guide
- Low Score (Conservative): More submissions are automatically approved, but some risky submissions may also be included.
- High Score (Strict): Safer with stricter verification criteria, but legitimate users may also be rejected.
- Recommended: It is recommended to start with conservative settings and gradually adjust based on operational data.
ID Recognition Guarantee Mode
Proceeds only when ID template recognition is successful.
ID Recognition Guarantee Mode Settings
ID Recognition Score UsageWhen ID recognition score is 80 or above and all fields recognized during ID photo are normal value recognition, the ID photo result confirmation page is omitted in the user view.
Universal ID Support
Proceeds with recognition without selecting ID type in liveform. (Korea excluded)
Universal ID Support Settings
If you want to be able to select only specific ID types as valid identity verification means, please contact customer support. Currently, only ARGOS administrators can configure this per project.
Age Limit
KYC is rejected when users below the set age submit.
Age Limit Settings
- This age limit function works based on the date of birth shown on the ID.
- For age limit functions through selfie, you must use Face-based Age Verification.
- Enter age in the number input field. (e.g., 13 years old)
- Users below the set age are automatically rejected when they submit.
Age Limit UsageCan be used in services requiring age restrictions according to legal requirements (alcohol, adult content, gambling, etc.). Users are automatically rejected based on their date of birth, ensuring compliance.
Automated Processing Only
Submissions not automatically approved are rejected. (Manual review excluded)
Automated Processing Only Settings
Automated Processing Only UsageCan be used when providing 24-hour unmanned KYC services or when manual review exclusion is not needed. Optimal automatic processing rate can be achieved by adjusting together with ARGOS score threshold.
Blacklist Countries (Issuing Country)
KYC progress is restricted for IDs issued from selected countries.
Blacklist Country Settings
- Search for countries to restrict through the country search function.
- Select countries from search results to add.
- Multiple countries can be selected and added to the blacklist.
Blacklist Country UsageCan be used when user access from specific countries must be restricted due to regulations or policies. For example, users from sanctioned countries or regions where service provision is restricted can be preemptively blocked.
Custom Policy Rules
Control ARGOS Score calculation and KYC Status decision logic with custom rules. You can create up to 5 policies per project.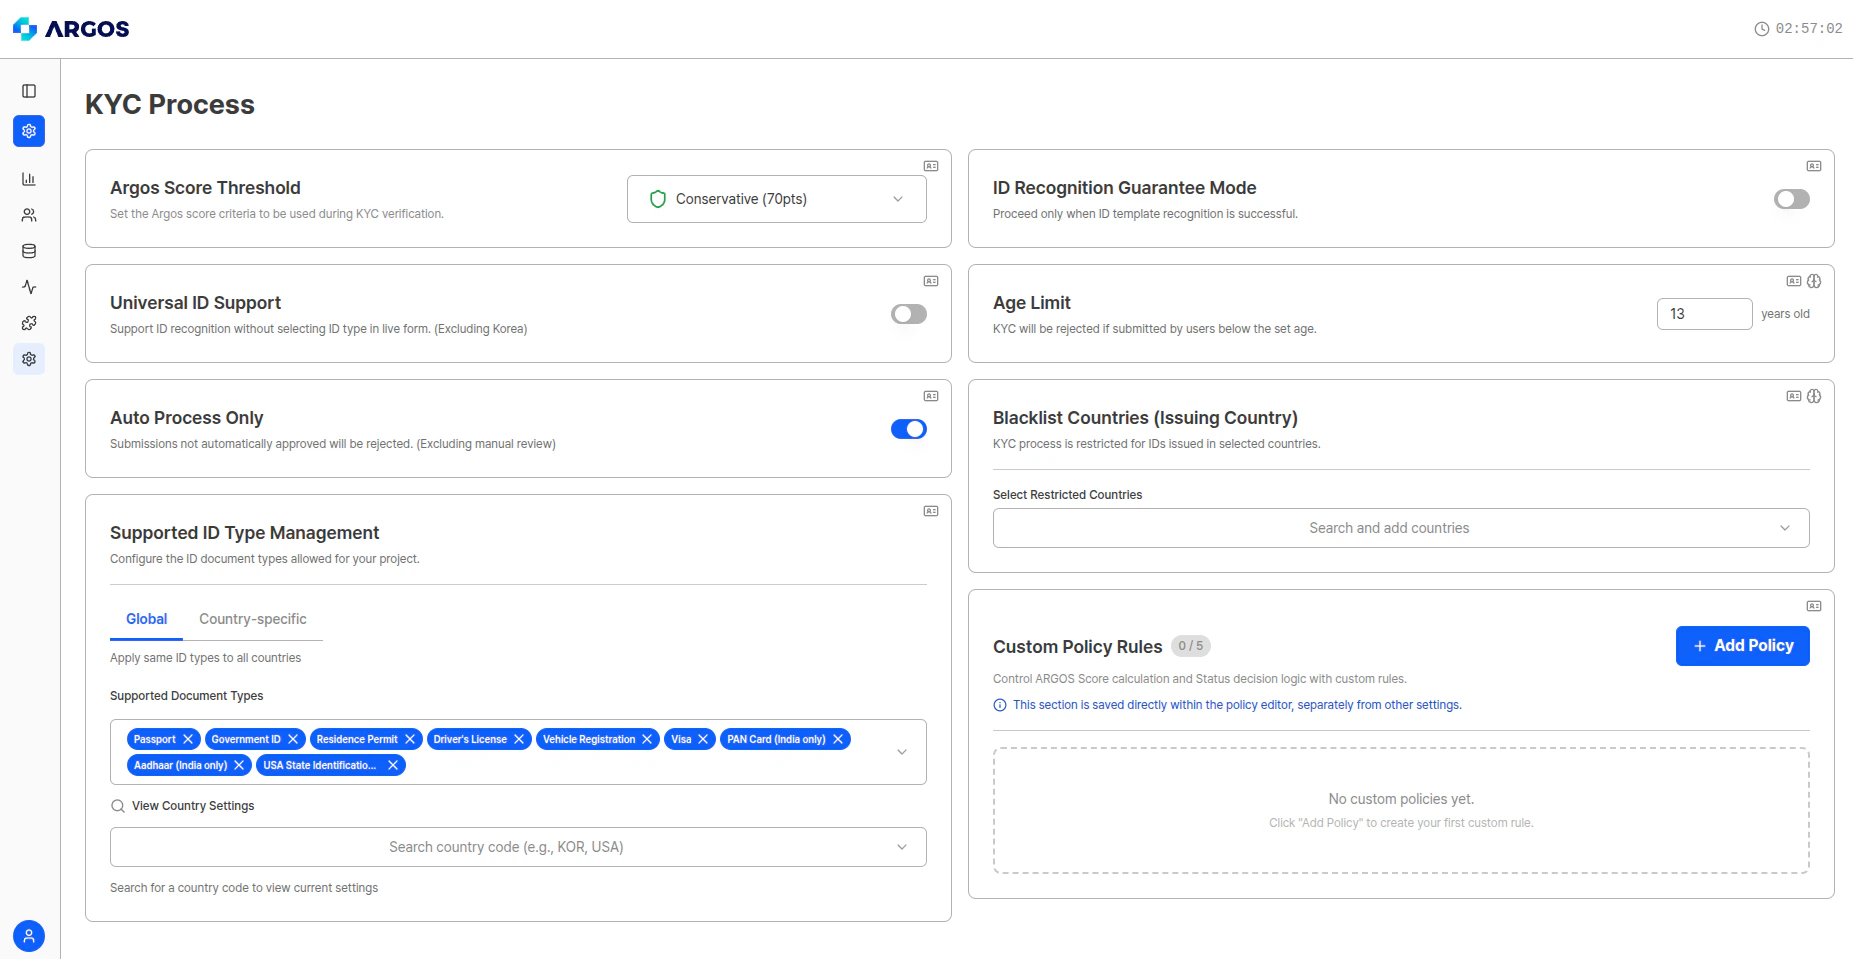
Custom Policy Rules settings
This section is saved directly within the policy editor, separately from other settings.
Policy editor
Click the + Add Policy button to open the policy editor. In the editor, you build policies by connecting triggers (conditions) and actions in a visual flow.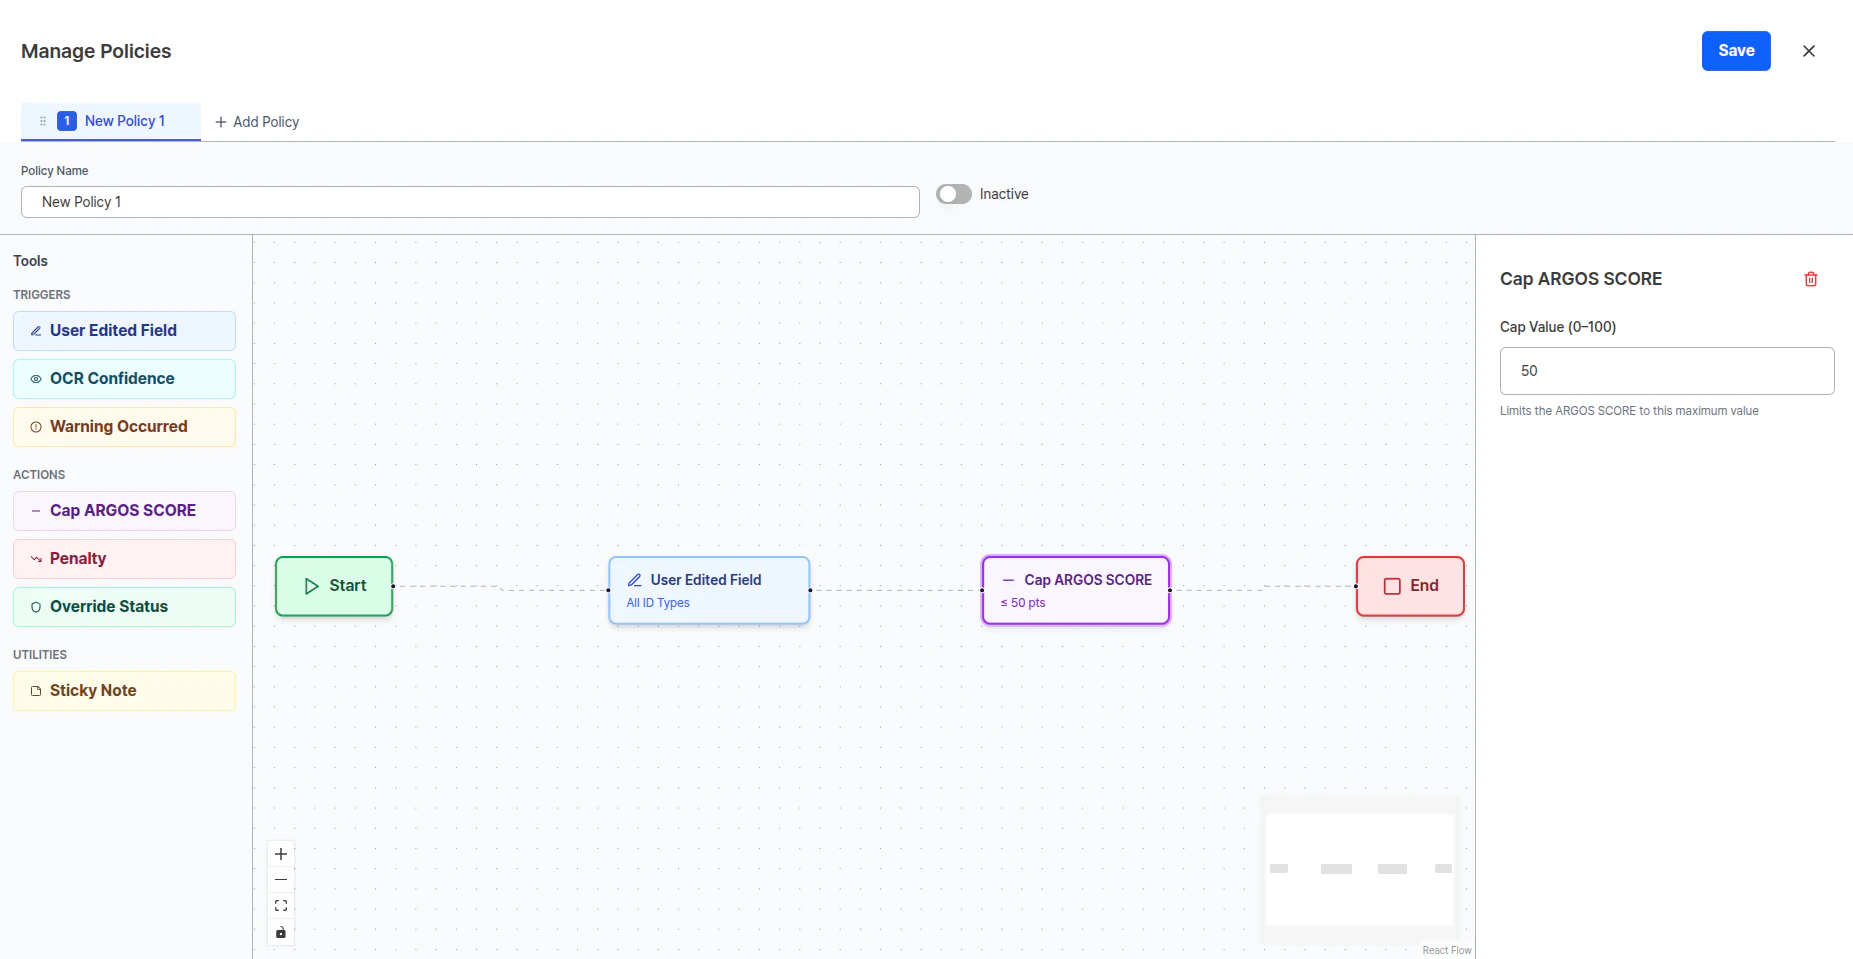
Policy editor - connect triggers and actions in a flow
Start → Trigger (condition) → Action (result) → End structure.
Triggers (conditions)
Triggers define the conditions under which a policy is applied. When a condition is met, the connected action is executed.Actions (results)
Actions define the operations to execute when a trigger condition is met.Utilities
Creating a policy
1
Add policy
Click the + Add Policy button in the Custom Policy Rules area on the KYC Process page.
2
Configure trigger
Drag a condition from the Triggers area in the left Tools panel onto the canvas. Click the trigger node to display the detail settings panel on the right.
- User Edited Field: Select target ID Types and fields.
- OCR Confidence: Set fields and confidence thresholds per ID Type.
- Warning Occurred: Select warning types to detect.
3
Configure action
Drag an action from the Actions area onto the canvas. Click the action node to configure its values.
- Cap ARGOS SCORE: Enter the cap value (0–100).
- Penalty: Choose the deduction method (absolute/relative) and enter the deduction value.
- Override Status: Select the KYC Status to apply.
4
Connect the flow
Connect nodes in the order:
Start → Trigger → Action → End.5
Save
Enter a policy name, verify the active/inactive state, and click the Save button.
After saving, return to the KYC Process page to confirm the policy appears in the Custom Policy Rules area.
Policy application order
Custom policies run immediately after the ARGOS Score decision, and are applied in the following order during KYC processing:- ARGOS Score (auto-approval) decision — Compares ARGOS Score against the Threshold to determine the initial KYC Status.
- Custom policy validation — Runs immediately after the ARGOS Score decision, validating activated policies in order and executing their actions.
- Automated Processing Only enforcement — A step that runs after custom policies. If the “Automated Processing Only” option is enabled, any Pending status at this stage (including a Pending forced by a custom policy) is rejected (
automatic_verification_fail). - Search-based duplicate user verification — A step that runs after custom policies, performing a final check for duplicate users.
Final result determination logic
After custom policy application, the final ARGOS Score and KYC Status are determined by the following rules:Policy application example
Policy application example
Configuration:
- ARGOS Score Threshold: 40 points
- Policy 1: Deduct 40 points (absolute) when low OCR confidence detected
- Policy 2: Override status to Rejected when low OCR confidence detected
- Original ARGOS Score: 96 points → Auto-approved (Approved)
- Policy 1 applied: 96 - 40 = 56 points (still above Threshold 40, so Approved maintained)
- Policy 2 applied: Status overridden to Rejected
- Final result: ARGOS Score 56 points, KYC Status Rejected
Supported ID Type Management
Set the ID types allowed in your project. You can configure this in two ways — Global and Per Country — choose the method that best fits your business requirements.Which method should you choose?
- Global: Best for applying the same ID Type policy across all countries. For example, use global settings if you want to “accept only passports from all countries.”
- Per Country: Best when different countries need different ID Type policies. For example, use per-country settings if you need a targeted strategy like “accept only passports in Country A, but allow both passports and driver’s licenses in Country B.”
Global
Applies the same ID Types uniformly across all countries.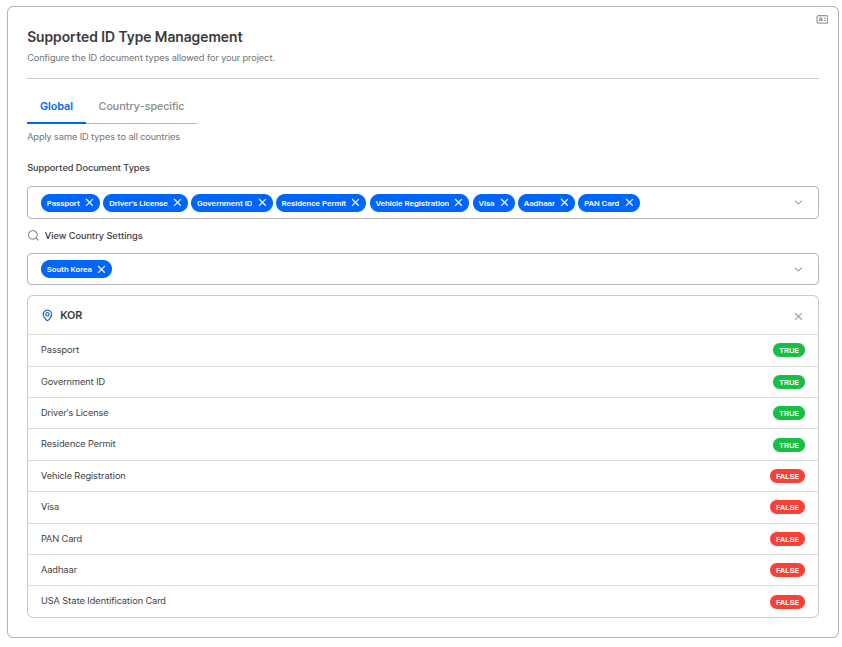
Global ID Type settings
Per Country
Configure ID Types individually per country through a CSV file.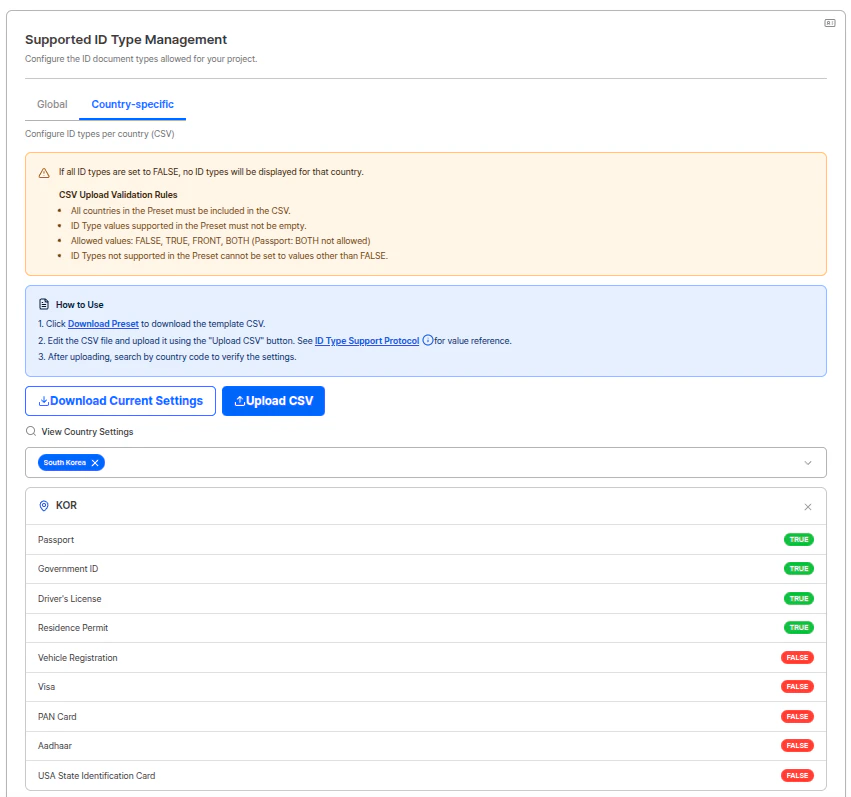
Per-country ID Type settings
1
Download Preset
Click the Download Current Settings button to download the template CSV file. The CSV contains all supported countries and the ID types available for KYC in each country.
2
Edit CSV File
In the downloaded CSV file, set a value for each country and ID type combination.
3
Upload CSV
Upload the modified CSV file using the CSV Upload button. After uploading, search by country code in Per-Country Settings Lookup to verify the settings were applied correctly.
- All countries included in the Preset must exist in the CSV.
- Values for ID Types supported by the Preset must not be missing.
- ID Types not supported by the Preset cannot be set to any value other than
FALSE.
Per-Country Settings Lookup
Regardless of whether global or per-country settings are used, you can check the currently applied settings status for each country. Select a country from the dropdown to view the allowed ID types and their activation status (TRUE / FALSE) for that country.
The per-country settings lookup is not where you change settings — it is an area that displays the current state reflecting the results configured in global or per-country settings.