

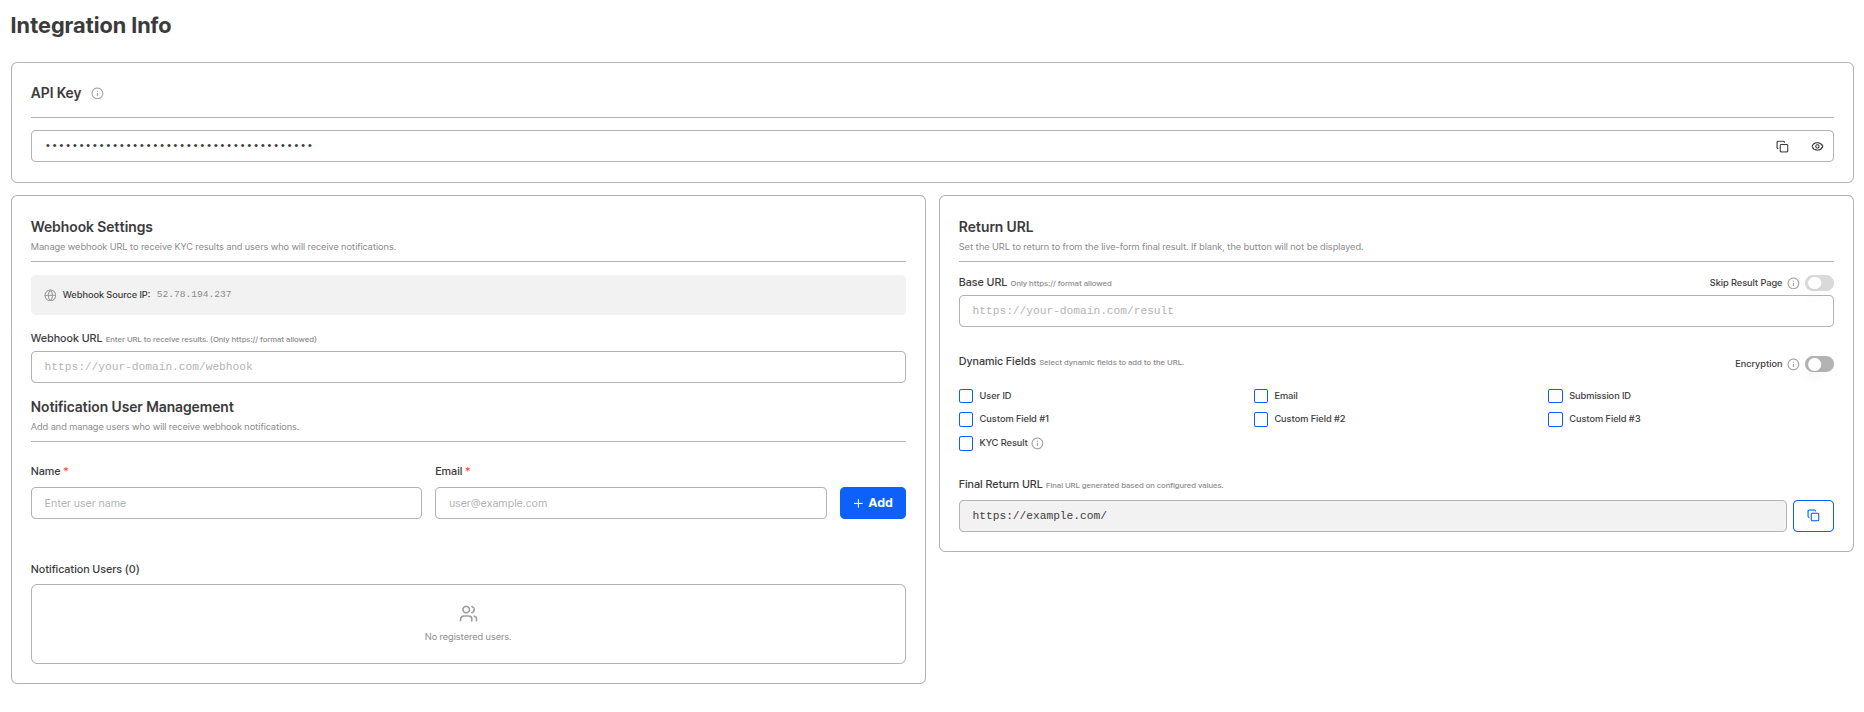
Integration Information Settings Page
API Key
You can view and manage the API key for the project.
API Key Settings
x-api-key header for all API requests.
API Key UsageYou can use various API functions such as submission queries, approval/rejection processing, token management, etc. using the API key.
Webhook Settings
The Webhook function supports real-time data integration with customer systems. When specific events occur, it sends HTTP POST requests to the endpoint (Endpoint URL) set by the customer, enabling real-time notifications and data processing without separate API calls.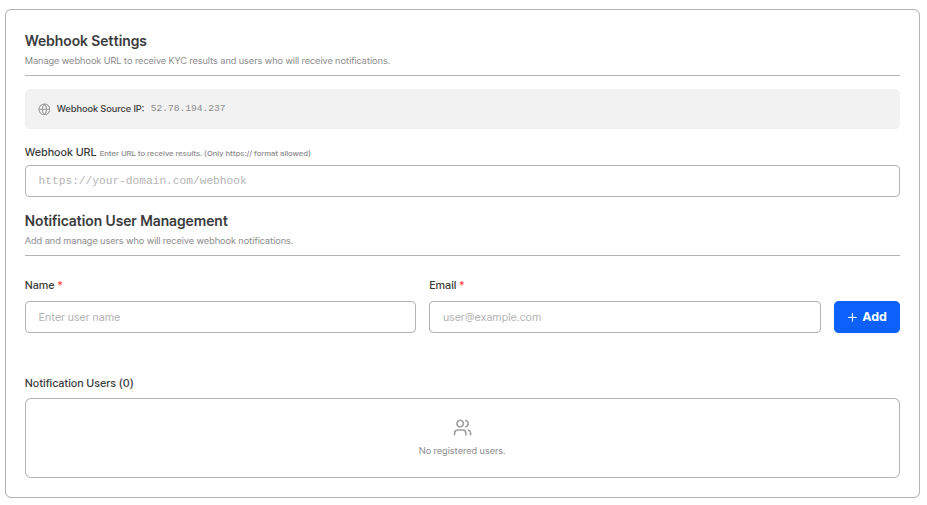
Webhook Settings
Webhook URL Settings
Set the endpoint URL where the customer system will receive webhook data. HTTP POST requests are sent to the set URL when webhook events occur.Firewall Configuration MethodAdd the IP address of your project’s region to the allow list in your customer’s firewall or security group settings. If you use projects in both regions, you must add both IP addresses:
- Webhook IP:
52.78.194.237(US region),43.202.228.115(KR region)
Webhook IP and URL ManagementFixed webhook IPs for each project can only be viewed on this page, and webhook URL change history is not stored, so please be mindful of webhook URL management.
Notification User Management
By adding names and emails through notification user management, you can receive information about webhooks sent yesterday via email the next morning. Configuration Method:- Enter name and email address.
- Click the add button to register notification users.
- Registered users receive webhook information sent the previous day via email every morning.
Daily Webhook ReportA summary of all webhook events sent the previous day (00:00 ~ 23:59 UTC) is sent via email to registered notification users every morning. This allows you to monitor webhook transmission status.
Return URL
Users are redirected to the set URL when KYC is completed or when they are taken to an error page.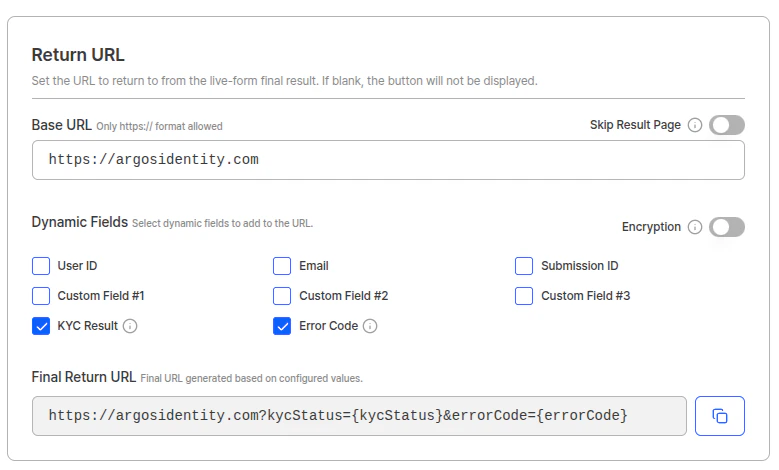
Return URL Settings
errorCode parameter is included so that your service can identify the reason for the block.
Return URL Example (normal completion):
Return URL Encryption
When the return URL encryption function is activated, return URL parameters are encrypted and delivered.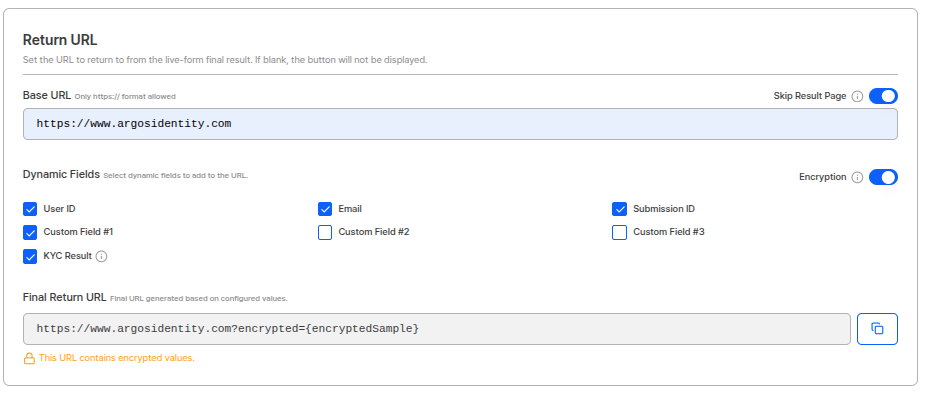
Return URL Encryption Settings
encrypted parameter.
Encrypted Return URL Example:
Return URL Encryption UsageWhen using return URLs containing sensitive information (email, user ID, etc.), you can strengthen security by activating the encryption function. AES-256-ECB method is used for decryption.
Encryption Guide
Return URL UsageAfter KYC completion, users can be automatically redirected to the customer’s service page, providing customized guidance pages according to approval/rejection status.
Skip Result Page
You can skip users viewing KYC results and redirect to your desired URL. When the skip result page function is activated, it skips the KYC result page and moves directly to the return URL. Usage Scenarios:- When customers want to provide their own result page
- When you want to flexibly provide results through dynamic field parameters in the return URL
Skip Result Page and Dynamic Fields CombinationWhen you activate the skip result page function and select parameters such as
kycStatus, submissionId in dynamic fields, KYC result information is included in the return URL. This allows customers to configure their own result pages.Dynamic Fields
Click the checkboxes in dynamic fields to select which items to pass as return URL query parameters. The selected values are automatically reflected in the Final Return URL preview at the bottom of the screen.
Final Return URL preview:
Using the Error Code (
errorCode) parameterWhen you check Error Code in dynamic fields, users who land on an error page can return to your service via the return URL button, with the errorCode value included in the query string. This lets your service identify the reason for the block (e.g., Device Verification failure, token expiry). For the full error code mapping, see the Error Codes and Pages reference.Webhook Event Types
The main event types sent via webhook are as follows:Use Cases
Customer Onboarding Process Automation
Customer Onboarding Process Automation
When a financial institution’s new customer’s KYC authentication is completed, they can receive immediate notifications via webhook and automatically proceed with follow-up processes such as account opening, card issuance, and service activation. Using return URLs and dynamic fields, customized guidance pages can be provided to customers according to approval/rejection status.
Operations Team Real-time Monitoring and Response
Operations Team Real-time Monitoring and Response
When KYC submissions are rejected or specific risk factors are detected, immediate notifications can be sent to the operations team via webhook for rapid response. You can check the previous day’s webhook transmission status every morning through the notification user management function.
Providing Custom Result Pages
Providing Custom Result Pages
Customers can configure their own result pages using the skip result page function and dynamic fields. Since KYC result information is included in the return URL, results can be processed immediately without separate API calls.