

What this tool is for
Use it during integration work to answer questions like “is my ciphertext correct?” and “what does a webhook actually look like?” You can try values and see results before writing any code.LiveForm
encrypted= valueFace Auth
API
Webhook
Download
- macOS
- Windows
Download
Unzip
EnDecryptGUI.app. Moving it to your Applications folder is convenient.Allow it on first launch
"EnDecryptGUI" was blocked click Open Anyway.
You only need to do this once.Switching tabs with the keyboard
You can also switch tabs from the keyboard:⌘1-⌘4 on macOS, Ctrl+1-Ctrl+4 on Windows,
in the order LiveForm, Face Auth, API, Webhook. Hover a tab to see its shortcut.

Hover a tab to see its shortcut
Before you start — two things to check
Get your project API key
Check your encryption algorithm
ECB or GCM.If the tool’s Encryption selector does not match, results will not line up.
The tool defaults to ECB and resets to ECB every time you relaunch it.LiveForm tab — building URL parameters
This is where you produce theencrypted= value for a LiveForm URL.
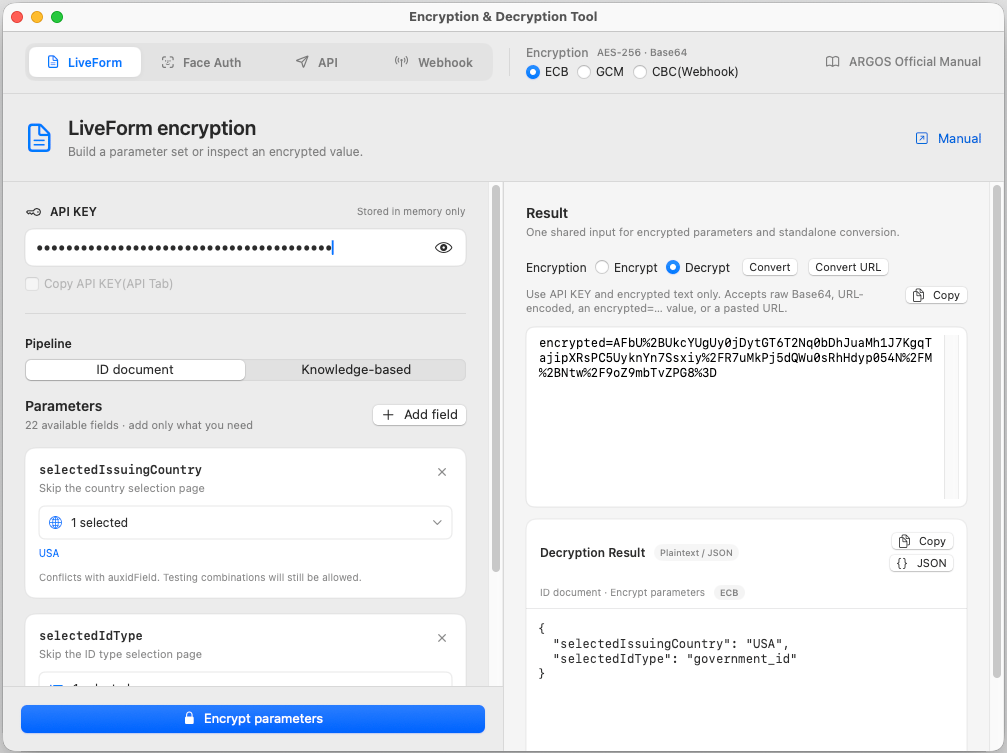
LiveForm tab - build a parameter set and get the encrypted value
Choose the pipeline
Enter the API key
Add parameters with Add field
Click Encrypt parameters
encrypted= followed by the URL-encoded ciphertext.
Copy it and append it to your URL.Decryption Result below shows the original JSON you just encrypted, formatted for reading,
so you can confirm what went in.The knowledgePrefill editor
In the Knowledge-based pipeline, knowledgePrefill opens its own editor.
Choose from name, gender, birthDate, nationality, SSN, address, and phoneNumber,
type the values, and the combined string such as gender=male,birthDate=1990-01-01
is composed live.
To try keys that are not in the list, switch to Raw text mode.
The Fields and Raw drafts are kept separately.
Jane Doe are examples,
not defaults — only what you actually type gets encrypted.The converter on the right — one value, quickly
Use this to encrypt or decrypt any text without building a parameter set. You only need the API key and the input box. It is available on both the LiveForm and Face Auth tabs.- raw ciphertext
- URL-encoded ciphertext
encrypted=...- a full URL containing an
encryptedparameter
Face Auth tab
Paste the Face Auth URL from the dashboard and the region is detected automatically andpid is filled in.
Enter the API key and an approved sid, then click Proceed to build the final URL.
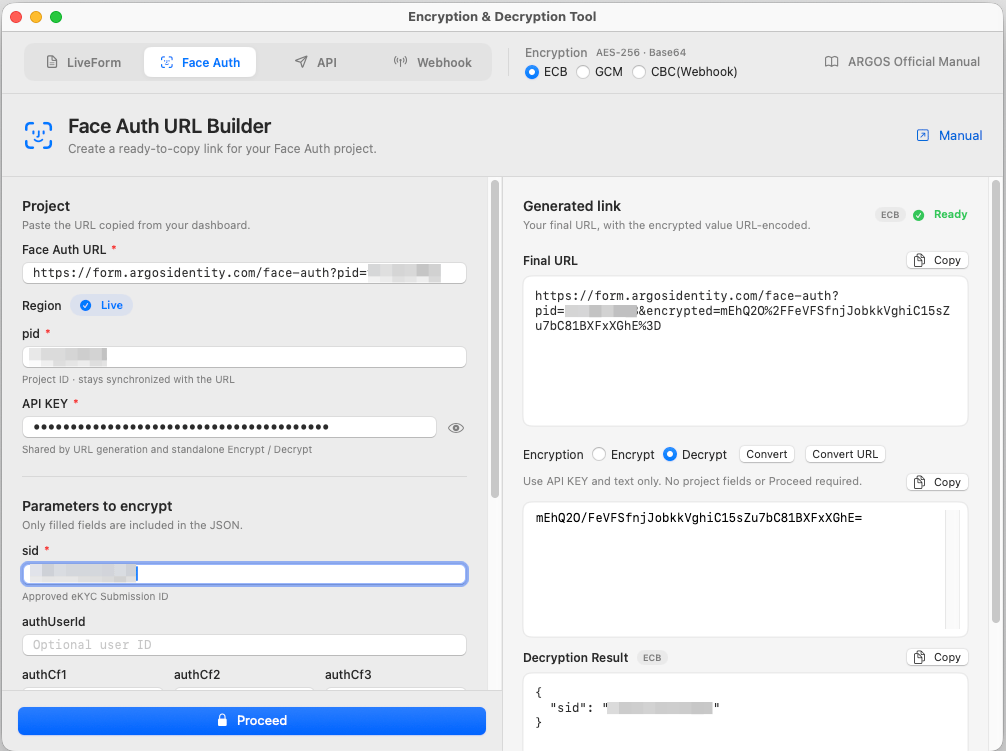
Face Auth tab - paste the dashboard URL and build the final link
pid and lang are not encrypted. What gets encrypted is sid plus the optional fields you filled in.
mainColor and innerColor are currently disabled — visible but not editable, and left out of the result.API tab
Fill in a form for any of the 17 endpoints and send a real request. Set the base URL and API key on the left, fill parameters on the right, then click Proceed.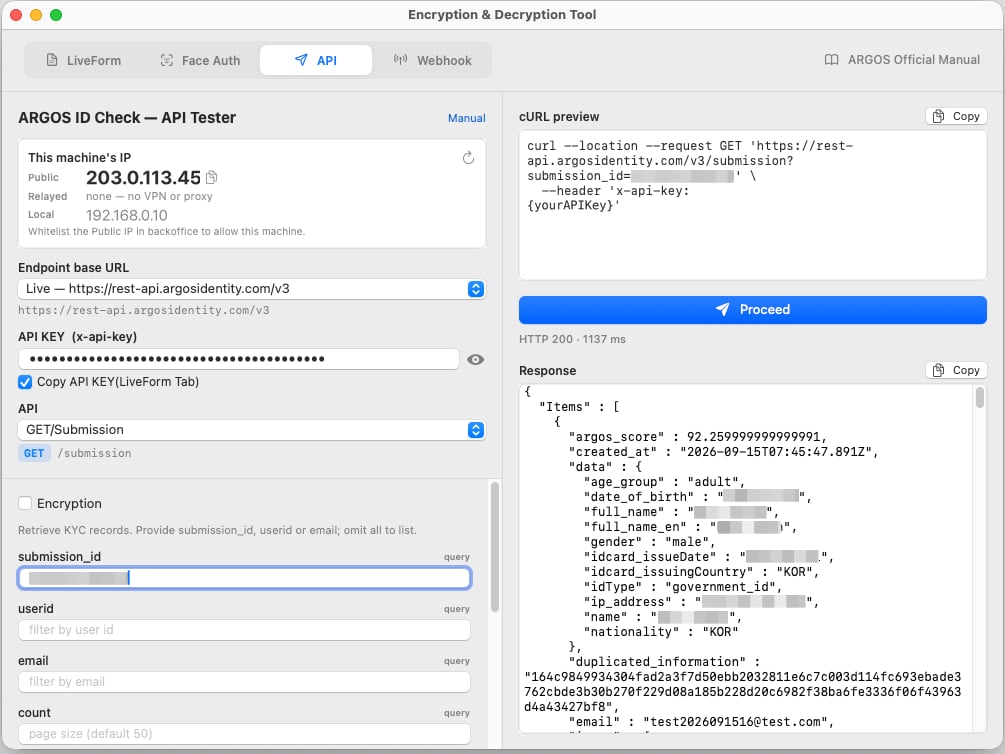
API tab - fill an endpoint form and check the cURL
- The cURL preview updates as you type. Copy it and run it in a terminal as-is.
- Responses show the HTTP status and elapsed time. JSON is formatted for reading.
- Your public IP, local IP, and VPN status are shown too, which helps with IP-restricted projects.
Using Secure Data Transfer (encryption)
If Secure Data Transfer is enabled on your project, Submission endpoints show an Encryption checkbox. Ticking it replaces the normal inputs with a singledata (encryption) field.
Write what you want to send as JSON
Encrypt it in the converter
Paste into data (encryption) and click Proceed
{"data":"...","isEncrypted":true}.
Copy the data value and run it through the converter in Decrypt mode.Webhook tab — receiving webhooks on your machine
A webhook is ARGOS sending results to your server. But the machine you develop on has no public address, so ARGOS cannot reach it. ngrok solves this. It creates a temporary public address and forwards anything sent there to your machine.ngrok http 8000 for you —
you never have to type the command yourself.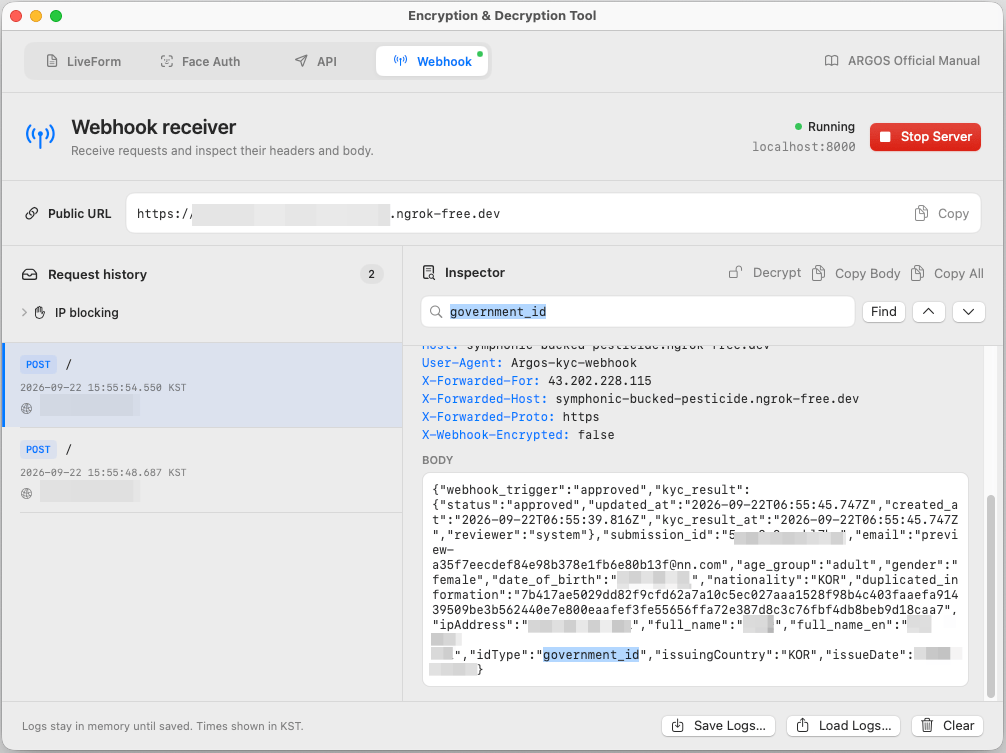
Webhook tab - inspect the headers and body of a received request
Step 1 — Install ngrok
- macOS
- Windows
Step 2 — Connect your ngrok account (once)
ngrok requires a free account.Sign up and copy your token
Register it
Authtoken saved means you are done. This is once per computer.Step 3 — Start the server
Click Start Server on the Webhook tab
Copy the public URL
https:// appears. Click Copy next to it.The status reads Running and a green dot appears on the Webhook tab.Register it in the dashboard
Test it
Decrypting what you received
If Secure Data Transfer is enabled, the body arrives as ciphertext. Click Decrypt above the body to open it. On success a Decrypted badge appears and the body is replaced with readable JSON.Trying IP blocking
Expand IP blocking at the bottom left and enter an IPv4 address to answer requests from it with 403. Those appear in the list as red BLOCK entries. Useful for checking retry behavior.Troubleshooting
Decryption produces garbled text
Decryption produces garbled text
ECB or GCM, and set the tool’s
Encryption selector to match.The tool resets to ECB on every launch, so a GCM project needs it selected each time.If the algorithm is right, check the API key. A stray leading or trailing space is a common
cause — the tool uses exactly what you typed, so one extra space changes everything.It does not work when I put it in a URL
It does not work when I put it in a URL
encrypted=.
Running encodeURIComponent() on it again in your code turns %2B into %252B and breaks it.Start Server does not start
Start Server does not start
ngrok config add-authtoken.ERR_NGROK_334 — ngrok is already running somewhere else under the same account.
A free account allows only one at a time. Stop the other one and try again.Port 8000 is in use — another program is using it. Close that program and retry.It says Running · existing ngrok tunnel
It says Running · existing ngrok tunnel
ngrok http 3000 yourself, the tool ignores it.If you want to start ngrok yourself, use exactly:Webhooks never arrive
Webhooks never arrive
- Make sure you pasted the current public URL into the dashboard webhook settings. A free ngrok account changes the address on every restart.
- Make sure the address starts with
https://. - Make sure you did not leave an address in IP blocking.
The app closes immediately on Windows
The app closes immediately on Windows
EnDecryptGUI.exe on its own will not work — all the DLLs in the same folder are required.Notes
- Inputs, API keys, and conversion results live in memory only. They disappear when you quit and are never written to disk.
- The LiveForm and Face Auth tabs use no network at all. Everything is computed locally.
- Only the API and Webhook tabs use the network.
- Each tab’s API key is independent. The one exception is Webhook’s Decrypt, which reads the LiveForm key.