1. Preparation
- Cursor IDE: Latest version (version 0.47.8 or higher recommended)
2. MCP Server Connection Method
ARGOS Identity MCP server uses the web URL method. This method can be used immediately without any installation and always provides the latest version of the documentation.3. Connect to MCP Server
3.1. Verify MCP Server URL
Check the MCP server URL provided in the MCP section of the Mintlify dashboard:3.2. Add MCP in Cursor Settings
There are two ways to add an MCP server in Cursor IDE:Method 1: UI Configuration (Recommended)
- Launch Cursor IDE.
- Go to Settings:
- Windows/Linux:
Ctrl + ,or File → Preferences → Settings from the menu - macOS:
Cmd + ,or Cursor → Settings from the menu
- Windows/Linux:
- Type
MCPorModel Context Protocolin the search box. - Find the Features → Model Context Protocol section.
- Click Add MCP Server or the + button.
- Enter the following information:
- Name:
argosidentity - URL:
https://developers.argosidentity.com/mcp
- Name:
- Click Save or Add.
Method 2: Direct Configuration File Editing
-
Open the Cursor IDE configuration file:
- Windows:
%APPDATA%\Cursor\User\settings.json - macOS:
~/Library/Application Support/Cursor/User/settings.json - Linux:
~/.config/Cursor/User/settings.json
- Windows:
- Add the following configuration:
MCP settings in Cursor can be managed at Settings → Features → Model Context Protocol. If you edited the configuration file directly, you need to restart Cursor for the changes to take effect.
3.3. Restart Cursor
If you edited the configuration file directly, completely quit and restart Cursor IDE.3.4. Verify Connection
After configuration, verify that ARGOS Identity MCP is enabled in Cursor IDE:- Go to Settings → Features → Model Context Protocol in Cursor IDE.
- Check if the
argosidentityserver appears in the list. - Verify that the server status shows “Connected” or “Active”.
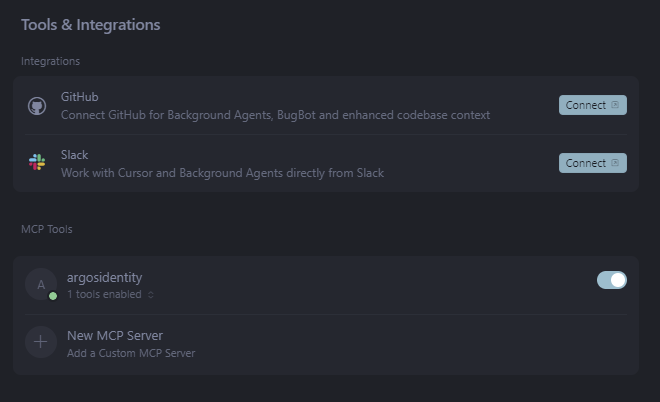
When the MCP server is properly connected, the
SearchArgosIdentity tool will appear in the “Available tools” section.3.5. Troubleshooting
If the MCP server is not connecting, check the following:- URL Verification: Verify that
https://developers.argosidentity.com/mcpis correct. - Network Connection: Check if your internet connection is working properly.
- Cursor Version: Verify that Cursor IDE is the latest version (0.47.8 or higher).
- Configuration File Format: If you edited the configuration file directly, verify that the JSON format is correct.
- Restart: Completely quit and restart Cursor IDE.
4. Start Using ARGOS Dev Guide MCP
You can directly ask ARGOS development documentation questions in Cursor’s New Chat window.Below is an example of an actual question and response:
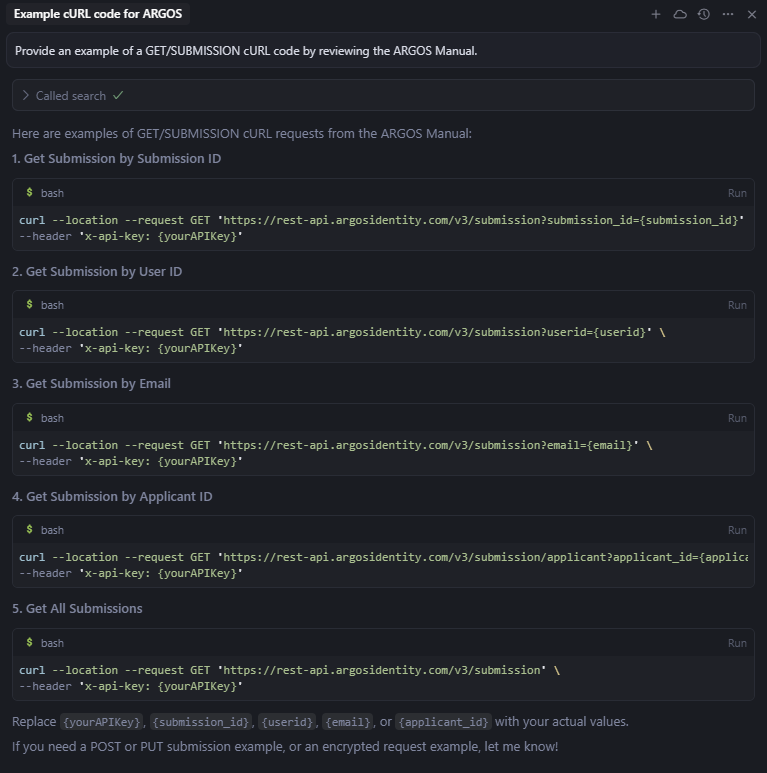
Once the MCP server is properly connected, Cursor can search ARGOS Identity documentation and answer questions.