Complete ID check Onboarding Guide
This guide is written for developers who are integrating ID check into their service for the first time. It walks through the real concerns you’ll face during integration, step by step, introducing the technologies ARGOS provides at each stage.- ARGOS Identity account (Sign up at idcheck.argosidentity.com)
- Dashboard access and API key confirmation
Core Principle of ID check Integration
There is one critical thing to understand first when integrating ID check into your system. Role of the API: The ID check API serves as a pipeline for the secure transfer of information to and from the ARGOS system. Its main purposes are:Table of Contents
Part 1: Foundation
Part 2: Integration
Part 3: Production
Part 1: Foundation
What is ARGOS ID check?
ARGOS ID check is an AI-powered identity verification platform. When users capture their ID documents and take selfies, the AI analyzes document authenticity and delivers verification results.Document Verification
AI Fraud Detection
Data Extraction
KYC/AML Compliance
Account Setup and Essential Information
Create Your Account
Confirm Essential Information
- Project ID (PID) — Unique project identifier
- Liveform URL — The identity verification page URL to provide to users (under the Project Pipeline section)
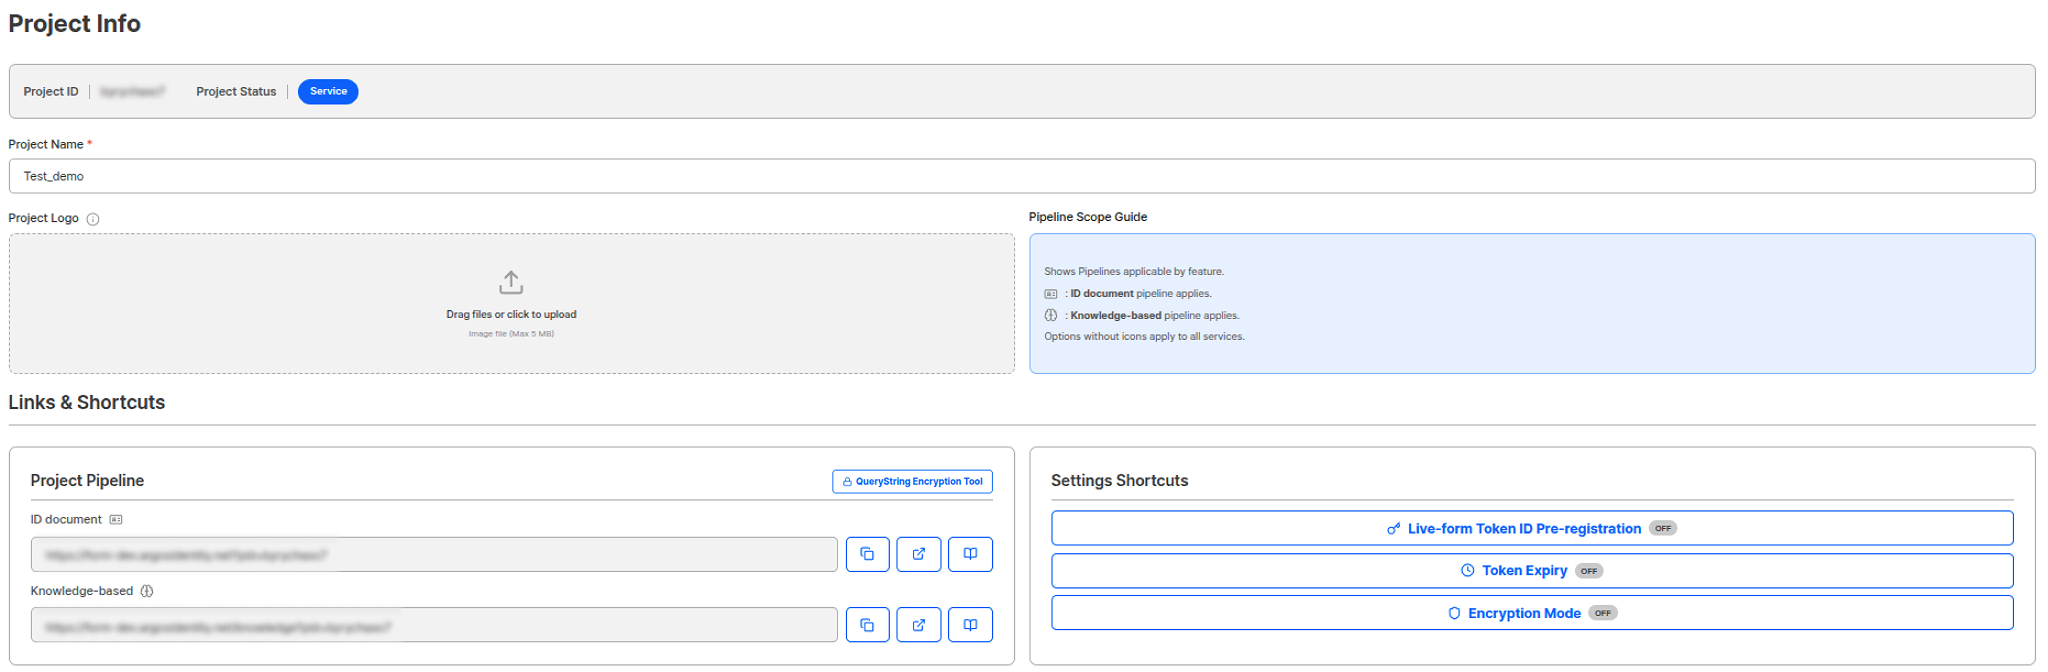
Confirm PID and Liveform URL on the Project Info page
- API Key — Used for API request authentication (never expose externally)

Confirm API Key on the Integration Info page
Core Concepts
Submission
Submission
- Submission ID — Unique identifier (e.g.,
sub_abc123) - KYC Status —
approved,rejected,pending(awaiting manual review),incomplete(not submitted / unfinished) - Extracted Data — Name, date of birth, nationality, etc.
- Images — ID document photos and selfies
- Metadata — Timestamps, IP address, userid/email passed by the customer, etc.
Liveform
Liveform
- Desktop: Displays a QR code for mobile scanning
- Mobile: Proceeds directly to the camera interface
Webhook
Webhook
approved— Verification approvedrejected— Verification rejectedsubmit— Submitted with pending statusupdated— Data updateddelete— Submission deletedcreated— Submission createdretry— User retrytoken_expired— Token expiredinjection— Data injected via APIaml— AML check completedaml_monitor— AML ongoing monitoring result
Token — Private Mode
Token — Private Mode
- Prevent the same URL from being shared with multiple people
- Provide verification links valid only for specific users
- Use in security-critical services (finance, healthcare, etc.)
- Generate a unique tokenId on your server and register it with ARGOS
- Add the
tokenparameter to the Liveform URL and deliver it to the user - Expires 3 minutes after first use or when the submission reaches a decision state
Return URL
Return URL
kycStatus), email, userid, custom fields, etc. are passed as query parameters.Example:Query Strings and Encryption
Query Strings and Encryption
email,userid,cf1~cf3— Pre-fill user informationblacklistCountries=false,ageLimit=false— Temporarily override policies
allowedCountries— Restrict allowed countriesallowedIdTypes— Restrict allowed document typesselectedIssuingCountry,selectedIdType— Skip selection screenstoken— Private mode token
- AES-256-ECB — Fast and simple block encryption
- AES-256-GCM — Enhanced encryption with authentication and integrity features
- API Key — The default API key assigned to the project
- Custom secretKey — A dedicated key issued separately from the dashboard (shown only once after issuance; must be reissued if lost)
Part 2: Integration
Solve the real concerns developers face, step by step.Q1. “How do I have users verify their identity from my app?”
Answer: Send users to the Liveform URL. Copy the Liveform URL from the dashboard and deliver it to users via button links, redirects, email links, or any other method.Get Your Liveform URL
Deliver to Users from Your App
Test the Basic Flow


- Desktop: QR code is displayed; scan with mobile to continue
- Mobile: Proceeds directly to camera interface
Q2. “Can I pass my service’s user information in advance?”
Answer: Add query string parameters to the URL. If users have already signed up, pre-filling their email, user ID, etc. means they won’t need to re-enter this on the Liveform. These values are also saved with the Submission data and can be used later when querying via webhooks or the GET Submission API. Key Parameters:Q3. “I’m concerned about the URL being shared with multiple people”
Answer: Register a Token to use Private Mode (one-time URL). Adding a Token to the Liveform URL makes it one-time use. After first use, once 3 minutes pass or verification completes, it can no longer be used.Generate a Unique tokenId on Your Server and Register with ARGOS
Deliver the Tokenized Liveform URL to the User
Handle Token Expiration
- 3 minutes have passed since first use
- The Submission associated with the Token reaches a decision state (approved/rejected/pending)
- Maximum 100,000 tokens per project
- Maximum 500 tokens per API request
- Token ID format: 8–64 characters, alphanumeric +
-_.
Q4. “I want to allow only specific countries or document types”
Answer: Use encrypted query string parameters. Security-sensitive parameters likeallowedCountries and allowedIdTypes must be encrypted and placed in the encrypted parameter. You can choose between AES-256-ECB or AES-256-GCM encryption modules, and use either the project API key or a Custom secretKey issued separately from the dashboard as the encryption key.
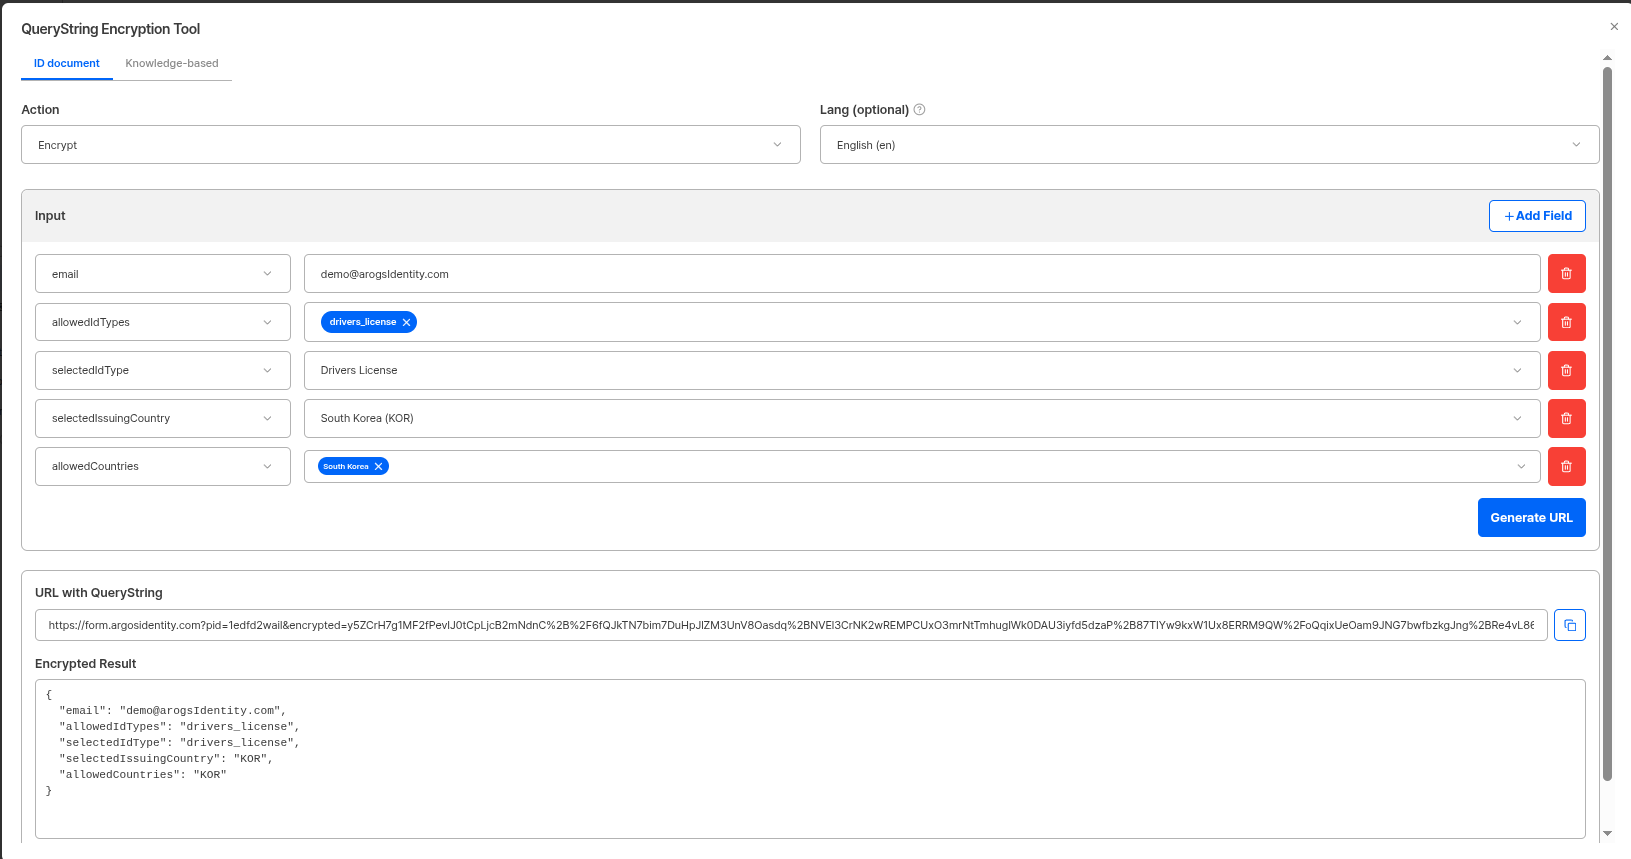
Query String Encryption/Decryption Tool
Q5. “I want to redirect users back to my app after verification”
Answer: Set up a Return URL in the dashboard. When users finish verification and click “OK”, they are redirected to the configured URL. KYC results are passed as query parameters.Set Return URL in Dashboard
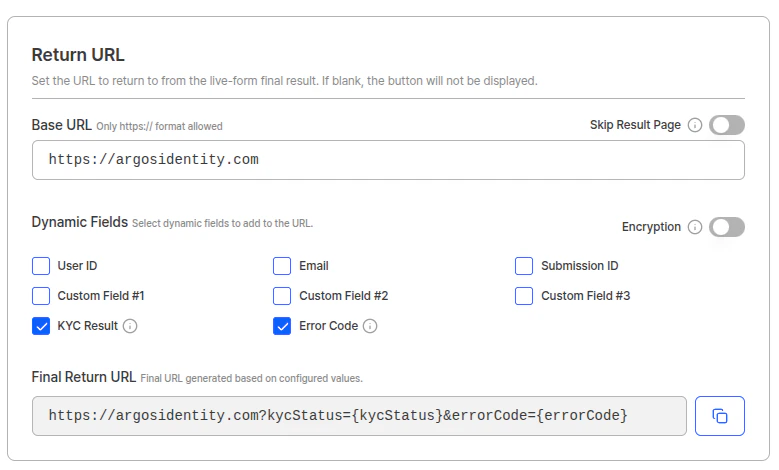
Return URL Settings
Handle the Redirect Results
kycStatus—approved,rejected,pendinguserid— User ID passed in the Liveform URLemail— User emailcf1,cf2,cf3— Custom fields
Q6. “I want to receive verification results on my server in real time”
Answer: Set up Webhooks. Webhooks send instant HTTP POST requests to your server when verification events occur. This is the most reliable and recommended method for receiving verification results.Create a Webhook Endpoint
Register Webhook URL in Dashboard
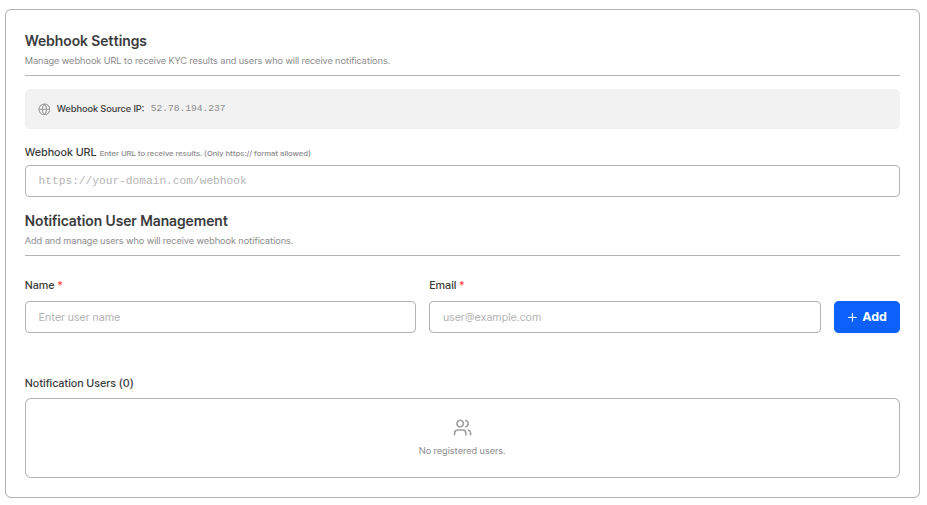
Webhook URL Settings
Review Webhook Events
Q7. “I want to integrate verification data with our DB/system”
Answer: Use the GET Submission API to query verification data. While real-time reception via webhooks is possible, use the GET Submission API when you need to directly query specific Submission data at a given point in time.POST /submission/review allows customers to review pending submissions directly via API when the project reviewer is set to ‘Client’. Already approved/rejected submissions cannot be modified.Q8. “I want to migrate existing KYC data to ARGOS”
Answer: Use the POST Submission API (Migration). This API is used in the following situations:- Data Migration: Transfer KYC-completed data from existing systems to the ARGOS dashboard
- Special Situations: Directly insert data in exceptional cases where ID Check verification is difficult
- Development and Testing: Use during development to test various scenarios
idType, issuingCountry, nationality, gender, issueDate, expireDate, identityNumber, documentNumber, userid, cf1~cf3, etc.
Notes:
- Only string data is supported. For image data, use the PUT Image API separately.
- For enhanced security, you can encrypt the request body with AES-256-ECB before sending.
Part 3: Production Deployment
Security Hardening
Complete these security configurations before deploying to production.1. Secure API Key Management
1. Secure API Key Management
.gitignore:2. IP Whitelist Configuration
2. IP Whitelist Configuration
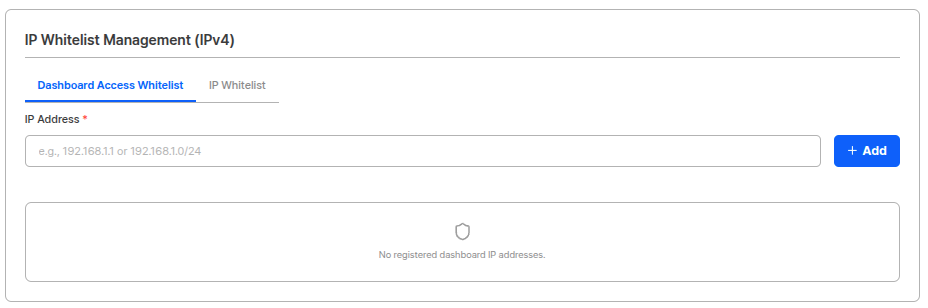
IP Whitelist Management
3. Enable Webhook Data Encryption
3. Enable Webhook Data Encryption

Secure Data Transfer Settings
Test Checklist
Verify the following items before deploying to production.Liveform Flow Testing
Basic Flow
Basic Flow
- Basic Liveform URL loads properly on desktop/mobile
- QR code scans on mobile and flow proceeds
- Camera permission request works correctly
- Document and selfie capture followed by submission completes
Query String Parameters
Query String Parameters
- User information is pre-filled with
email,useridparameters - Encrypted parameters (
allowedCountries, etc.) work correctly - Private mode URL with Token works properly
- Appropriate error screen is displayed when accessing an expired Token
Return URL
Return URL
- Redirected to Return URL after verification completion
-
kycStatus,userid,emailparameters are passed correctly - Parameters are passed via
encryptedparameter when encryption option is enabled
Webhook Testing
Webhook Reception Verification
Webhook Reception Verification
- Webhook endpoint receives events properly
-
approved,rejected,submitevents are processed correctly - 200 OK response is returned immediately on webhook receipt
- Idempotency handling for duplicate webhooks works
- Encrypted webhooks are decrypted correctly
API Testing
- GET Submission returns correct data
- Querying by
userid,emailworks - Token registration (POST Token) and retrieval (GET Token) work properly
- Only authorized IPs can access when IP whitelist is enabled
- 403 response is returned for requests with invalid API keys
Security Testing
- API key is not exposed in client-side code
- API key is not included in git history
- Webhook URL uses HTTPS
- Permissions are not granted based solely on Return URL parameters (verified via webhook)
Production Transition Checklist
Final Dashboard Settings Verification
- Webhook URL is set to production server address (HTTPS)
- All production server IPs are registered in IP whitelist
- Secure Data Transfer (webhook encryption) is configured as needed
- Return URL is set to production app address
- Project settings (allowed document types, country blacklist, age limits, etc.) match requirements
Final Code Verification
- API key is loaded from environment variables
- No hard-coded API keys in the code
- Error handling and logging are implemented in webhook handler
- Webhook idempotency handling is implemented
- Frontend does not call ARGOS API directly
Monitoring Setup
- Verification starts vs. completions
- Approved / Rejected / Pending ratios
- Webhook reception failure rate
- Token reissuance frequency due to expiration