

How to Use
You tell your Review Ops Agent how the work is done in the dashboard, and run it for each subject through the API.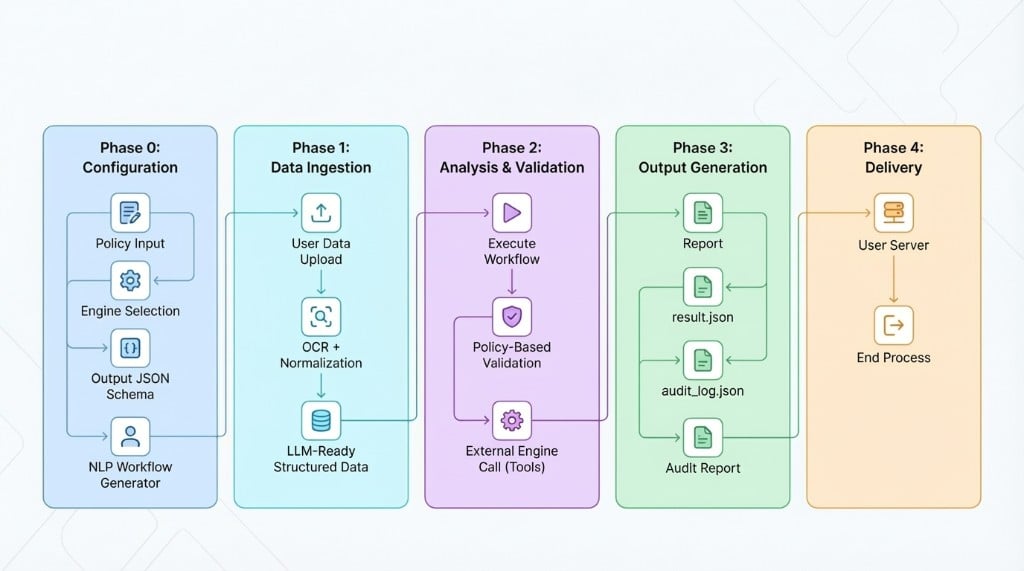
Configuration (policy, engines, output schema) → data ingestion (OCR, normalization) → analysis and validation → report, JSON, and audit log generation → delivery to your server.
Building blocks
Plain-language policy
Write how the work is done and your decision criteria as ordinary sentences. One policy clause becomes one execution step.
Automatic engine assignment
You never pick which engine a check needs. Engines are attached from the content of the policy, and the execution order is decided for you.
Output schema
Define the JSON structure you receive. Results come back in exactly the shape your system expects, so no post-processing conversion is needed.
Grounds for every verdict
You get more than values — you get why each value came out that way, with a step-by-step execution record and every external lookup in the audit log.
The whole flow
1
Configure the workflow (dashboard)
Write the policy and define the output schema you want back. Saving generates the playbook.
2
Create a profile (API)
Create one profile per verification subject. One vendor or one applicant is one profile.
3
Add documents (API)
Upload documents to the profile. Images and PDFs go through OCR; office documents go through text extraction.
4
Run the analysis (API)
The playbook runs in order, and you get back the verdict along with results shaped by your output schema.
1. Create a project and a workflow in the dashboard
1
Create a project
In the dashboard, select Create Project and enter a name and description. This documentation uses a project named
Demo as its example.An API key is issued along with the project. Find it on the API Key tab in the project settings — managing your API key.2
Create a workflow
Inside the project, select Create New Workflow to open the four-step wizard.
- Basic information — name it
Vendor Onboarding Document Verification Policy - Policy definition — write, in plain language, what you verify and against which criteria
- AI model — without a choice, the default model is used
- Output schema — define the JSON structure you want back from an analysis
wf_ prefix). You can also find the workflow ID by reading the project.
2. Run an analysis through the API
1
Create a profile
A profile is the unit that holds one verification subject. One vendor or one applicant is one profile.
id in the response is the profile ID, and folders[0].id is the default folder created with it. You need both in the next step.2
Add the documents
Upload the documents to the default folder. You can send a file or plain text.Record the
id (item_ prefix) from the response — you pass it in the analysis request. Add all three documents the same way.A single file is limited to 10MB, and one profile to 100MB of uploads in total. There is no per-folder count limit. The supported formats are in adding an item, and a format missing from that list is rejected at upload.
3
Wait for processing to finish
An added item goes through text extraction and moves from
PENDING to ACTIVE. Every item must be ACTIVE before an analysis can run.4
Run the analysis
Pass the item IDs to include as Analyses are asynchronous. The response returns only the analysis ID, immediately.
targetItems. The workflow’s policy, engines, and output schema are applied automatically.5
Read the result
Poll the status with the analysis ID, and read the result once There are three things to read.
status is completed.When you need a PDF for a person to read, get it from
GET /analyses/:analysisId/report.Next steps
Reading analysis results
The envelope structure, why a field is empty, and the order to read the verdicts in.
Core concepts
The data hierarchy from project to analysis, and what a playbook is.
Creating a workflow
The whole dashboard procedure, from writing the policy to the output schema.
API reference
Full definitions for all 23 endpoints.