> ## Documentation Index
> Fetch the complete documentation index at: https://developers.argosidentity.com/llms.txt
> Use this file to discover all available pages before exploring further.
# Product updates: March 2026
> ARGOS Identity product updates for March 2026
Hello, this is ARGOS Identity.
Here are the new features and improvements we delivered in March.
***
## Mongolian & Turkish language support
Feature Update
Mongolian (`mn`) and Turkish (`tr`) have been added as supported languages for the KYC liveform. You can display the liveform in these languages via the language parameter in the liveform URL or the end user's environment.
See the [Query String and Token Guide](/en/idcheck/getting-started/liveform-url/querystring-and-token-guide) for supported languages and query string settings. For the full changelog entry, see [Changelog](/en/idcheck/changelog/overview).
***
## Passive liveness capture UI improvement
UX Improvement
The passive liveness capture screen now displays a guide message **after 2 seconds** to help users complete the capture. The guide message UI supports your [Custom Theme](#custom-theme) colors.
***
## Image rotation in the liveform
New Feature
Users can rotate uploaded images **90° clockwise** **before submission** in the liveform, so misoriented ID images can be corrected without leaving the flow.
***
## Administrator invitation
Feature Update
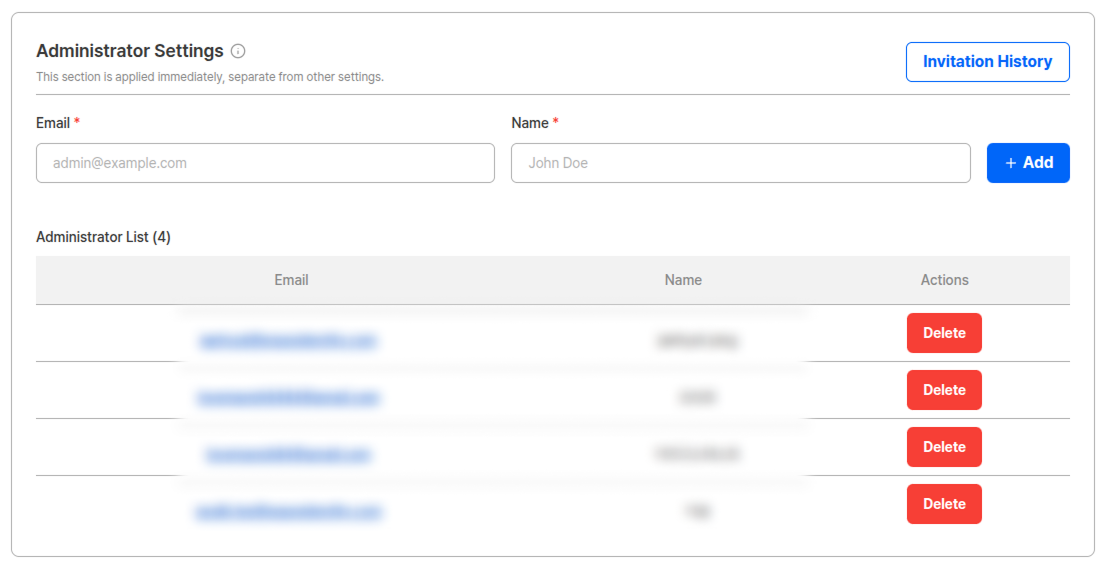
The **administrator invitation** feature has been added to the project administrator settings. You can register administrators by entering their email and name, then clicking the **+ Add** button.
 ### How it works
| Condition | Behavior |
| ------------------------------------------------- | ---------------------------------------------------------------------------------------------------------------------------------------------------------- |
| **User already registered on ID Check dashboard** | The user is immediately added to the administrator list. |
| **Unregistered user** | An invitation email is sent to the entered address. The user is registered as an administrator after accepting the invitation and completing registration. |
### Invitation history
Click the **Invitation History** button to view the invitation history for the project's administrators. You can manage invitation status, including the invited date and expiration date for each invitation.
### How it works
| Condition | Behavior |
| ------------------------------------------------- | ---------------------------------------------------------------------------------------------------------------------------------------------------------- |
| **User already registered on ID Check dashboard** | The user is immediately added to the administrator list. |
| **Unregistered user** | An invitation email is sent to the entered address. The user is registered as an administrator after accepting the invitation and completing registration. |
### Invitation history
Click the **Invitation History** button to view the invitation history for the project's administrators. You can manage invitation status, including the invited date and expiration date for each invitation.
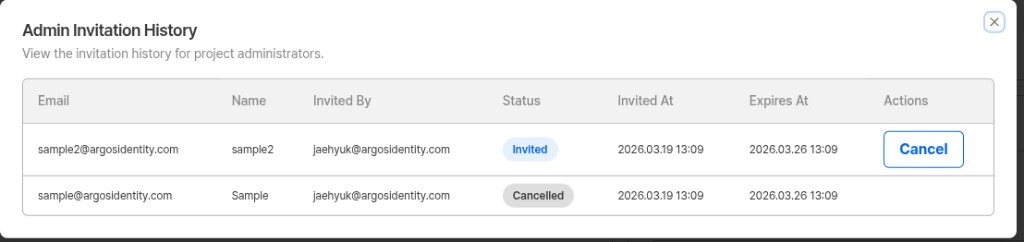 * Invitations are valid for **7 days** from the date they are sent.
* If an invitation has expired, you can re-invite the user by entering their email and name again.
* For invitations with `Invited` status, you can cancel them using the **Cancel** button.
For detailed setup instructions, see the [system operation guide](/dashboard/en/project-management/project-settings/system-operation#administrator-settings).
***
## Device Verification
New Feature
Device Verification has been added to analyze the information of devices accessing KYC authentication and **preemptively block non-mobile device access** such as desktops, virtual environments, and bots. The following 3 verification checks are performed.
| Verification Item | Description |
| ------------------ | ---------------------------------------------------------------------------------------------------- |
| **Browser check** | Analyzes the browser's UserAgent to determine whether the device is a desktop PC or automation tool. |
| **Graphics check** | Detects desktop-only GPUs or virtual environments through WebGL information. |
| **Screen check** | Analyzes touchscreen support to verify whether the device supports mobile-level multitouch. |
If even 1 of the 3 verifications fails, the user is redirected to an error page (`DE-20000`) and cannot enter the KYC process.
### Pre-verification List menu added
The pre-verification list, previously located under User Submissions, has been separated into an independent menu. A **Pre-verification List** menu has been added between **Statistics** and **User Submissions**, with **VPN & Proxy** and **Device Verification** pages underneath.
View device verification results.
Activate the option in Authentication Enhancement and Forgery Prevention.
***
## Custom Theme
New Feature
You can now apply your brand colors to the KYC liveform using the new **Custom Theme** query string parameters: `mainColor` and `innerColor`. Specify a 6-digit hex color code to replace the default ARGOS theme colors with your own brand colors on CTA buttons and key UI elements.
### Query string parameters
| Parameter | Format | Description |
| ------------ | -------------------------------------- | ------------------------------------------------------------------------ |
| `mainColor` | 6-digit hex with `#` (e.g., `#AEFF00`) | Sets the primary color for CTA buttons and main action elements. |
| `innerColor` | 6-digit hex with `#` (e.g., `#FFFFFF`) | Sets the inner (text/icon) color within CTA buttons and action elements. |
* The `#` prefix is required. Values without `#` (e.g., `AEFF00`) will not be applied correctly.
* Must be encrypted for use. The values above must be included inside the `encrypted` parameter.
**Example URL:**
```
https://form.argosidentity.com?pid={project_Id}&encrypted={'mainColor': '#AEFF00', 'innerColor': '#FFFFFF'}
```
The content inside `encrypted` must be encrypted. The URL above is shown unencrypted for illustration only.
You can easily test Custom Theme parameters using the [Query String Encryption/Decryption Tool](/dashboard/en/project-management/project-settings/project-info#query-string-encryptiondecryption-tool) in the dashboard under **Project Settings > Project Info**.
### Color preview
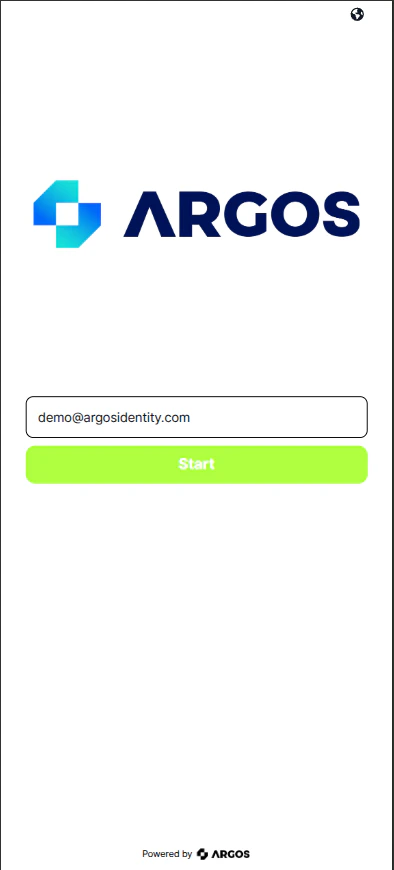
Below is an example of the liveform with `mainColor=#AEFF00` and `innerColor=#FFFFFF` applied. The CTA button color changes from the default ARGOS blue to the custom brand color.
* Invitations are valid for **7 days** from the date they are sent.
* If an invitation has expired, you can re-invite the user by entering their email and name again.
* For invitations with `Invited` status, you can cancel them using the **Cancel** button.
For detailed setup instructions, see the [system operation guide](/dashboard/en/project-management/project-settings/system-operation#administrator-settings).
***
## Device Verification
New Feature
Device Verification has been added to analyze the information of devices accessing KYC authentication and **preemptively block non-mobile device access** such as desktops, virtual environments, and bots. The following 3 verification checks are performed.
| Verification Item | Description |
| ------------------ | ---------------------------------------------------------------------------------------------------- |
| **Browser check** | Analyzes the browser's UserAgent to determine whether the device is a desktop PC or automation tool. |
| **Graphics check** | Detects desktop-only GPUs or virtual environments through WebGL information. |
| **Screen check** | Analyzes touchscreen support to verify whether the device supports mobile-level multitouch. |
If even 1 of the 3 verifications fails, the user is redirected to an error page (`DE-20000`) and cannot enter the KYC process.
### Pre-verification List menu added
The pre-verification list, previously located under User Submissions, has been separated into an independent menu. A **Pre-verification List** menu has been added between **Statistics** and **User Submissions**, with **VPN & Proxy** and **Device Verification** pages underneath.
View device verification results.
Activate the option in Authentication Enhancement and Forgery Prevention.
***
## Custom Theme
New Feature
You can now apply your brand colors to the KYC liveform using the new **Custom Theme** query string parameters: `mainColor` and `innerColor`. Specify a 6-digit hex color code to replace the default ARGOS theme colors with your own brand colors on CTA buttons and key UI elements.
### Query string parameters
| Parameter | Format | Description |
| ------------ | -------------------------------------- | ------------------------------------------------------------------------ |
| `mainColor` | 6-digit hex with `#` (e.g., `#AEFF00`) | Sets the primary color for CTA buttons and main action elements. |
| `innerColor` | 6-digit hex with `#` (e.g., `#FFFFFF`) | Sets the inner (text/icon) color within CTA buttons and action elements. |
* The `#` prefix is required. Values without `#` (e.g., `AEFF00`) will not be applied correctly.
* Must be encrypted for use. The values above must be included inside the `encrypted` parameter.
**Example URL:**
```
https://form.argosidentity.com?pid={project_Id}&encrypted={'mainColor': '#AEFF00', 'innerColor': '#FFFFFF'}
```
The content inside `encrypted` must be encrypted. The URL above is shown unencrypted for illustration only.
You can easily test Custom Theme parameters using the [Query String Encryption/Decryption Tool](/dashboard/en/project-management/project-settings/project-info#query-string-encryptiondecryption-tool) in the dashboard under **Project Settings > Project Info**.
### Color preview
Below is an example of the liveform with `mainColor=#AEFF00` and `innerColor=#FFFFFF` applied. The CTA button color changes from the default ARGOS blue to the custom brand color.
 ### What changes
| Element | Custom Theme applied |
| -------------------------------------------------- | -------------------- |
| CTA buttons (e.g., Next, Confirm, Submit) | Yes |
| Positive action indicators (e.g., Approved status) | Yes |
| Negative indicators (e.g., Rejected, Warning) | No |
| Black body text | No |
Custom Theme currently applies only to positive action elements such as CTA buttons and approval-related UI. Negative indicators (rejected, warning) and existing black text are not affected. Support for these elements is planned for a future update.
* For the full list of query string parameters, see the [Query String and Token Guide](/en/idcheck/getting-started/liveform-url/querystring-and-token-guide).
* For detailed application scope and screen-by-screen breakdown, see [Liveform Customization — Custom Theme](/dashboard/en/project-management/user-experience/liveform-customization#custom-theme-query-string).
***
## Custom policy reject code added
Feature Update
A new reject code has been added for rejections due to custom policy application.
| Reject Code | Reject Comment |
| ----------------------- | ---------------------------------------------------------------------------- |
| `applied_custom_policy` | KYC result has been determined as rejected due to the applied custom policy. |
For the full list of reject codes, see [Rejected Codes and Comments](/en/idcheck/reference_tables/reject-codes-and-comments).
***
ARGOS continually improves identity verification for stronger security and better user experience.
Thank you for using ARGOS Identity.
**ARGOS Identity Team**
### What changes
| Element | Custom Theme applied |
| -------------------------------------------------- | -------------------- |
| CTA buttons (e.g., Next, Confirm, Submit) | Yes |
| Positive action indicators (e.g., Approved status) | Yes |
| Negative indicators (e.g., Rejected, Warning) | No |
| Black body text | No |
Custom Theme currently applies only to positive action elements such as CTA buttons and approval-related UI. Negative indicators (rejected, warning) and existing black text are not affected. Support for these elements is planned for a future update.
* For the full list of query string parameters, see the [Query String and Token Guide](/en/idcheck/getting-started/liveform-url/querystring-and-token-guide).
* For detailed application scope and screen-by-screen breakdown, see [Liveform Customization — Custom Theme](/dashboard/en/project-management/user-experience/liveform-customization#custom-theme-query-string).
***
## Custom policy reject code added
Feature Update
A new reject code has been added for rejections due to custom policy application.
| Reject Code | Reject Comment |
| ----------------------- | ---------------------------------------------------------------------------- |
| `applied_custom_policy` | KYC result has been determined as rejected due to the applied custom policy. |
For the full list of reject codes, see [Rejected Codes and Comments](/en/idcheck/reference_tables/reject-codes-and-comments).
***
ARGOS continually improves identity verification for stronger security and better user experience.
Thank you for using ARGOS Identity.
**ARGOS Identity Team**