> ## Documentation Index
> Fetch the complete documentation index at: https://developers.argosidentity.com/llms.txt
> Use this file to discover all available pages before exploring further.
# Complete Onboarding Guide
> Step-by-step integration guide for customers adopting ARGOS ID check for the first time
# Complete ID check Onboarding Guide
This guide is written for **developers who are integrating ID check into their service for the first time**. It walks through the real concerns you'll face during integration, step by step, introducing the technologies ARGOS provides at each stage.
**Prerequisites**
* ARGOS Identity account ([Sign up at idcheck.argosidentity.com](https://idcheck.argosidentity.com/))
* Dashboard access and API key confirmation
***
## Core Principle of ID check Integration
There is one critical thing to understand first when integrating ID check into your system.
**ID check is a Liveform-based service.**
The entire identity verification process (capturing ID documents with camera, taking selfies, AI verification) takes place on the **Liveform hosted by ARGOS**. Customers cannot build or replace this UI themselves.
There is only one thing you need to do: **Send your users to the Liveform URL.**
**Role of the API:**
The ID check API serves as a pipeline for the secure transfer of information to and from the ARGOS system. Its main purposes are:
| Purpose | Related APIs | Description |
| ------------------------------- | -------------------------------------- | --------------------------------------------------------------------------------- |
| **Token Management** | POST/GET/DELETE Token | Create and manage one-time URLs in Private mode |
| **Data Retrieval & Management** | GET/PATCH/DELETE Submission, GET Image | Query, modify, delete verified Submission data, retrieve images |
| **System Integration** | POST Review, PUT Image | Process pending submissions, add/replace images for workflow integration |
| **Migration** | POST Submission | Migrate existing KYC data, insert data in special situations, development testing |
***
## Table of Contents
Account setup, core concepts
Liveform connection, receiving results, data utilization
Security hardening, testing, going live
***
## Part 1: Foundation
### What is ARGOS ID check?
ARGOS ID check is an **AI-powered identity verification platform**. When users capture their ID documents and take selfies, the AI analyzes document authenticity and delivers verification results.
Verify passports, driver's licenses, national IDs, residence permits, and other identity documents issued by a wide range of countries.
Automatically detect forgery, photo substitution, and document tampering with AI.
Automatically extract name, date of birth, nationality, and other information from ID documents.
Customizable verification rules and audit trail capabilities.
***
### Account Setup and Essential Information
Sign up at [idcheck.argosidentity.com](https://idcheck.argosidentity.com/), verify your email, and log in to the dashboard.
Confirm the following three items from the dashboard. Each item can be found under the **Project Management** menu in the new dashboard.
**1. Project ID (PID) and Liveform URL**
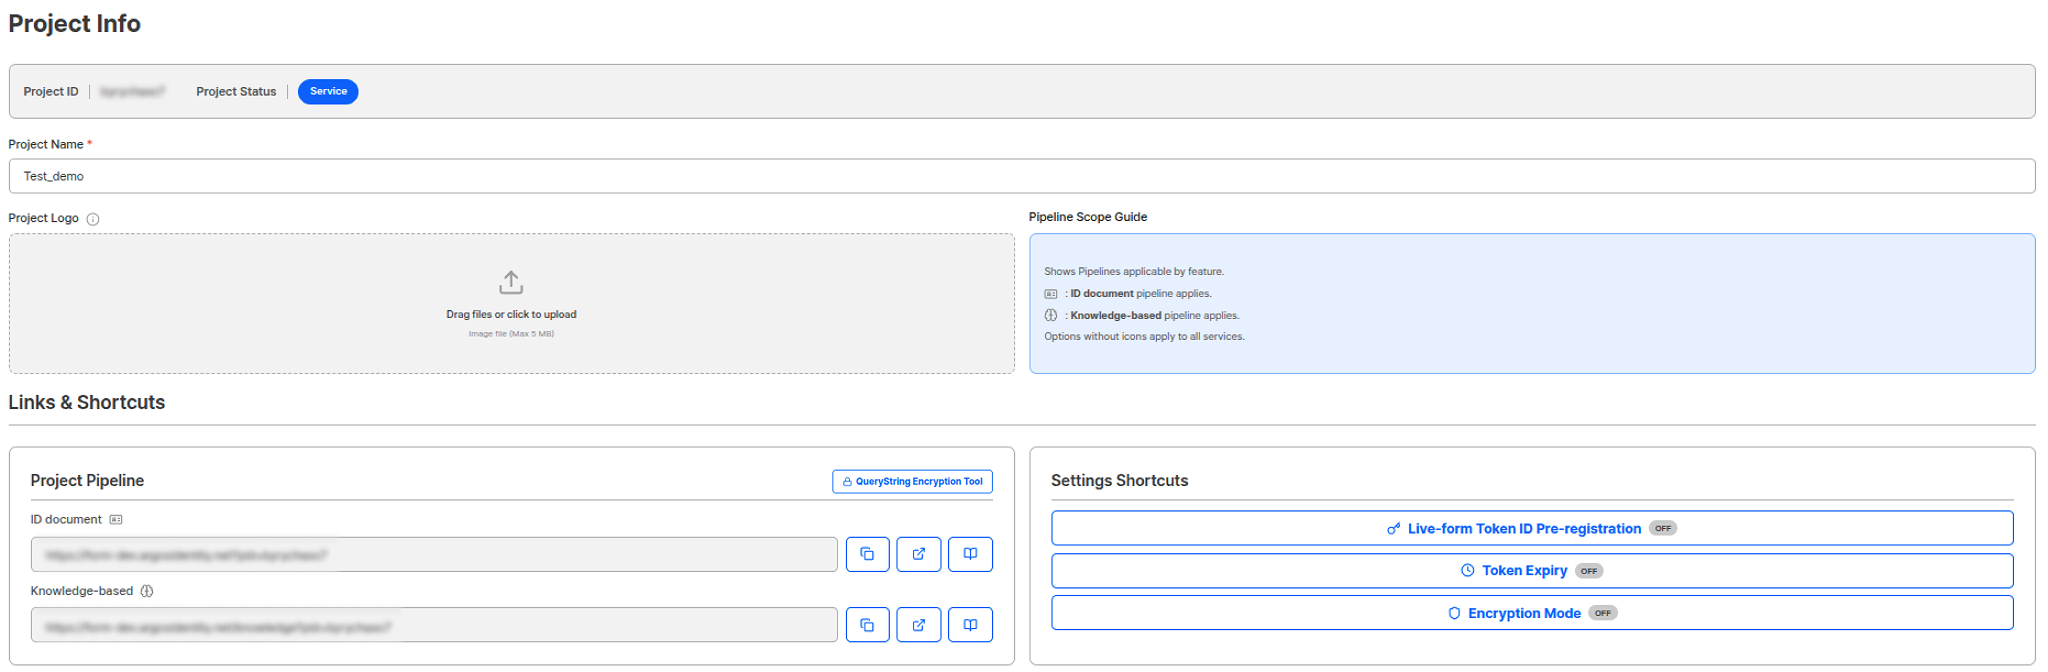
Navigate to **Project Management → Project Settings → Project Info** to confirm.
* **Project ID (PID)** — Unique project identifier
* **Liveform URL** — The identity verification page URL to provide to users (under the Project Pipeline section)
 **2. API Key**
Navigate to **Project Management → Project Settings → Integration Info** to confirm.
* **API Key** — Used for API request authentication (never expose externally)
**2. API Key**
Navigate to **Project Management → Project Settings → Integration Info** to confirm.
* **API Key** — Used for API request authentication (never expose externally)
 ```
API Key: argos_live_abc123xyz...
Project ID: pid_abc123
Liveform URL: https://form.argosidentity.com?pid=pid_abc123
```
**Security Note**: Treat your API key like a password. Never expose it in client-side code (frontend) or commit it to git. Always store it in server-side environment variables.
***
### Core Concepts
A **Submission** represents a single identity verification attempt. When a user captures and submits their ID document on the Liveform, a Submission is created.
**Key Properties:**
* **Submission ID** — Unique identifier (e.g., `sub_abc123`)
* **KYC Status** — `approved`, `rejected`, `pending` (awaiting manual review), `incomplete` (not submitted / unfinished)
* **Extracted Data** — Name, date of birth, nationality, etc.
* **Images** — ID document photos and selfies
* **Metadata** — Timestamps, IP address, userid/email passed by the customer, etc.
**Submission Status Flow:**
```
(User opens/fills Liveform) → Incomplete (not yet submitted)
→ after submission/review → Approved | Rejected | Pending
`Created` is a webhook trigger name, not a KYC status. The official KYC status enum has four values: `Approved`, `Rejected`, `Pending`, `Incomplete`.
```
**Liveform** is the identity verification page hosted by ARGOS. Customers simply need to provide this URL to their users.
* **Desktop**: Displays a QR code for mobile scanning
* **Mobile**: Proceeds directly to the camera interface
**Base URL Structure:**
```
https://form.argosidentity.com?pid={project_id}
```
You can customize user information, country restrictions, security options, and more by adding query string parameters.
**Webhooks** send real-time HTTP POST requests to your server when verification events occur. This is the **most recommended method** for receiving verification results in production.
**Key Events:**
* `approved` — Verification approved
* `rejected` — Verification rejected
* `submit` — Submitted with pending status
* `updated` — Data updated
* `delete` — Submission deleted
* `created` — Submission created
* `retry` — User retry
* `token_expired` — Token expired
* `injection` — Data injected via API
* `aml` — AML check completed
* `aml_monitor` — AML ongoing monitoring result
Register your webhook URL in **Project Management → Project Settings → Integration Info**.
Using a **Token** makes Liveform URLs one-time use (Private Mode).
**Use Cases:**
* Prevent the same URL from being shared with multiple people
* Provide verification links valid only for specific users
* Use in security-critical services (finance, healthcare, etc.)
**How It Works:**
* Generate a unique tokenId on your server and register it with ARGOS
* Add the `token` parameter to the Liveform URL and deliver it to the user
* Expires 3 minutes after first use or when the submission reaches a decision state
**Return URL** is the URL where users are redirected after completing verification and clicking "OK" or after 5 seconds.
Set it in the dashboard, and KYC status (`kycStatus`), email, userid, custom fields, etc. are passed as query parameters.
**Example:**
```
https://yourapp.com/verification-complete?kycStatus=approved&userid=user123&email=user@example.com
```
Return URL is for user experience (UX) flow. Use **webhooks** as the official channel for receiving verification results.
**Query strings** customize Liveform behavior:
* `email`, `userid`, `cf1`\~`cf3` — Pre-fill user information
* `blacklistCountries=false`, `ageLimit=false` — Temporarily override policies
**Security-sensitive parameters must be encrypted:**
* `allowedCountries` — Restrict allowed countries
* `allowedIdTypes` — Restrict allowed document types
* `selectedIssuingCountry`, `selectedIdType` — Skip selection screens
* `token` — Private mode token
**Encryption Modules:**
* **AES-256-ECB** — Fast and simple block encryption
* **AES-256-GCM** — Enhanced encryption with authentication and integrity features
**Encryption Keys:**
* **API Key** — The default API key assigned to the project
* **Custom secretKey** — A dedicated key issued separately from the dashboard (shown only once after issuance; must be reissued if lost)
Use the dashboard's **Query String Encryption/Decryption Tool** (**Project Management → Project Settings → Project Info**) to generate and test encrypted URLs directly without writing code.
Learn more: [Query String & Token Guide](/en/idcheck/getting-started/liveform-url/querystring-and-token-guide) | [Encryption Guide](/en/idcheck/getting-started/encrypt-and-decrypt-data/overview)
***
## Part 2: Integration
Solve the real concerns developers face, step by step.
***
### Q1. "How do I have users verify their identity from my app?"
**Answer: Send users to the Liveform URL.**
Copy the Liveform URL from the dashboard and deliver it to users via button links, redirects, email links, or any other method.
Copy the Liveform URL from **Project Management → Project Settings → Project Info** (Project Pipeline section) in the dashboard:
```
https://form.argosidentity.com?pid={your_project_id}
```
**Web App — Link Button:**
```html theme={null}
Verify Your Identity
```
**Mobile App — Open External Browser:**
```javascript theme={null}
// React Native example
import { Linking } from 'react-native';
const startVerification = () => {
Linking.openURL('https://form.argosidentity.com?pid={your_pid}');
};
```
**Backend Redirect:**
```javascript theme={null}
// Node.js Express example
app.get('/verify', (req, res) => {
res.redirect('https://form.argosidentity.com?pid={your_pid}');
});
```
Open the URL directly in a browser to test the basic verification flow.
* **Desktop**: QR code is displayed; scan with mobile to continue
* **Mobile**: Proceeds directly to camera interface
***
### Q2. "Can I pass my service's user information in advance?"
**Answer: Add query string parameters to the URL.**
If users have already signed up, pre-filling their email, user ID, etc. means they won't need to re-enter this on the Liveform. These values are also saved with the Submission data and can be used later when querying via webhooks or the GET Submission API.
**Key Parameters:**
| Parameter | Description | Example |
| ------------------- | ------------------------------------------------------- | ------------------ |
| `email` | User email | `user@example.com` |
| `userid` | Internal user ID | `user_12345` |
| `cf1`, `cf2`, `cf3` | Custom metadata (e.g., campaign ID, service identifier) | `campaign_summer` |
| `sid` | Submission ID (used for updates) | `sub_abc123` |
**Example URL:**
```javascript theme={null}
const email = encodeURIComponent("user@example.com");
const userid = "user_12345";
const liveformUrl = `https://form.argosidentity.com?pid={your_pid}&email=${email}&userid=${userid}&cf1=campaign_summer`;
```
By putting your internal system's user ID in `userid`, you can later look up that user's verification results directly via webhooks or the GET Submission API.
***
### Q3. "I'm concerned about the URL being shared with multiple people"
**Answer: Register a Token to use Private Mode (one-time URL).**
Adding a Token to the Liveform URL makes it one-time use. After first use, once 3 minutes pass or verification completes, it can no longer be used.
```bash theme={null}
curl -X POST 'https://rest-api.argosidentity.com/v3/submission/tokens' \
-H 'x-api-key: YOUR_API_KEY' \
-H 'Content-Type: text/plain' \
-d '{"tokenId": ["user-session-001", "user-session-002"]}'
```
**Response:**
```json theme={null}
{
"success": true,
"message": "All tokens are now in the pool",
"summary": {
"totalSubmitted": 2,
"currentCount": 2
}
}
```
The Token registration API must only be called **from the server side**. Since it includes the API key, it must never be called directly from the client (frontend).
```javascript theme={null}
const tokenId = "user-session-001";
const secureUrl = `https://form.argosidentity.com?pid={your_pid}&token=${tokenId}`;
// Deliver to user via email, SMS, etc.
sendEmail(userEmail, `Verification link: ${secureUrl}`);
```
Tokens become invalid when:
* **3 minutes** have passed since first use
* The Submission associated with the Token reaches a decision state (approved/rejected/pending)
When a token expires, generate a new one and deliver it to the user.
**Token Limitations:**
* Maximum **100,000** tokens per project
* Maximum **500** tokens per API request
* Token ID format: 8–64 characters, alphanumeric + `-_.`
Learn more: [POST Token API](/en/idcheck/api-reference/api-reference-guide/post-token) | [Query String & Token Guide](/en/idcheck/getting-started/liveform-url/querystring-and-token-guide)
***
### Q4. "I want to allow only specific countries or document types"
**Answer: Use encrypted query string parameters.**
Security-sensitive parameters like `allowedCountries` and `allowedIdTypes` must be encrypted and placed in the `encrypted` parameter. You can choose between **AES-256-ECB** or **AES-256-GCM** encryption modules, and use either the project **API key** or a **Custom secretKey** issued separately from the dashboard as the encryption key.
**Generate Encrypted URLs Directly from the Dashboard**
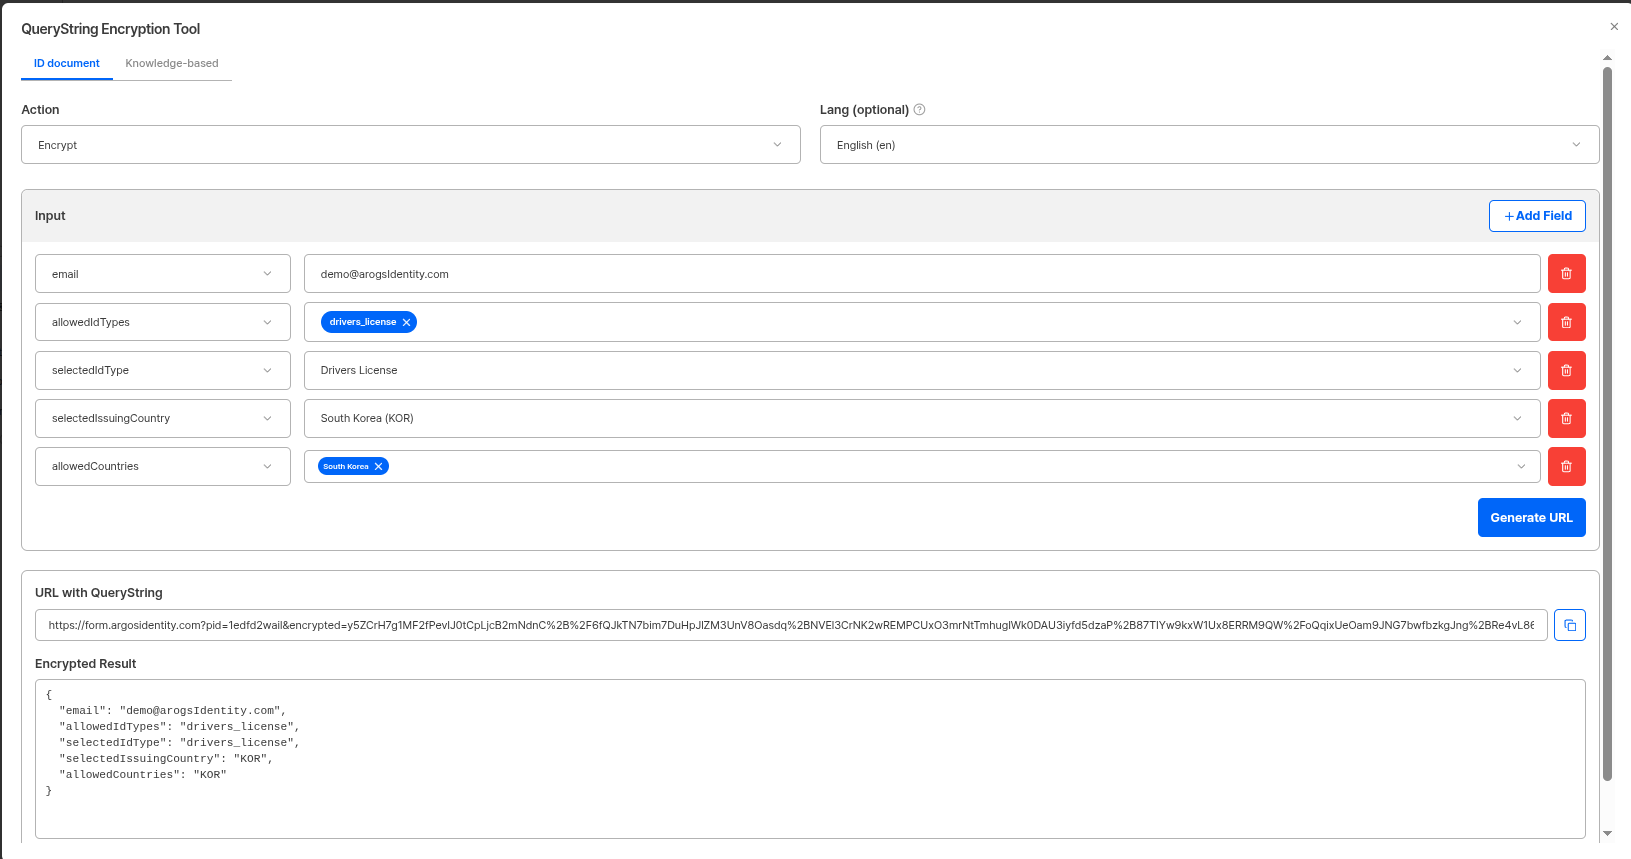
To generate and test encrypted Liveform URLs without writing code, use the dashboard's **Query String Encryption/Decryption Tool**.
→ **Project Management → Project Settings → Project Info → Query String Encryption/Decryption Tool**
Enter the parameters to encrypt and an encrypted URL is automatically generated. You can also decrypt existing encrypted URLs to verify the included parameters.
```
API Key: argos_live_abc123xyz...
Project ID: pid_abc123
Liveform URL: https://form.argosidentity.com?pid=pid_abc123
```
**Security Note**: Treat your API key like a password. Never expose it in client-side code (frontend) or commit it to git. Always store it in server-side environment variables.
***
### Core Concepts
A **Submission** represents a single identity verification attempt. When a user captures and submits their ID document on the Liveform, a Submission is created.
**Key Properties:**
* **Submission ID** — Unique identifier (e.g., `sub_abc123`)
* **KYC Status** — `approved`, `rejected`, `pending` (awaiting manual review), `incomplete` (not submitted / unfinished)
* **Extracted Data** — Name, date of birth, nationality, etc.
* **Images** — ID document photos and selfies
* **Metadata** — Timestamps, IP address, userid/email passed by the customer, etc.
**Submission Status Flow:**
```
(User opens/fills Liveform) → Incomplete (not yet submitted)
→ after submission/review → Approved | Rejected | Pending
`Created` is a webhook trigger name, not a KYC status. The official KYC status enum has four values: `Approved`, `Rejected`, `Pending`, `Incomplete`.
```
**Liveform** is the identity verification page hosted by ARGOS. Customers simply need to provide this URL to their users.
* **Desktop**: Displays a QR code for mobile scanning
* **Mobile**: Proceeds directly to the camera interface
**Base URL Structure:**
```
https://form.argosidentity.com?pid={project_id}
```
You can customize user information, country restrictions, security options, and more by adding query string parameters.
**Webhooks** send real-time HTTP POST requests to your server when verification events occur. This is the **most recommended method** for receiving verification results in production.
**Key Events:**
* `approved` — Verification approved
* `rejected` — Verification rejected
* `submit` — Submitted with pending status
* `updated` — Data updated
* `delete` — Submission deleted
* `created` — Submission created
* `retry` — User retry
* `token_expired` — Token expired
* `injection` — Data injected via API
* `aml` — AML check completed
* `aml_monitor` — AML ongoing monitoring result
Register your webhook URL in **Project Management → Project Settings → Integration Info**.
Using a **Token** makes Liveform URLs one-time use (Private Mode).
**Use Cases:**
* Prevent the same URL from being shared with multiple people
* Provide verification links valid only for specific users
* Use in security-critical services (finance, healthcare, etc.)
**How It Works:**
* Generate a unique tokenId on your server and register it with ARGOS
* Add the `token` parameter to the Liveform URL and deliver it to the user
* Expires 3 minutes after first use or when the submission reaches a decision state
**Return URL** is the URL where users are redirected after completing verification and clicking "OK" or after 5 seconds.
Set it in the dashboard, and KYC status (`kycStatus`), email, userid, custom fields, etc. are passed as query parameters.
**Example:**
```
https://yourapp.com/verification-complete?kycStatus=approved&userid=user123&email=user@example.com
```
Return URL is for user experience (UX) flow. Use **webhooks** as the official channel for receiving verification results.
**Query strings** customize Liveform behavior:
* `email`, `userid`, `cf1`\~`cf3` — Pre-fill user information
* `blacklistCountries=false`, `ageLimit=false` — Temporarily override policies
**Security-sensitive parameters must be encrypted:**
* `allowedCountries` — Restrict allowed countries
* `allowedIdTypes` — Restrict allowed document types
* `selectedIssuingCountry`, `selectedIdType` — Skip selection screens
* `token` — Private mode token
**Encryption Modules:**
* **AES-256-ECB** — Fast and simple block encryption
* **AES-256-GCM** — Enhanced encryption with authentication and integrity features
**Encryption Keys:**
* **API Key** — The default API key assigned to the project
* **Custom secretKey** — A dedicated key issued separately from the dashboard (shown only once after issuance; must be reissued if lost)
Use the dashboard's **Query String Encryption/Decryption Tool** (**Project Management → Project Settings → Project Info**) to generate and test encrypted URLs directly without writing code.
Learn more: [Query String & Token Guide](/en/idcheck/getting-started/liveform-url/querystring-and-token-guide) | [Encryption Guide](/en/idcheck/getting-started/encrypt-and-decrypt-data/overview)
***
## Part 2: Integration
Solve the real concerns developers face, step by step.
***
### Q1. "How do I have users verify their identity from my app?"
**Answer: Send users to the Liveform URL.**
Copy the Liveform URL from the dashboard and deliver it to users via button links, redirects, email links, or any other method.
Copy the Liveform URL from **Project Management → Project Settings → Project Info** (Project Pipeline section) in the dashboard:
```
https://form.argosidentity.com?pid={your_project_id}
```
**Web App — Link Button:**
```html theme={null}
Verify Your Identity
```
**Mobile App — Open External Browser:**
```javascript theme={null}
// React Native example
import { Linking } from 'react-native';
const startVerification = () => {
Linking.openURL('https://form.argosidentity.com?pid={your_pid}');
};
```
**Backend Redirect:**
```javascript theme={null}
// Node.js Express example
app.get('/verify', (req, res) => {
res.redirect('https://form.argosidentity.com?pid={your_pid}');
});
```
Open the URL directly in a browser to test the basic verification flow.
* **Desktop**: QR code is displayed; scan with mobile to continue
* **Mobile**: Proceeds directly to camera interface
***
### Q2. "Can I pass my service's user information in advance?"
**Answer: Add query string parameters to the URL.**
If users have already signed up, pre-filling their email, user ID, etc. means they won't need to re-enter this on the Liveform. These values are also saved with the Submission data and can be used later when querying via webhooks or the GET Submission API.
**Key Parameters:**
| Parameter | Description | Example |
| ------------------- | ------------------------------------------------------- | ------------------ |
| `email` | User email | `user@example.com` |
| `userid` | Internal user ID | `user_12345` |
| `cf1`, `cf2`, `cf3` | Custom metadata (e.g., campaign ID, service identifier) | `campaign_summer` |
| `sid` | Submission ID (used for updates) | `sub_abc123` |
**Example URL:**
```javascript theme={null}
const email = encodeURIComponent("user@example.com");
const userid = "user_12345";
const liveformUrl = `https://form.argosidentity.com?pid={your_pid}&email=${email}&userid=${userid}&cf1=campaign_summer`;
```
By putting your internal system's user ID in `userid`, you can later look up that user's verification results directly via webhooks or the GET Submission API.
***
### Q3. "I'm concerned about the URL being shared with multiple people"
**Answer: Register a Token to use Private Mode (one-time URL).**
Adding a Token to the Liveform URL makes it one-time use. After first use, once 3 minutes pass or verification completes, it can no longer be used.
```bash theme={null}
curl -X POST 'https://rest-api.argosidentity.com/v3/submission/tokens' \
-H 'x-api-key: YOUR_API_KEY' \
-H 'Content-Type: text/plain' \
-d '{"tokenId": ["user-session-001", "user-session-002"]}'
```
**Response:**
```json theme={null}
{
"success": true,
"message": "All tokens are now in the pool",
"summary": {
"totalSubmitted": 2,
"currentCount": 2
}
}
```
The Token registration API must only be called **from the server side**. Since it includes the API key, it must never be called directly from the client (frontend).
```javascript theme={null}
const tokenId = "user-session-001";
const secureUrl = `https://form.argosidentity.com?pid={your_pid}&token=${tokenId}`;
// Deliver to user via email, SMS, etc.
sendEmail(userEmail, `Verification link: ${secureUrl}`);
```
Tokens become invalid when:
* **3 minutes** have passed since first use
* The Submission associated with the Token reaches a decision state (approved/rejected/pending)
When a token expires, generate a new one and deliver it to the user.
**Token Limitations:**
* Maximum **100,000** tokens per project
* Maximum **500** tokens per API request
* Token ID format: 8–64 characters, alphanumeric + `-_.`
Learn more: [POST Token API](/en/idcheck/api-reference/api-reference-guide/post-token) | [Query String & Token Guide](/en/idcheck/getting-started/liveform-url/querystring-and-token-guide)
***
### Q4. "I want to allow only specific countries or document types"
**Answer: Use encrypted query string parameters.**
Security-sensitive parameters like `allowedCountries` and `allowedIdTypes` must be encrypted and placed in the `encrypted` parameter. You can choose between **AES-256-ECB** or **AES-256-GCM** encryption modules, and use either the project **API key** or a **Custom secretKey** issued separately from the dashboard as the encryption key.
**Generate Encrypted URLs Directly from the Dashboard**
To generate and test encrypted Liveform URLs without writing code, use the dashboard's **Query String Encryption/Decryption Tool**.
→ **Project Management → Project Settings → Project Info → Query String Encryption/Decryption Tool**
Enter the parameters to encrypt and an encrypted URL is automatically generated. You can also decrypt existing encrypted URLs to verify the included parameters.
 **Encrypting with Code:**
```javascript theme={null}
const CryptoJS = require('crypto-js');
function encryptQueryParams(data, apiKey) {
const hashedKey = CryptoJS.SHA256(apiKey);
const key = CryptoJS.lib.WordArray.create(hashedKey.words.slice(0, 8), 32);
const encrypted = CryptoJS.AES.encrypt(
JSON.stringify(data),
key,
{ mode: CryptoJS.mode.ECB }
);
return encrypted.ciphertext.toString(CryptoJS.enc.Base64);
}
// Example 1: Restrict allowed countries and document types
const config1 = {
allowedCountries: "USA,KOR,JPN", // ISO Alpha-3 codes
allowedIdTypes: "passport,drivers_license"
};
// Example 2: Pre-select country and document type (skip selection screens)
const config2 = {
selectedIssuingCountry: "KOR",
selectedIdType: "drivers_license"
};
const encrypted = encryptQueryParams(config1, YOUR_API_KEY);
const liveformUrl = `https://form.argosidentity.com?pid={your_pid}&encrypted=${encodeURIComponent(encrypted)}`;
```
**Parameters Requiring Encryption:**
| Parameter | Description |
| --------------------------------- | ---------------------------------------------------------------------------------------------- |
| `allowedCountries` | Countries to allow (ISO Alpha-3 codes, comma-separated) |
| `allowedIdTypes` | Document types to allow |
| `selectedIssuingCountry` | Skip country selection and specify directly |
| `selectedIdType` | Skip document type selection and specify directly (must be used with `selectedIssuingCountry`) |
| `projectionId` / `projectionName` | Apply Projection to exclude specific fields |
| `auxidField` | Additional identity verification (e.g., phone number SMS verification) |
`selectedIdType` must always be used together with `selectedIssuingCountry`. Using it alone will cause an error.
Learn more: [Query String & Token Guide](/en/idcheck/getting-started/liveform-url/querystring-and-token-guide)
***
### Q5. "I want to redirect users back to my app after verification"
**Answer: Set up a Return URL in the dashboard.**
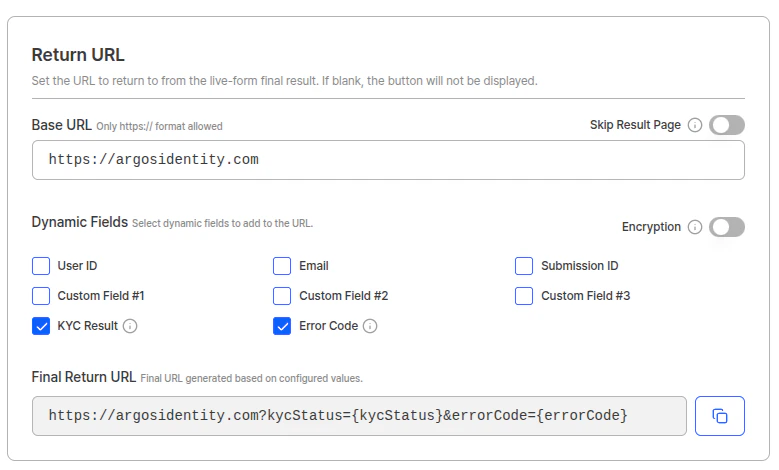
When users finish verification and click "OK", they are redirected to the configured URL. KYC results are passed as query parameters.
Enter the Return URL in **Project Management → Project Settings → Integration Info**:
**Encrypting with Code:**
```javascript theme={null}
const CryptoJS = require('crypto-js');
function encryptQueryParams(data, apiKey) {
const hashedKey = CryptoJS.SHA256(apiKey);
const key = CryptoJS.lib.WordArray.create(hashedKey.words.slice(0, 8), 32);
const encrypted = CryptoJS.AES.encrypt(
JSON.stringify(data),
key,
{ mode: CryptoJS.mode.ECB }
);
return encrypted.ciphertext.toString(CryptoJS.enc.Base64);
}
// Example 1: Restrict allowed countries and document types
const config1 = {
allowedCountries: "USA,KOR,JPN", // ISO Alpha-3 codes
allowedIdTypes: "passport,drivers_license"
};
// Example 2: Pre-select country and document type (skip selection screens)
const config2 = {
selectedIssuingCountry: "KOR",
selectedIdType: "drivers_license"
};
const encrypted = encryptQueryParams(config1, YOUR_API_KEY);
const liveformUrl = `https://form.argosidentity.com?pid={your_pid}&encrypted=${encodeURIComponent(encrypted)}`;
```
**Parameters Requiring Encryption:**
| Parameter | Description |
| --------------------------------- | ---------------------------------------------------------------------------------------------- |
| `allowedCountries` | Countries to allow (ISO Alpha-3 codes, comma-separated) |
| `allowedIdTypes` | Document types to allow |
| `selectedIssuingCountry` | Skip country selection and specify directly |
| `selectedIdType` | Skip document type selection and specify directly (must be used with `selectedIssuingCountry`) |
| `projectionId` / `projectionName` | Apply Projection to exclude specific fields |
| `auxidField` | Additional identity verification (e.g., phone number SMS verification) |
`selectedIdType` must always be used together with `selectedIssuingCountry`. Using it alone will cause an error.
Learn more: [Query String & Token Guide](/en/idcheck/getting-started/liveform-url/querystring-and-token-guide)
***
### Q5. "I want to redirect users back to my app after verification"
**Answer: Set up a Return URL in the dashboard.**
When users finish verification and click "OK", they are redirected to the configured URL. KYC results are passed as query parameters.
Enter the Return URL in **Project Management → Project Settings → Integration Info**:
 ```
https://yourapp.com/verification-complete
```
Users are redirected with the following parameters:
```
https://yourapp.com/verification-complete?kycStatus=approved&userid=user123&email=user@example.com&cf1=campaign_summer
```
**Parameters Passed:**
* `kycStatus` — `approved`, `rejected`, `pending`
* `userid` — User ID passed in the Liveform URL
* `email` — User email
* `cf1`, `cf2`, `cf3` — Custom fields
```javascript theme={null}
// Express.js example
app.get('/verification-complete', async (req, res) => {
const { userid, kycStatus } = req.query;
if (kycStatus === 'approved') {
await updateUser(userid, { verified: true });
res.render('verification-success');
} else if (kycStatus === 'pending') {
res.render('verification-pending');
} else {
res.render('verification-rejected');
}
});
```
The `kycStatus` passed via Return URL is for user experience (UX) screen transitions. For officially recording verification results in your database or reflecting them in internal systems, it is recommended to use **webhooks**. Return URL parameters can be tampered with.
Learn more: [Return URL Guide](/en/idcheck/getting-started/liveform-url/return-url-guide)
***
### Q6. "I want to receive verification results on my server in real time"
**Answer: Set up Webhooks.**
Webhooks send instant HTTP POST requests to your server when verification events occur. This is the **most reliable and recommended method** for receiving verification results.
Create an HTTPS endpoint on your server to receive POST requests:
```javascript theme={null}
// Node.js Express example
const express = require('express');
const app = express();
app.use(express.json());
app.post('/webhooks/idcheck', async (req, res) => {
const event = req.body;
// Process based on event type
switch (event.webhook_trigger) {
case 'approved':
// Handle verification approval
await db.users.update({ id: event.userid, verified: true });
break;
case 'rejected':
// Handle verification rejection
await db.users.update({ id: event.userid, verified: false });
break;
case 'submit':
// Handle pending manual review
await notifyAdmin(`${event.userid} requires manual review`);
break;
}
// Return 200 immediately (ARGOS webhooks are one-way, no retry)
res.status(200).json({ received: true });
});
```
**Important Webhook Implementation Principles:**
* ARGOS typically delivers webhooks **within 5 seconds** of the event. Webhooks are one-way notifications and are not automatically retried on delivery failure. To guard against missed events, consider using the GET Submission API as a reconciliation fallback.
* Return 200 OK as soon as the request is received and run any heavy processing asynchronously.
* Implement **idempotency** handling because the same trigger (e.g. `updated`) can fire again for the same Submission ID.
Enter the endpoint URL in the **Webhook Settings** section under **Project Management → Project Settings → Integration Info**:
```
https://yourapp.com/webhooks/idcheck
```
```
https://yourapp.com/verification-complete
```
Users are redirected with the following parameters:
```
https://yourapp.com/verification-complete?kycStatus=approved&userid=user123&email=user@example.com&cf1=campaign_summer
```
**Parameters Passed:**
* `kycStatus` — `approved`, `rejected`, `pending`
* `userid` — User ID passed in the Liveform URL
* `email` — User email
* `cf1`, `cf2`, `cf3` — Custom fields
```javascript theme={null}
// Express.js example
app.get('/verification-complete', async (req, res) => {
const { userid, kycStatus } = req.query;
if (kycStatus === 'approved') {
await updateUser(userid, { verified: true });
res.render('verification-success');
} else if (kycStatus === 'pending') {
res.render('verification-pending');
} else {
res.render('verification-rejected');
}
});
```
The `kycStatus` passed via Return URL is for user experience (UX) screen transitions. For officially recording verification results in your database or reflecting them in internal systems, it is recommended to use **webhooks**. Return URL parameters can be tampered with.
Learn more: [Return URL Guide](/en/idcheck/getting-started/liveform-url/return-url-guide)
***
### Q6. "I want to receive verification results on my server in real time"
**Answer: Set up Webhooks.**
Webhooks send instant HTTP POST requests to your server when verification events occur. This is the **most reliable and recommended method** for receiving verification results.
Create an HTTPS endpoint on your server to receive POST requests:
```javascript theme={null}
// Node.js Express example
const express = require('express');
const app = express();
app.use(express.json());
app.post('/webhooks/idcheck', async (req, res) => {
const event = req.body;
// Process based on event type
switch (event.webhook_trigger) {
case 'approved':
// Handle verification approval
await db.users.update({ id: event.userid, verified: true });
break;
case 'rejected':
// Handle verification rejection
await db.users.update({ id: event.userid, verified: false });
break;
case 'submit':
// Handle pending manual review
await notifyAdmin(`${event.userid} requires manual review`);
break;
}
// Return 200 immediately (ARGOS webhooks are one-way, no retry)
res.status(200).json({ received: true });
});
```
**Important Webhook Implementation Principles:**
* ARGOS typically delivers webhooks **within 5 seconds** of the event. Webhooks are one-way notifications and are not automatically retried on delivery failure. To guard against missed events, consider using the GET Submission API as a reconciliation fallback.
* Return 200 OK as soon as the request is received and run any heavy processing asynchronously.
* Implement **idempotency** handling because the same trigger (e.g. `updated`) can fire again for the same Submission ID.
Enter the endpoint URL in the **Webhook Settings** section under **Project Management → Project Settings → Integration Info**:
```
https://yourapp.com/webhooks/idcheck
```
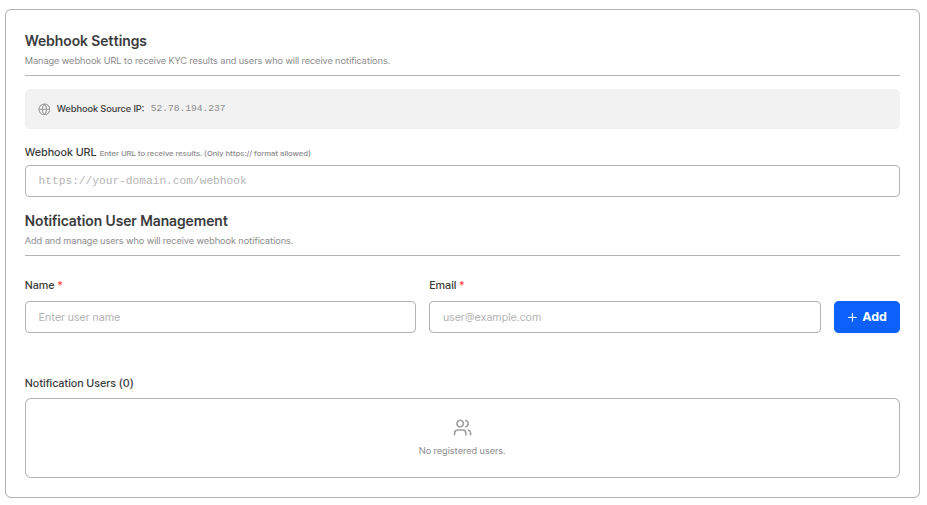 Webhook URLs must use **HTTPS**. For local development, use [ngrok](https://ngrok.com/) or [webhook.site](https://webhook.site) for testing.
**All Event Types:**
| Event | Description | Use Case |
| --------------- | --------------------------------- | ----------------------------------------- |
| `approved` | Verification approved | Update user status, grant service access |
| `rejected` | Verification rejected | Notify user, request resubmission |
| `submit` | Pending status | Admin notification, manual review request |
| `updated` | Data updated | DB synchronization |
| `delete` | Submission deleted | Clean up related data |
| `created` | Submission created | Track verification starts |
| `retry` | User retry | Monitor retry patterns |
| `token_expired` | Token expired | Issue new token |
| `injection` | Data injected via API (Injection) | API operation logging |
| `aml` | AML check completed | Process compliance results |
| `aml_monitor` | AML ongoing monitoring result | Continuous monitoring processing |
Learn more: [Webhook Events Detailed Guide](/en/idcheck/webhooks/overview)
***
### Q7. "I want to integrate verification data with our DB/system"
**Answer: Use the GET Submission API to query verification data.**
While real-time reception via webhooks is possible, use the GET Submission API when you need to directly query specific Submission data at a given point in time.
```bash theme={null}
# Query single submission by Submission ID
curl -X GET 'https://rest-api.argosidentity.com/v3/submission?submission_id={submission_id}' \
-H 'x-api-key: YOUR_API_KEY'
# Query by user ID
curl -X GET 'https://rest-api.argosidentity.com/v3/submission?userid={userid}' \
-H 'x-api-key: YOUR_API_KEY'
# Query by email
curl -X GET 'https://rest-api.argosidentity.com/v3/submission?email={email}' \
-H 'x-api-key: YOUR_API_KEY'
# Query full list (pagination)
curl -X GET 'https://rest-api.argosidentity.com/v3/submission?count=50' \
-H 'x-api-key: YOUR_API_KEY'
```
**Query Parameters:**
| Parameter | Description |
| ------------------------- | --------------------------------------------------------------- |
| `submission_id` | Query a single submission by its unique ID |
| `userid` | Query all submissions matching the user ID |
| `email` | Query all submissions matching the email |
| `count` | Number of results to return (default: 50) |
| `start_date` / `end_date` | Date range filter (YYYY-MM-DD) |
| `request_type` | Query only specific data types (`kyc`, `aml`, `data`, `others`) |
**Response Example:**
```json theme={null}
{
"Items": [
{
"data": {
"full_name": "John Doe",
"gender": "male",
"nationality": "USA",
"date_of_birth": "1990-01-01",
"idType": "passport",
"idcard_issuingCountry": "USA",
"cf1": "campaign_summer"
},
"email": "user@example.com",
"submission_id": "sub_abc123",
"userid": "user_12345",
"created_at": "2024-01-15-10-30-00-000",
"kyc": {
"result": "approved",
"comment": [],
"commentCode": []
},
"image": {
"idImage": "{idImage URL}",
"selfieImage": "{selfieImage URL}"
}
}
]
}
```
**Other Data Management and System Integration APIs:**
| API | Purpose |
| ---------------------------- | -------------------------------------------------------------------- |
| `PATCH /submission` | Modify Submission data (kycStatus, fullName, email, etc.) |
| `DELETE /submission` | Delete entire Submission (for GDPR data deletion requests, etc.) |
| `DELETE /submission/partial` | Delete images only (preserve metadata) |
| `GET /image` | Retrieve images stored in a Submission (ID documents, selfies, etc.) |
| `PUT /image` | Add or replace images in an existing Submission (Base64 encoded) |
| `POST /submission/review` | Approve/reject pending Submissions via API (automate manual review) |
`POST /submission/review` allows customers to review pending submissions directly via API when the project reviewer is set to 'Client'. Already approved/rejected submissions cannot be modified.
Learn more: [GET Submission API](/en/idcheck/api-reference/api-reference-guide/get-submission) | [Review API](/en/idcheck/api-reference/api-reference-guide/post-client-review)
***
### Q8. "I want to migrate existing KYC data to ARGOS"
**Answer: Use the POST Submission API (Migration).**
This API is used in the following situations:
* **Data Migration**: Transfer KYC-completed data from existing systems to the ARGOS dashboard
* **Special Situations**: Directly insert data in exceptional cases where ID Check verification is difficult
* **Development and Testing**: Use during development to test various scenarios
Submissions created through this API **do not go through ARGOS's standard verification process (AI verification)**. The accuracy and validity of submitted data is entirely the customer's responsibility.
Standard identity verification for new users must always be done through the **Liveform**.
```bash theme={null}
curl -X POST 'https://rest-api.argosidentity.com/v3/submission/migration' \
-H 'Content-Type: application/json' \
-H 'x-api-key: YOUR_API_KEY' \
-d '{
"admin": "admin@yourcompany.com",
"email": "user@example.com",
"fullName": "John Doe",
"birthDate": "1990-01-01",
"kycStatus": "approved",
"idType": "passport",
"issuingCountry": "USA",
"nationality": "USA",
"gender": "male",
"userid": "user_12345"
}'
```
**Required Fields:**
| Field | Description |
| ----------- | ----------------------------------------------------- |
| `admin` | Project admin email (must be registered in dashboard) |
| `email` | KYC submitter's email address |
| `fullName` | Submitter's full name |
| `birthDate` | Date of birth (YYYY-MM-DD) |
| `kycStatus` | `approved` or `rejected` |
**Optional Fields:** `idType`, `issuingCountry`, `nationality`, `gender`, `issueDate`, `expireDate`, `identityNumber`, `documentNumber`, `userid`, `cf1`\~`cf3`, etc.
**Notes:**
* Only string data is supported. For image data, use the [PUT Image API](/en/idcheck/api-reference/api-reference-guide/put-image) separately.
* For enhanced security, you can encrypt the request body with AES-256-ECB before sending.
Learn more: [POST Submission API](/en/idcheck/api-reference/api-reference-guide/post-submission)
***
## Part 3: Production Deployment
### Security Hardening
Complete these security configurations before deploying to production.
API keys must never be exposed in client-side code (frontend) or git.
**Use Environment Variables (Required):**
```bash theme={null}
# .env file
ARGOS_API_KEY=argos_live_abc123xyz...
ARGOS_PROJECT_ID=pid_abc123
```
```javascript theme={null}
// Load in Node.js
require('dotenv').config();
const apiKey = process.env.ARGOS_API_KEY;
```
**Backend Proxy Pattern (Recommended):**
```javascript theme={null}
// ❌ Calling ARGOS API directly from frontend — Never do this
// fetch('https://rest-api.argosidentity.com/...', { headers: { 'x-api-key': '...' } })
// ✅ Frontend calls only your own backend API
// Backend server calls ARGOS API and returns results
app.post('/api/start-verification', authenticateUser, async (req, res) => {
const tokenId = `session-${req.user.id}-${Date.now()}`;
// Call ARGOS API only from server side
await fetch('https://rest-api.argosidentity.com/v3/submission/tokens', {
method: 'POST',
headers: { 'x-api-key': process.env.ARGOS_API_KEY, 'Content-Type': 'text/plain' },
body: JSON.stringify({ tokenId: [tokenId] })
});
const liveformUrl = `https://form.argosidentity.com?pid=${process.env.ARGOS_PROJECT_ID}&token=${tokenId}`;
res.json({ liveformUrl });
});
```
Make sure to add to `.gitignore`:
```
.env
.env.local
.env.production
```
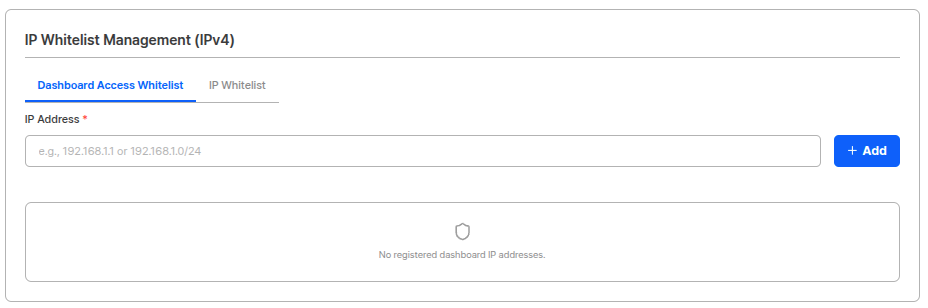
Registering server IPs that call the ARGOS API in the whitelist blocks API access from unauthorized IPs (403).
Register your server IPs in **Project Management → Project Settings → System Operation → IP Whitelist Management**:
Webhook URLs must use **HTTPS**. For local development, use [ngrok](https://ngrok.com/) or [webhook.site](https://webhook.site) for testing.
**All Event Types:**
| Event | Description | Use Case |
| --------------- | --------------------------------- | ----------------------------------------- |
| `approved` | Verification approved | Update user status, grant service access |
| `rejected` | Verification rejected | Notify user, request resubmission |
| `submit` | Pending status | Admin notification, manual review request |
| `updated` | Data updated | DB synchronization |
| `delete` | Submission deleted | Clean up related data |
| `created` | Submission created | Track verification starts |
| `retry` | User retry | Monitor retry patterns |
| `token_expired` | Token expired | Issue new token |
| `injection` | Data injected via API (Injection) | API operation logging |
| `aml` | AML check completed | Process compliance results |
| `aml_monitor` | AML ongoing monitoring result | Continuous monitoring processing |
Learn more: [Webhook Events Detailed Guide](/en/idcheck/webhooks/overview)
***
### Q7. "I want to integrate verification data with our DB/system"
**Answer: Use the GET Submission API to query verification data.**
While real-time reception via webhooks is possible, use the GET Submission API when you need to directly query specific Submission data at a given point in time.
```bash theme={null}
# Query single submission by Submission ID
curl -X GET 'https://rest-api.argosidentity.com/v3/submission?submission_id={submission_id}' \
-H 'x-api-key: YOUR_API_KEY'
# Query by user ID
curl -X GET 'https://rest-api.argosidentity.com/v3/submission?userid={userid}' \
-H 'x-api-key: YOUR_API_KEY'
# Query by email
curl -X GET 'https://rest-api.argosidentity.com/v3/submission?email={email}' \
-H 'x-api-key: YOUR_API_KEY'
# Query full list (pagination)
curl -X GET 'https://rest-api.argosidentity.com/v3/submission?count=50' \
-H 'x-api-key: YOUR_API_KEY'
```
**Query Parameters:**
| Parameter | Description |
| ------------------------- | --------------------------------------------------------------- |
| `submission_id` | Query a single submission by its unique ID |
| `userid` | Query all submissions matching the user ID |
| `email` | Query all submissions matching the email |
| `count` | Number of results to return (default: 50) |
| `start_date` / `end_date` | Date range filter (YYYY-MM-DD) |
| `request_type` | Query only specific data types (`kyc`, `aml`, `data`, `others`) |
**Response Example:**
```json theme={null}
{
"Items": [
{
"data": {
"full_name": "John Doe",
"gender": "male",
"nationality": "USA",
"date_of_birth": "1990-01-01",
"idType": "passport",
"idcard_issuingCountry": "USA",
"cf1": "campaign_summer"
},
"email": "user@example.com",
"submission_id": "sub_abc123",
"userid": "user_12345",
"created_at": "2024-01-15-10-30-00-000",
"kyc": {
"result": "approved",
"comment": [],
"commentCode": []
},
"image": {
"idImage": "{idImage URL}",
"selfieImage": "{selfieImage URL}"
}
}
]
}
```
**Other Data Management and System Integration APIs:**
| API | Purpose |
| ---------------------------- | -------------------------------------------------------------------- |
| `PATCH /submission` | Modify Submission data (kycStatus, fullName, email, etc.) |
| `DELETE /submission` | Delete entire Submission (for GDPR data deletion requests, etc.) |
| `DELETE /submission/partial` | Delete images only (preserve metadata) |
| `GET /image` | Retrieve images stored in a Submission (ID documents, selfies, etc.) |
| `PUT /image` | Add or replace images in an existing Submission (Base64 encoded) |
| `POST /submission/review` | Approve/reject pending Submissions via API (automate manual review) |
`POST /submission/review` allows customers to review pending submissions directly via API when the project reviewer is set to 'Client'. Already approved/rejected submissions cannot be modified.
Learn more: [GET Submission API](/en/idcheck/api-reference/api-reference-guide/get-submission) | [Review API](/en/idcheck/api-reference/api-reference-guide/post-client-review)
***
### Q8. "I want to migrate existing KYC data to ARGOS"
**Answer: Use the POST Submission API (Migration).**
This API is used in the following situations:
* **Data Migration**: Transfer KYC-completed data from existing systems to the ARGOS dashboard
* **Special Situations**: Directly insert data in exceptional cases where ID Check verification is difficult
* **Development and Testing**: Use during development to test various scenarios
Submissions created through this API **do not go through ARGOS's standard verification process (AI verification)**. The accuracy and validity of submitted data is entirely the customer's responsibility.
Standard identity verification for new users must always be done through the **Liveform**.
```bash theme={null}
curl -X POST 'https://rest-api.argosidentity.com/v3/submission/migration' \
-H 'Content-Type: application/json' \
-H 'x-api-key: YOUR_API_KEY' \
-d '{
"admin": "admin@yourcompany.com",
"email": "user@example.com",
"fullName": "John Doe",
"birthDate": "1990-01-01",
"kycStatus": "approved",
"idType": "passport",
"issuingCountry": "USA",
"nationality": "USA",
"gender": "male",
"userid": "user_12345"
}'
```
**Required Fields:**
| Field | Description |
| ----------- | ----------------------------------------------------- |
| `admin` | Project admin email (must be registered in dashboard) |
| `email` | KYC submitter's email address |
| `fullName` | Submitter's full name |
| `birthDate` | Date of birth (YYYY-MM-DD) |
| `kycStatus` | `approved` or `rejected` |
**Optional Fields:** `idType`, `issuingCountry`, `nationality`, `gender`, `issueDate`, `expireDate`, `identityNumber`, `documentNumber`, `userid`, `cf1`\~`cf3`, etc.
**Notes:**
* Only string data is supported. For image data, use the [PUT Image API](/en/idcheck/api-reference/api-reference-guide/put-image) separately.
* For enhanced security, you can encrypt the request body with AES-256-ECB before sending.
Learn more: [POST Submission API](/en/idcheck/api-reference/api-reference-guide/post-submission)
***
## Part 3: Production Deployment
### Security Hardening
Complete these security configurations before deploying to production.
API keys must never be exposed in client-side code (frontend) or git.
**Use Environment Variables (Required):**
```bash theme={null}
# .env file
ARGOS_API_KEY=argos_live_abc123xyz...
ARGOS_PROJECT_ID=pid_abc123
```
```javascript theme={null}
// Load in Node.js
require('dotenv').config();
const apiKey = process.env.ARGOS_API_KEY;
```
**Backend Proxy Pattern (Recommended):**
```javascript theme={null}
// ❌ Calling ARGOS API directly from frontend — Never do this
// fetch('https://rest-api.argosidentity.com/...', { headers: { 'x-api-key': '...' } })
// ✅ Frontend calls only your own backend API
// Backend server calls ARGOS API and returns results
app.post('/api/start-verification', authenticateUser, async (req, res) => {
const tokenId = `session-${req.user.id}-${Date.now()}`;
// Call ARGOS API only from server side
await fetch('https://rest-api.argosidentity.com/v3/submission/tokens', {
method: 'POST',
headers: { 'x-api-key': process.env.ARGOS_API_KEY, 'Content-Type': 'text/plain' },
body: JSON.stringify({ tokenId: [tokenId] })
});
const liveformUrl = `https://form.argosidentity.com?pid=${process.env.ARGOS_PROJECT_ID}&token=${tokenId}`;
res.json({ liveformUrl });
});
```
Make sure to add to `.gitignore`:
```
.env
.env.local
.env.production
```
Registering server IPs that call the ARGOS API in the whitelist blocks API access from unauthorized IPs (403).
Register your server IPs in **Project Management → Project Settings → System Operation → IP Whitelist Management**:
 ```
52.12.34.56
52.12.34.57
```
You must register **all** server IPs that call the API: production servers, staging servers, CI/CD pipeline IPs, etc.
You can encrypt sensitive KYC data transmitted via webhooks.
Set **"Secure Data Transfer"** to **ON** in **Project Management → Security Settings → Data Protection**.
```
52.12.34.56
52.12.34.57
```
You must register **all** server IPs that call the API: production servers, staging servers, CI/CD pipeline IPs, etc.
You can encrypt sensitive KYC data transmitted via webhooks.
Set **"Secure Data Transfer"** to **ON** in **Project Management → Security Settings → Data Protection**.
 When enabled, webhook payloads are delivered encrypted in the following format:
```json theme={null}
{
"response": {
"body": "encrypted-string"
}
}
```
**Decryption Method (AES-256-CBC):**
```javascript theme={null}
const CryptoJS = require('crypto-js');
function decryptWebhook(encryptedData, apiKey) {
const hashedKey = CryptoJS.SHA256(apiKey);
const key = CryptoJS.lib.WordArray.create(hashedKey.words.slice(0, 8), 32);
const iv = CryptoJS.lib.WordArray.create(hashedKey.words.slice(8, 12), 16);
const cipherParams = CryptoJS.lib.CipherParams.create({
ciphertext: CryptoJS.enc.Base64.parse(encryptedData)
});
const decrypted = CryptoJS.AES.decrypt(cipherParams, key, {
iv: iv,
mode: CryptoJS.mode.CBC,
padding: CryptoJS.pad.Pkcs7
});
return JSON.parse(decrypted.toString(CryptoJS.enc.Utf8));
}
app.post('/webhooks/idcheck', (req, res) => {
const event = decryptWebhook(req.body.response.body, process.env.ARGOS_API_KEY);
// Process event...
res.status(200).json({ received: true });
});
```
**Encryption Method Differences:**
* **Webhook** decryption: **AES-256-CBC**
* **API requests/responses**: **AES-256-ECB**
* **Query strings**: **AES-256-ECB** or **AES-256-GCM**
Do not confuse the encryption methods for each purpose.
Learn more: [Encryption Guide](/en/idcheck/getting-started/encrypt-and-decrypt-data/overview)
***
### Test Checklist
Verify the following items before deploying to production.
* [ ] Basic Liveform URL loads properly on desktop/mobile
* [ ] QR code scans on mobile and flow proceeds
* [ ] Camera permission request works correctly
* [ ] Document and selfie capture followed by submission completes
* [ ] User information is pre-filled with `email`, `userid` parameters
* [ ] Encrypted parameters (`allowedCountries`, etc.) work correctly
* [ ] Private mode URL with Token works properly
* [ ] Appropriate error screen is displayed when accessing an expired Token
* [ ] Redirected to Return URL after verification completion
* [ ] `kycStatus`, `userid`, `email` parameters are passed correctly
* [ ] Parameters are passed via `encrypted` parameter when encryption option is enabled
**Test Method 1: Using webhook.site**
```
1. Visit https://webhook.site
2. Copy the generated unique URL
3. Enter it in the dashboard Webhook URL field
4. Perform a test verification on Liveform
5. Check the payload on webhook.site
```
**Test Method 2: Using ngrok (local development)**
```bash theme={null}
# Run local server
node server.js # port 3000
# Expose externally in a separate terminal
ngrok http 3000
# Enter the generated HTTPS URL in the dashboard
# e.g., https://abc123.ngrok.io/webhooks/idcheck
```
* [ ] Webhook endpoint receives events properly
* [ ] `approved`, `rejected`, `submit` events are processed correctly
* [ ] 200 OK response is returned immediately on webhook receipt
* [ ] Idempotency handling for duplicate webhooks works
* [ ] Encrypted webhooks are decrypted correctly
* [ ] GET Submission returns correct data
* [ ] Querying by `userid`, `email` works
* [ ] Token registration (POST Token) and retrieval (GET Token) work properly
* [ ] Only authorized IPs can access when IP whitelist is enabled
* [ ] 403 response is returned for requests with invalid API keys
* [ ] API key is not exposed in client-side code
* [ ] API key is not included in git history
* [ ] Webhook URL uses HTTPS
* [ ] Permissions are not granted based solely on Return URL parameters (verified via webhook)
***
### Production Transition Checklist
* [ ] Webhook URL is set to production server address (HTTPS)
* [ ] All production server IPs are registered in IP whitelist
* [ ] Secure Data Transfer (webhook encryption) is configured as needed
* [ ] Return URL is set to production app address
* [ ] Project settings (allowed document types, country blacklist, age limits, etc.) match requirements
* [ ] API key is loaded from environment variables
* [ ] No hard-coded API keys in the code
* [ ] Error handling and logging are implemented in webhook handler
* [ ] Webhook idempotency handling is implemented
* [ ] Frontend does not call ARGOS API directly
Key metrics to track in production:
* Verification starts vs. completions
* Approved / Rejected / Pending ratios
* Webhook reception failure rate
* Token reissuance frequency due to expiration
***
## Next Steps
Once you've completed integration, explore advanced features with the documentation below.
All options for Liveform customization
Detailed guide for each event's payload
AES-256-ECB, GCM, CBC encryption implementation
Full API specifications for GET Submission, Token API, and more
Post-verification redirect configuration
Check Liveform supported environments
When enabled, webhook payloads are delivered encrypted in the following format:
```json theme={null}
{
"response": {
"body": "encrypted-string"
}
}
```
**Decryption Method (AES-256-CBC):**
```javascript theme={null}
const CryptoJS = require('crypto-js');
function decryptWebhook(encryptedData, apiKey) {
const hashedKey = CryptoJS.SHA256(apiKey);
const key = CryptoJS.lib.WordArray.create(hashedKey.words.slice(0, 8), 32);
const iv = CryptoJS.lib.WordArray.create(hashedKey.words.slice(8, 12), 16);
const cipherParams = CryptoJS.lib.CipherParams.create({
ciphertext: CryptoJS.enc.Base64.parse(encryptedData)
});
const decrypted = CryptoJS.AES.decrypt(cipherParams, key, {
iv: iv,
mode: CryptoJS.mode.CBC,
padding: CryptoJS.pad.Pkcs7
});
return JSON.parse(decrypted.toString(CryptoJS.enc.Utf8));
}
app.post('/webhooks/idcheck', (req, res) => {
const event = decryptWebhook(req.body.response.body, process.env.ARGOS_API_KEY);
// Process event...
res.status(200).json({ received: true });
});
```
**Encryption Method Differences:**
* **Webhook** decryption: **AES-256-CBC**
* **API requests/responses**: **AES-256-ECB**
* **Query strings**: **AES-256-ECB** or **AES-256-GCM**
Do not confuse the encryption methods for each purpose.
Learn more: [Encryption Guide](/en/idcheck/getting-started/encrypt-and-decrypt-data/overview)
***
### Test Checklist
Verify the following items before deploying to production.
* [ ] Basic Liveform URL loads properly on desktop/mobile
* [ ] QR code scans on mobile and flow proceeds
* [ ] Camera permission request works correctly
* [ ] Document and selfie capture followed by submission completes
* [ ] User information is pre-filled with `email`, `userid` parameters
* [ ] Encrypted parameters (`allowedCountries`, etc.) work correctly
* [ ] Private mode URL with Token works properly
* [ ] Appropriate error screen is displayed when accessing an expired Token
* [ ] Redirected to Return URL after verification completion
* [ ] `kycStatus`, `userid`, `email` parameters are passed correctly
* [ ] Parameters are passed via `encrypted` parameter when encryption option is enabled
**Test Method 1: Using webhook.site**
```
1. Visit https://webhook.site
2. Copy the generated unique URL
3. Enter it in the dashboard Webhook URL field
4. Perform a test verification on Liveform
5. Check the payload on webhook.site
```
**Test Method 2: Using ngrok (local development)**
```bash theme={null}
# Run local server
node server.js # port 3000
# Expose externally in a separate terminal
ngrok http 3000
# Enter the generated HTTPS URL in the dashboard
# e.g., https://abc123.ngrok.io/webhooks/idcheck
```
* [ ] Webhook endpoint receives events properly
* [ ] `approved`, `rejected`, `submit` events are processed correctly
* [ ] 200 OK response is returned immediately on webhook receipt
* [ ] Idempotency handling for duplicate webhooks works
* [ ] Encrypted webhooks are decrypted correctly
* [ ] GET Submission returns correct data
* [ ] Querying by `userid`, `email` works
* [ ] Token registration (POST Token) and retrieval (GET Token) work properly
* [ ] Only authorized IPs can access when IP whitelist is enabled
* [ ] 403 response is returned for requests with invalid API keys
* [ ] API key is not exposed in client-side code
* [ ] API key is not included in git history
* [ ] Webhook URL uses HTTPS
* [ ] Permissions are not granted based solely on Return URL parameters (verified via webhook)
***
### Production Transition Checklist
* [ ] Webhook URL is set to production server address (HTTPS)
* [ ] All production server IPs are registered in IP whitelist
* [ ] Secure Data Transfer (webhook encryption) is configured as needed
* [ ] Return URL is set to production app address
* [ ] Project settings (allowed document types, country blacklist, age limits, etc.) match requirements
* [ ] API key is loaded from environment variables
* [ ] No hard-coded API keys in the code
* [ ] Error handling and logging are implemented in webhook handler
* [ ] Webhook idempotency handling is implemented
* [ ] Frontend does not call ARGOS API directly
Key metrics to track in production:
* Verification starts vs. completions
* Approved / Rejected / Pending ratios
* Webhook reception failure rate
* Token reissuance frequency due to expiration
***
## Next Steps
Once you've completed integration, explore advanced features with the documentation below.
All options for Liveform customization
Detailed guide for each event's payload
AES-256-ECB, GCM, CBC encryption implementation
Full API specifications for GET Submission, Token API, and more
Post-verification redirect configuration
Check Liveform supported environments