> ## Documentation Index
> Fetch the complete documentation index at: https://developers.argosidentity.com/llms.txt
> Use this file to discover all available pages before exploring further.
# Profile options
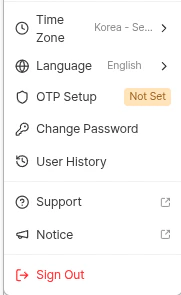
> Manage personal account options — time zone, language, OTP, password, and user history — from the profile menu in the bottom-left corner of the dashboard.
Click your **account email in the bottom-left corner** of the dashboard to open the profile menu. From this menu you can manage the key options for your personal account without signing out.
 ***
## Time Zone
Sets the reference time zone for all dates and times shown in the dashboard. Submission timestamps, user history, and event logs are all displayed in the selected time zone.
* Default: **Korea - Seoul** (KST)
* The change is applied across the dashboard immediately.
***
## Language
Select the dashboard UI language. The currently supported languages are:
| Language | Value |
| -------- | --------- |
| English | `English` |
| Korean | `한국어` |
The dashboard UI language is independent from the end user's language in the KYC liveform. For liveform language, see the [Query String and Token Guide](/en/idcheck/getting-started/liveform-url/querystring-and-token-guide).
***
## OTP Setup
Enables **One-Time Password (OTP)** two-factor authentication for dashboard sign-in. Once OTP is set up, you must enter an OTP code after your password to complete sign-in.
| State | Label |
| -------------- | --------------------- |
| Not configured | `Not Set` badge shown |
| Configured | No badge |
### How to configure
In the profile menu, click **OTP Setup**.
Scan the on-screen QR code with a TOTP-compatible app such as Google Authenticator or Authy.
Enter the 6-digit code shown in your authenticator app to finish enrollment.
If you lose access to your authenticator app, you will not be able to sign in. Keep a backup device or contact your administrator.
***
## Change Password
New in 2026-04
Previously, changing your password required signing out and going through the **Forgot Password** flow. You can now change your password directly from the profile menu via **Change Password** while signed in. The flow branches based on whether OTP is enabled.
### When OTP is not set
In the profile menu, click **Change Password** to open the modal.
Enter your current password to verify your identity.
Enter the new password, confirm it in the second field, and save.
When the change succeeds, the modal closes with a success message. Your existing session stays active — you do not need to sign back in.
### When OTP is set
In the profile menu, click **Change Password**.
Enter the OTP code from your authenticator app to verify your identity.
Enter the new password, confirm it in the second field, and save.
When the change succeeds, the modal closes with a success message.
This feature was added in the April 2026 update. See the [April 2026 update](/en/idcheck/notices/2026-04-update#change-account-password-from-the-dashboard) for details.
***
## User History
Review the recent activity of the currently signed-in account — sign-in timestamps, source IPs, and major dashboard setting changes — in chronological order.
For access delegation and sign-in log policies, see the [Access Control](/dashboard/en/project-management/security-settings/access-control) guide.
***
## Support and Notice
* **Support**: Opens the ARGOS Identity customer support page in a new tab.
* **Notice**: Opens the product announcements and updates page in a new tab. You can also browse the same content in the [Product Updates overview](/en/idcheck/notices/overview).
***
## Sign Out
Ends the current session and returns to the sign-in screen. Always sign out when you are done on shared or public devices.
***
## Time Zone
Sets the reference time zone for all dates and times shown in the dashboard. Submission timestamps, user history, and event logs are all displayed in the selected time zone.
* Default: **Korea - Seoul** (KST)
* The change is applied across the dashboard immediately.
***
## Language
Select the dashboard UI language. The currently supported languages are:
| Language | Value |
| -------- | --------- |
| English | `English` |
| Korean | `한국어` |
The dashboard UI language is independent from the end user's language in the KYC liveform. For liveform language, see the [Query String and Token Guide](/en/idcheck/getting-started/liveform-url/querystring-and-token-guide).
***
## OTP Setup
Enables **One-Time Password (OTP)** two-factor authentication for dashboard sign-in. Once OTP is set up, you must enter an OTP code after your password to complete sign-in.
| State | Label |
| -------------- | --------------------- |
| Not configured | `Not Set` badge shown |
| Configured | No badge |
### How to configure
In the profile menu, click **OTP Setup**.
Scan the on-screen QR code with a TOTP-compatible app such as Google Authenticator or Authy.
Enter the 6-digit code shown in your authenticator app to finish enrollment.
If you lose access to your authenticator app, you will not be able to sign in. Keep a backup device or contact your administrator.
***
## Change Password
New in 2026-04
Previously, changing your password required signing out and going through the **Forgot Password** flow. You can now change your password directly from the profile menu via **Change Password** while signed in. The flow branches based on whether OTP is enabled.
### When OTP is not set
In the profile menu, click **Change Password** to open the modal.
Enter your current password to verify your identity.
Enter the new password, confirm it in the second field, and save.
When the change succeeds, the modal closes with a success message. Your existing session stays active — you do not need to sign back in.
### When OTP is set
In the profile menu, click **Change Password**.
Enter the OTP code from your authenticator app to verify your identity.
Enter the new password, confirm it in the second field, and save.
When the change succeeds, the modal closes with a success message.
This feature was added in the April 2026 update. See the [April 2026 update](/en/idcheck/notices/2026-04-update#change-account-password-from-the-dashboard) for details.
***
## User History
Review the recent activity of the currently signed-in account — sign-in timestamps, source IPs, and major dashboard setting changes — in chronological order.
For access delegation and sign-in log policies, see the [Access Control](/dashboard/en/project-management/security-settings/access-control) guide.
***
## Support and Notice
* **Support**: Opens the ARGOS Identity customer support page in a new tab.
* **Notice**: Opens the product announcements and updates page in a new tab. You can also browse the same content in the [Product Updates overview](/en/idcheck/notices/overview).
***
## Sign Out
Ends the current session and returns to the sign-in screen. Always sign out when you are done on shared or public devices.