> ## Documentation Index
> Fetch the complete documentation index at: https://developers.argosidentity.com/llms.txt
> Use this file to discover all available pages before exploring further.
# FACE AUTH Guide
> Learn how to use the FACE AUTH add-on service that compares selfies with existing eKYC approved users to verify if they are the same person.
FACE AUTH is an **add-on service** that immediately verifies whether a user is the same person by comparing the selfie (Reference) from a Submission ID obtained from existing eKYC with the user's latest selfie (Target). You can complete re-authentication with just one selfie without a separate complex process.
## Representative Use Cases
Since identity can be re-verified with just one selfie without a password or authentication code, you can enhance security while reducing user friction.
Used by **financial institutions** as a re-authentication means to reduce account theft risk during device change·number change.
**ATO Prevention** - Apply access block/release policies with additional face authentication when high-risk login, overseas access, or bulk attempts are detected.
**Periodic KYC Refresh** - Used as a periodic same-person verification procedure in high-value services·regulated industries.
Insert as identity verification step before important account changes such as password reset, payment method·contact change.
## Operation Method (3-Step)
An **approved Submission** from eKYC must exist. (Reference)
Call Add-On URL (including pid + Submission ID) → Take selfie
When entering from desktop, QR is displayed → Continue shooting on mobile.
Automatic comparison of registered vs verified → Results are stored in dashboard as **Auth ID** (submission).
**Key Checks**
* Approved Submission ID must exist. (Reference)
* FACE AUTH URL must be **encrypted for security** when used.
* Threshold·liveness·occlusion (mask/helmet/hat, etc.) policies can be controlled through project options.
## Benefits of FACE AUTH
| Benefit | Description |
| -------------------------- | --------------------------------------------------------------------------------------------- |
| **Fast Re-authentication** | Complete with just one selfie without re-shooting ID |
| **Security Enhancement** | Protect accounts as an additional factor alongside password·OTP |
| **Policy Flexibility** | Detailed settings by situation such as face match threshold, liveness, occlusion blocking |
| **Simple Integration** | Operates as an add-on dependent on existing eKYC project, maintaining operational consistency |
***
## Project Creation and Settings
To use FACE AUTH, first create an Add-On project in the dashboard and set policies (threshold·liveness·occlusion).
### Step 1: Create Add-On Project
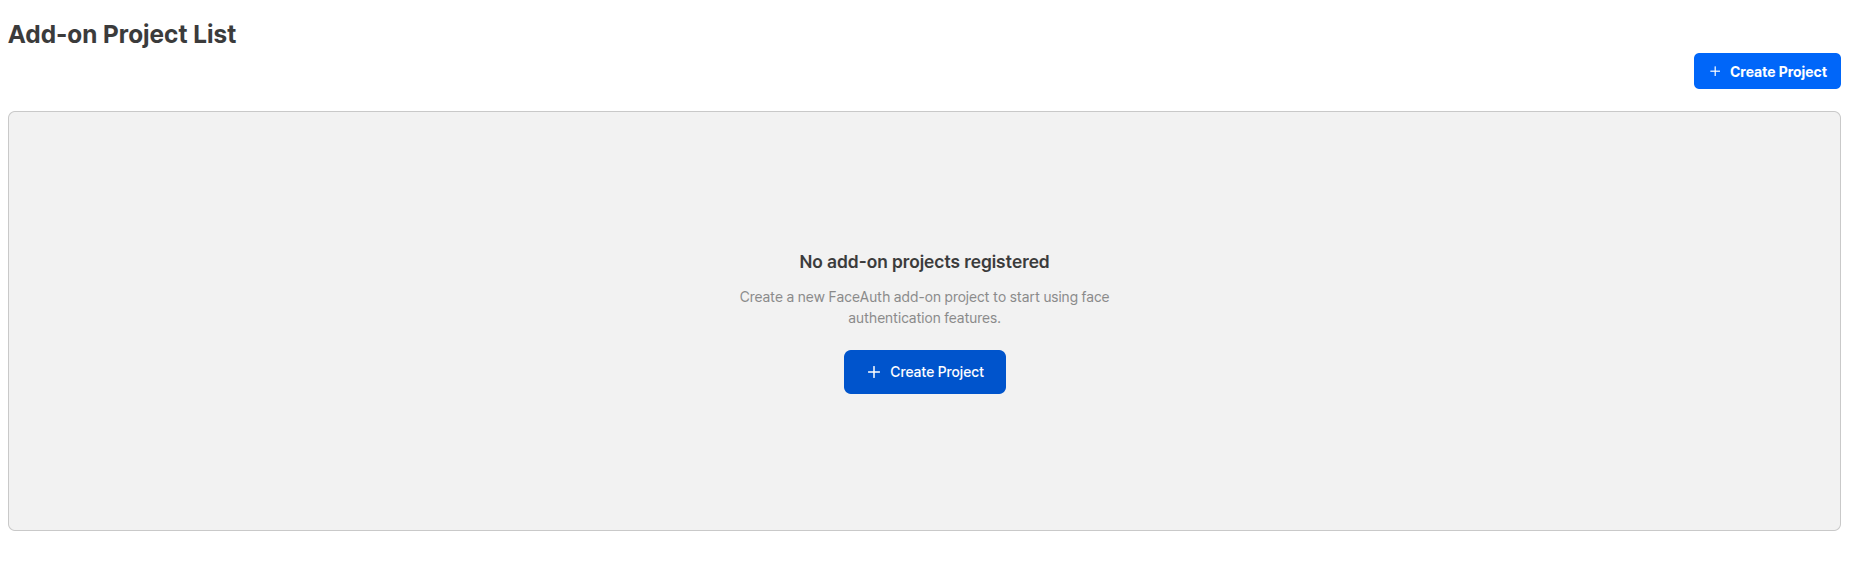
Select **Add-On menu → 'Create Project'** in the dashboard to create a new FACE AUTH project.
Dependency connection with eKYC project is formed immediately upon creation, and Add-On URL and API key are automatically mapped.
```
Path: Dashboard > Add-On > Create Project
```
 ### Step 2: Project Information Settings
Specify project name·logo in the settings screen, and set button/URL to move to after authentication submission completion.
### Step 2: Project Information Settings
Specify project name·logo in the settings screen, and set button/URL to move to after authentication submission completion.
 | Setting Item | Description |
| ------------------ | --------------------------------------------------------------------------------- |
| **Project Name** | Displayed as title on authentication start screen |
| **Project Status** | Service (Normal Operation) / Closed (Authentication Disabled) |
| **Add on Logo** | Displayed at top of first authentication screen (ARGOS logo displayed if not set) |
| **Return URL** | URL where user is redirected after authentication completion |
### Step 3: Policy (Threshold) Settings
Thresholds are **more lenient when lower, stricter when higher**. Adjust step by step to match service risk·UX goals.
| Setting Item | Description |
| ------------------ | --------------------------------------------------------------------------------- |
| **Project Name** | Displayed as title on authentication start screen |
| **Project Status** | Service (Normal Operation) / Closed (Authentication Disabled) |
| **Add on Logo** | Displayed at top of first authentication screen (ARGOS logo displayed if not set) |
| **Return URL** | URL where user is redirected after authentication completion |
### Step 3: Policy (Threshold) Settings
Thresholds are **more lenient when lower, stricter when higher**. Adjust step by step to match service risk·UX goals.
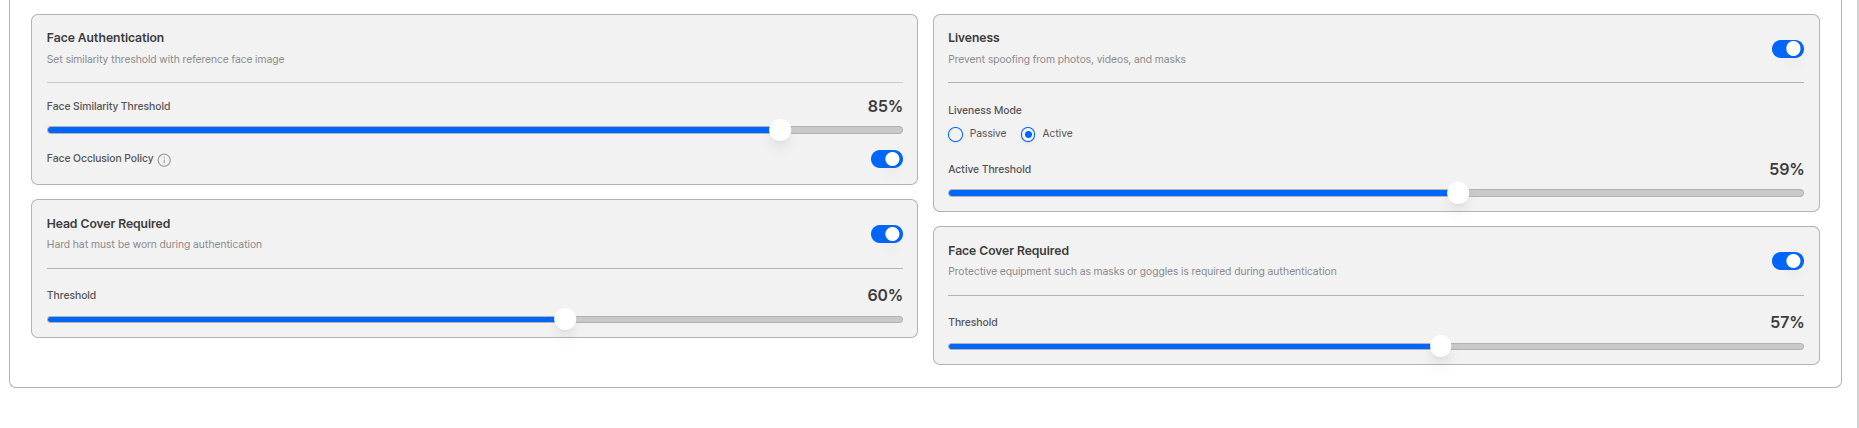 | Policy Item | Description | Recommended Value |
| --------------------------------- | ------------------------------------------------------------------------ | ----------------- |
| **Face Authentication Threshold** | Criteria for judging if same person as eKYC approved user's face | 98 points |
| **Liveness** | Determines if shot selfie is of an actual living person (Passive/Active) | 70 points |
| **Face Occlusion** | Checks if face is not occluded by other objects during authentication | - |
Face occlusion and face occlusion threshold **cannot be used simultaneously**.
**Special Environment Options:**
* **Head Occlusion Threshold**: Environments requiring safety helmet (bike, construction site, etc.)
* **Face Occlusion Threshold**: Environments requiring mask (hospital, construction site, etc.)
### Step 4: Add-On URL Parameters and Encryption Settings
Required parameters must be registered to use FACE AUTH URL.
**Required Parameters:**
| Parameter | Description |
| --------- | ------------------------------------------------------------------------------------------------ |
| `pid` | Add-On project ID (included in URL path/parameters) |
| `sid` | eKYC Submission ID (Add-On authentication possible only in approved status, encryption required) |
**URL Pattern Example:**
```
...?pid={ADDON_PID}&encrypted={encrypted}
```
In the `encrypted` statement, use Submission ID as `sid` and Token ID as `token`.
#### Token Expiration Condition Settings
You can configure limited access control through Token ID.
| Policy Item | Description | Recommended Value |
| --------------------------------- | ------------------------------------------------------------------------ | ----------------- |
| **Face Authentication Threshold** | Criteria for judging if same person as eKYC approved user's face | 98 points |
| **Liveness** | Determines if shot selfie is of an actual living person (Passive/Active) | 70 points |
| **Face Occlusion** | Checks if face is not occluded by other objects during authentication | - |
Face occlusion and face occlusion threshold **cannot be used simultaneously**.
**Special Environment Options:**
* **Head Occlusion Threshold**: Environments requiring safety helmet (bike, construction site, etc.)
* **Face Occlusion Threshold**: Environments requiring mask (hospital, construction site, etc.)
### Step 4: Add-On URL Parameters and Encryption Settings
Required parameters must be registered to use FACE AUTH URL.
**Required Parameters:**
| Parameter | Description |
| --------- | ------------------------------------------------------------------------------------------------ |
| `pid` | Add-On project ID (included in URL path/parameters) |
| `sid` | eKYC Submission ID (Add-On authentication possible only in approved status, encryption required) |
**URL Pattern Example:**
```
...?pid={ADDON_PID}&encrypted={encrypted}
```
In the `encrypted` statement, use Submission ID as `sid` and Token ID as `token`.
#### Token Expiration Condition Settings
You can configure limited access control through Token ID.
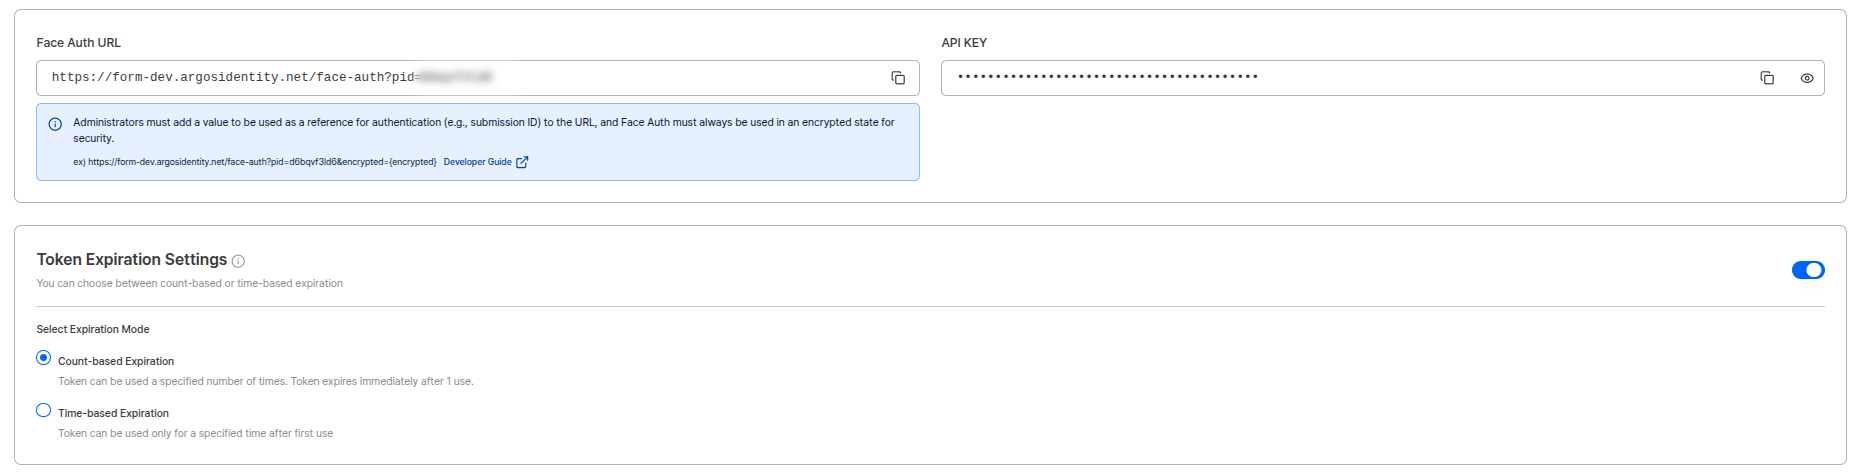 | Expiration Condition | Description |
| -------------------------- | ------------------------------------------------------------- |
| **Usage-based Expiration** | Expire the Token ID when token is used once |
| **Time-based Expiration** | Measure time from when token is used once and expire Token ID |
Expiration triggering condition is when **"Start" button is clicked** on the first FACE AUTH screen.
***
## Providing to Users
FACE AUTH can be provided in two ways.
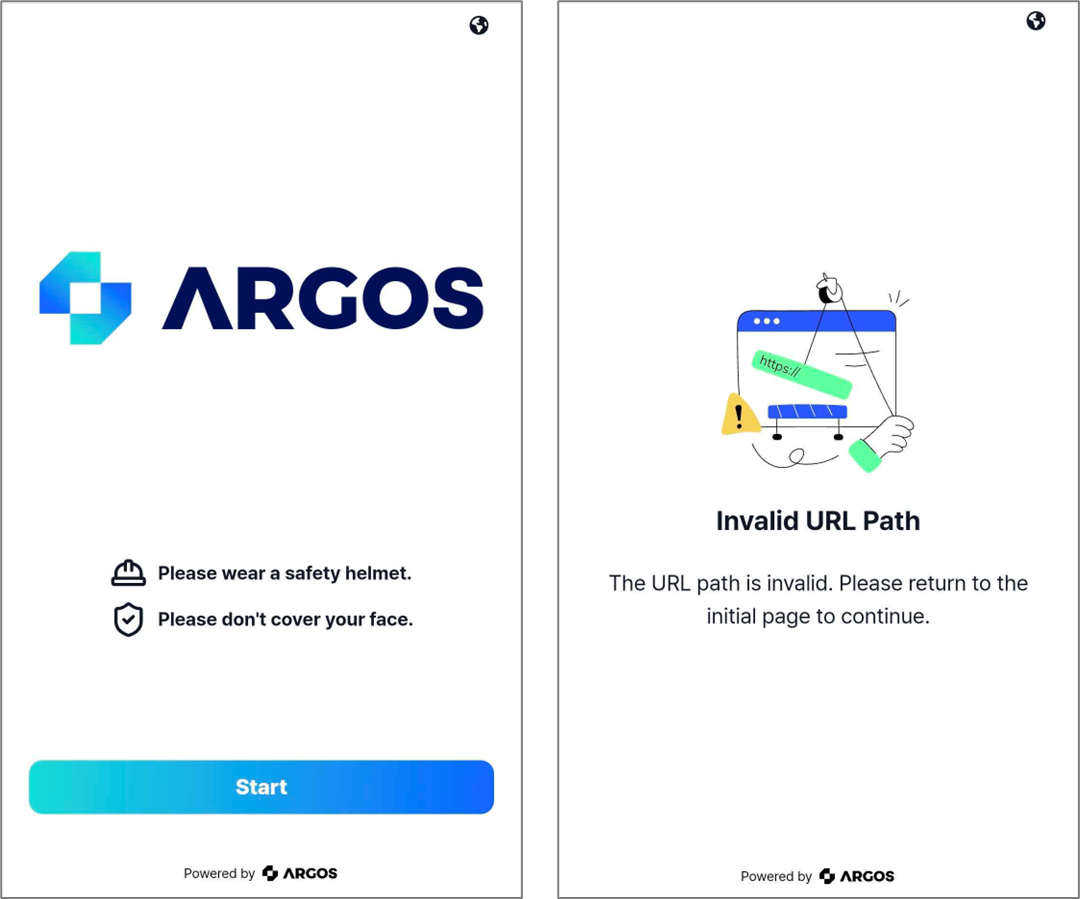
Guide users to open the Add-On URL to proceed with re-authentication through selfie shooting on the web screen.
**Required Parameters:**
* `pid={AddOn Project ID}` — included in the URL query string in plaintext
* `encrypted={...}` — must contain `sid={Approved eKYC Submission ID}` inside, AES-256 encrypted (see [Step 4](#step-4-add-on-url-parameters-and-encryption-settings))
```text URL pattern theme={null}
https://form.argosidentity.com/face-auth?pid={ADDON_PID}&encrypted={encrypted}
```
**Desktop → Mobile Transition:**
When opened on PC, QR code is displayed so users can scan with their phone and continue shooting.
**Checklist**
* ✅ Connect Add-On URL to link/button
* ✅ Verify `sid` is not missing and refers to an `approved` eKYC submission
* ✅ Security-sensitive parameters such as `sid` must be embedded inside `encrypted` — never exposed in plaintext
* ✅ If desktop traffic is high, place QR transition guide text at top fixed position
Expose FACE AUTH in your own UI with buttons·modals·step-based flow, and call Add-On via API from backend.
**Active Liveness is not supported** when proceeding with API method.
* faceImage recommended specs: 960 x 720
* Requires a **separate API Key** different from existing liveform API Key.
**Checklist**
* ✅ Verify Add-On project creation linked to eKYC approval history (registered copy)
* ✅ Implement logic to pass pid·submissionId when calling
* ✅ Route to next step in success/failure callbacks
Learn API-based integration methods in detail.
### Operation Verification (Smoke Test)
* Whether authentication screen appears when Add-On URL is called with approved submissionId
* Whether QR display and mobile transition are natural when entering from PC
* Whether results are stored·queried as Add-On submission (Auth ID) after shooting
| Expiration Condition | Description |
| -------------------------- | ------------------------------------------------------------- |
| **Usage-based Expiration** | Expire the Token ID when token is used once |
| **Time-based Expiration** | Measure time from when token is used once and expire Token ID |
Expiration triggering condition is when **"Start" button is clicked** on the first FACE AUTH screen.
***
## Providing to Users
FACE AUTH can be provided in two ways.
Guide users to open the Add-On URL to proceed with re-authentication through selfie shooting on the web screen.
**Required Parameters:**
* `pid={AddOn Project ID}` — included in the URL query string in plaintext
* `encrypted={...}` — must contain `sid={Approved eKYC Submission ID}` inside, AES-256 encrypted (see [Step 4](#step-4-add-on-url-parameters-and-encryption-settings))
```text URL pattern theme={null}
https://form.argosidentity.com/face-auth?pid={ADDON_PID}&encrypted={encrypted}
```
**Desktop → Mobile Transition:**
When opened on PC, QR code is displayed so users can scan with their phone and continue shooting.
**Checklist**
* ✅ Connect Add-On URL to link/button
* ✅ Verify `sid` is not missing and refers to an `approved` eKYC submission
* ✅ Security-sensitive parameters such as `sid` must be embedded inside `encrypted` — never exposed in plaintext
* ✅ If desktop traffic is high, place QR transition guide text at top fixed position
Expose FACE AUTH in your own UI with buttons·modals·step-based flow, and call Add-On via API from backend.
**Active Liveness is not supported** when proceeding with API method.
* faceImage recommended specs: 960 x 720
* Requires a **separate API Key** different from existing liveform API Key.
**Checklist**
* ✅ Verify Add-On project creation linked to eKYC approval history (registered copy)
* ✅ Implement logic to pass pid·submissionId when calling
* ✅ Route to next step in success/failure callbacks
Learn API-based integration methods in detail.
### Operation Verification (Smoke Test)
* Whether authentication screen appears when Add-On URL is called with approved submissionId
* Whether QR display and mobile transition are natural when entering from PC
* Whether results are stored·queried as Add-On submission (Auth ID) after shooting
 ***
## AUTH ID - Authentication Result Verification
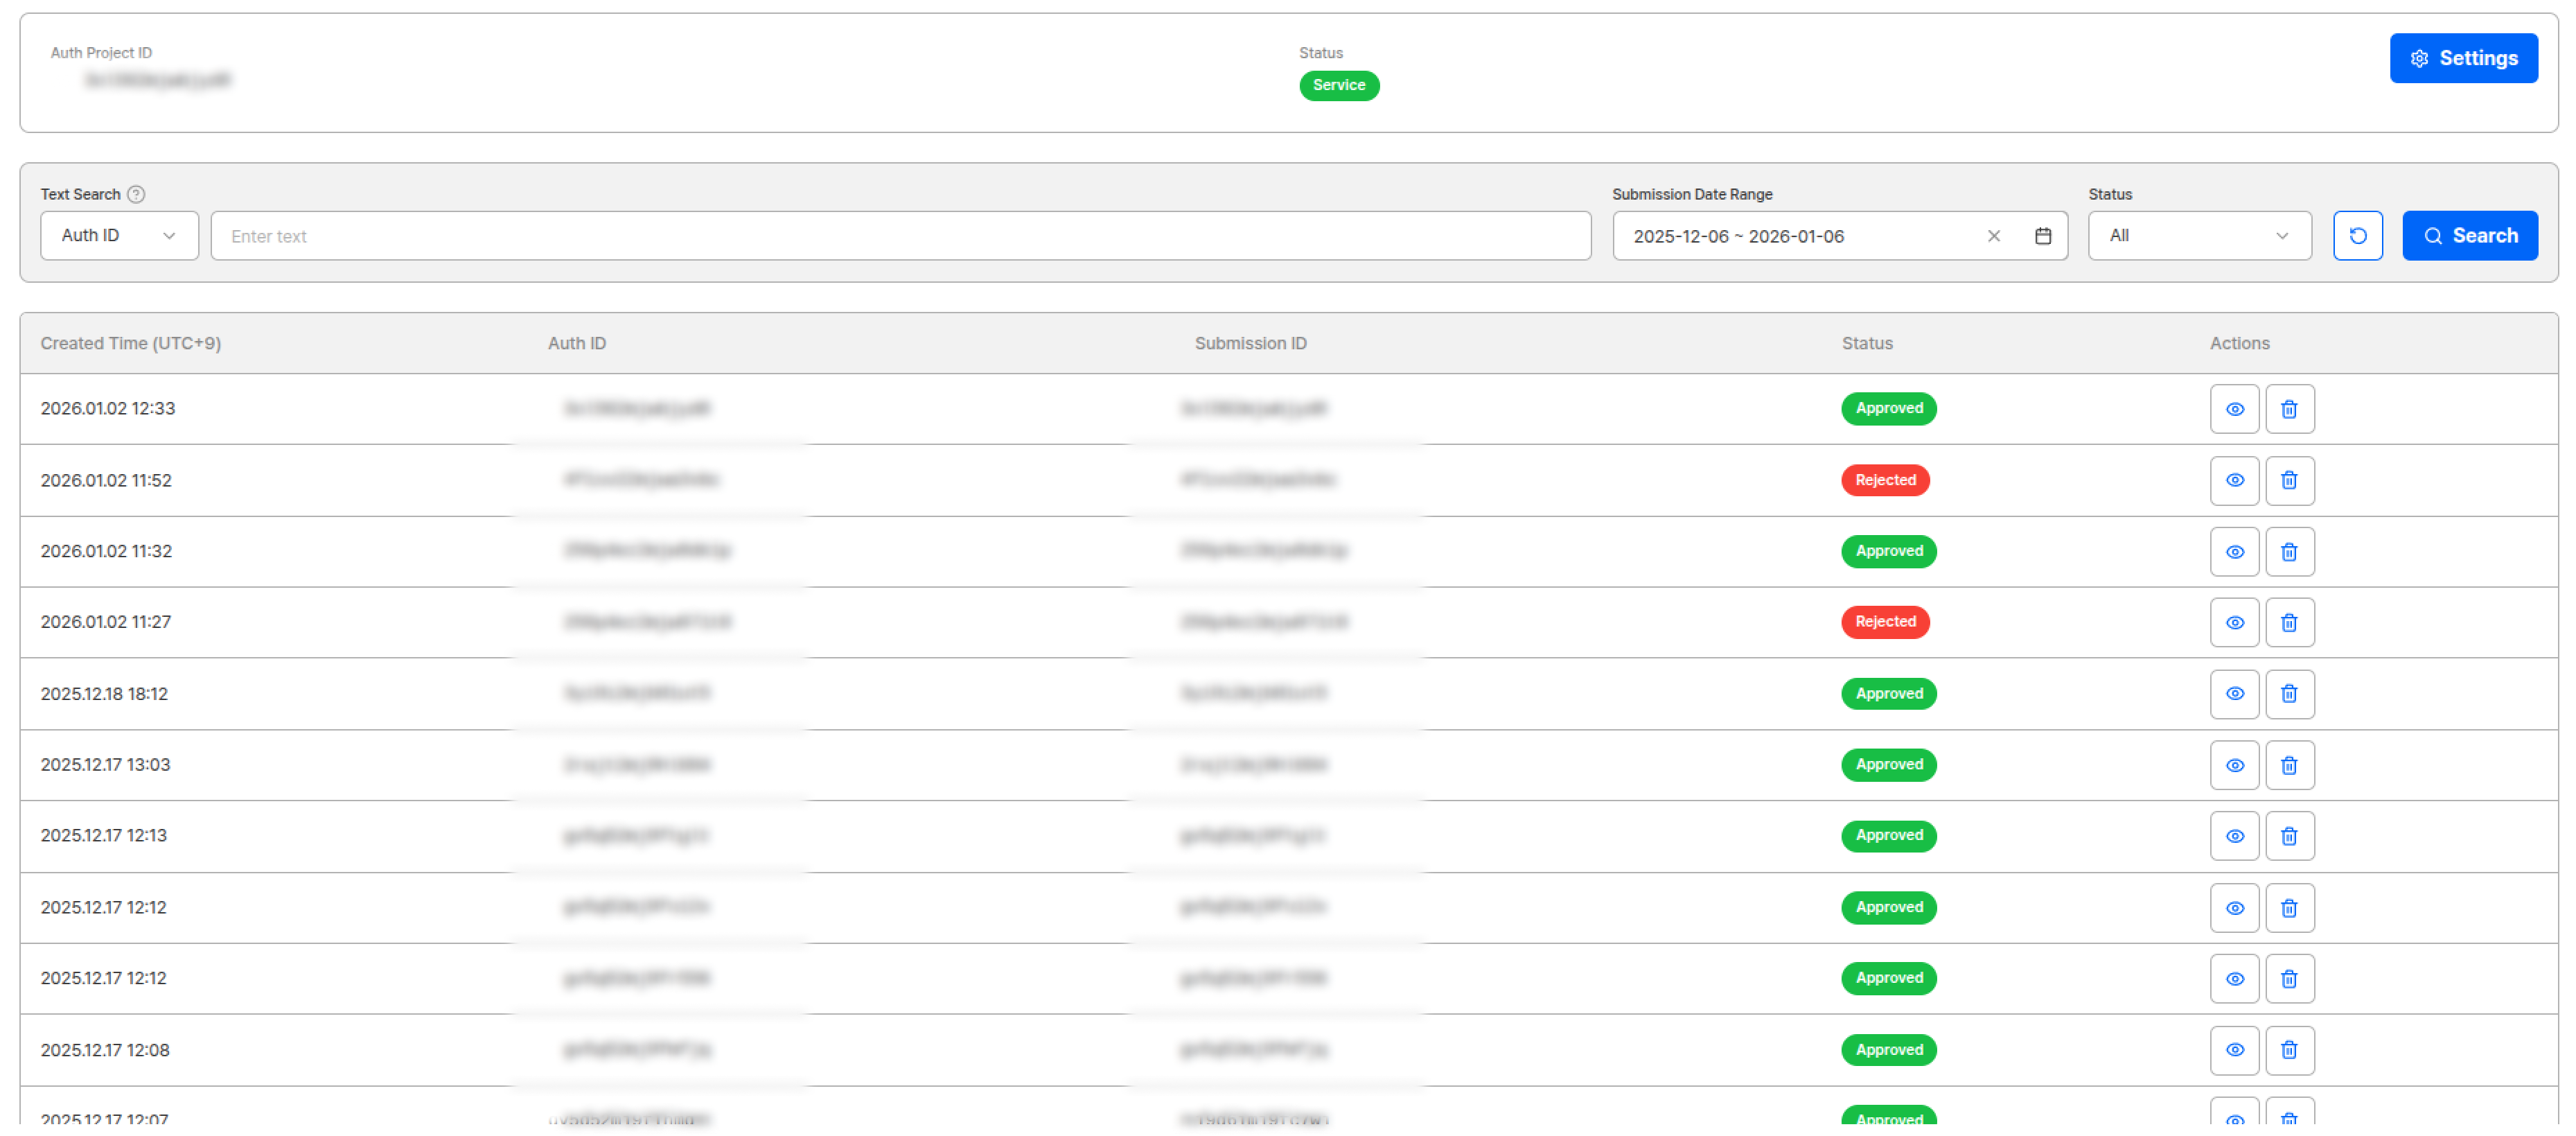
Auth ID refers to one result (submission) of FACE AUTH (add-on). Same-person judgment comparing registered copy (face approved from eKYC previously) with this selfie (verified copy), applied policy snapshot, and processing timeline are recorded together.
### View Results in Dashboard
```
Dashboard > Add-On (FACE AUTH) Project > Submission (Auth ID) List > Detail View
```
**Information viewable in list screen:**
* Time
* AUTH ID (TARGET)
* Submission ID (Reference)
* Status
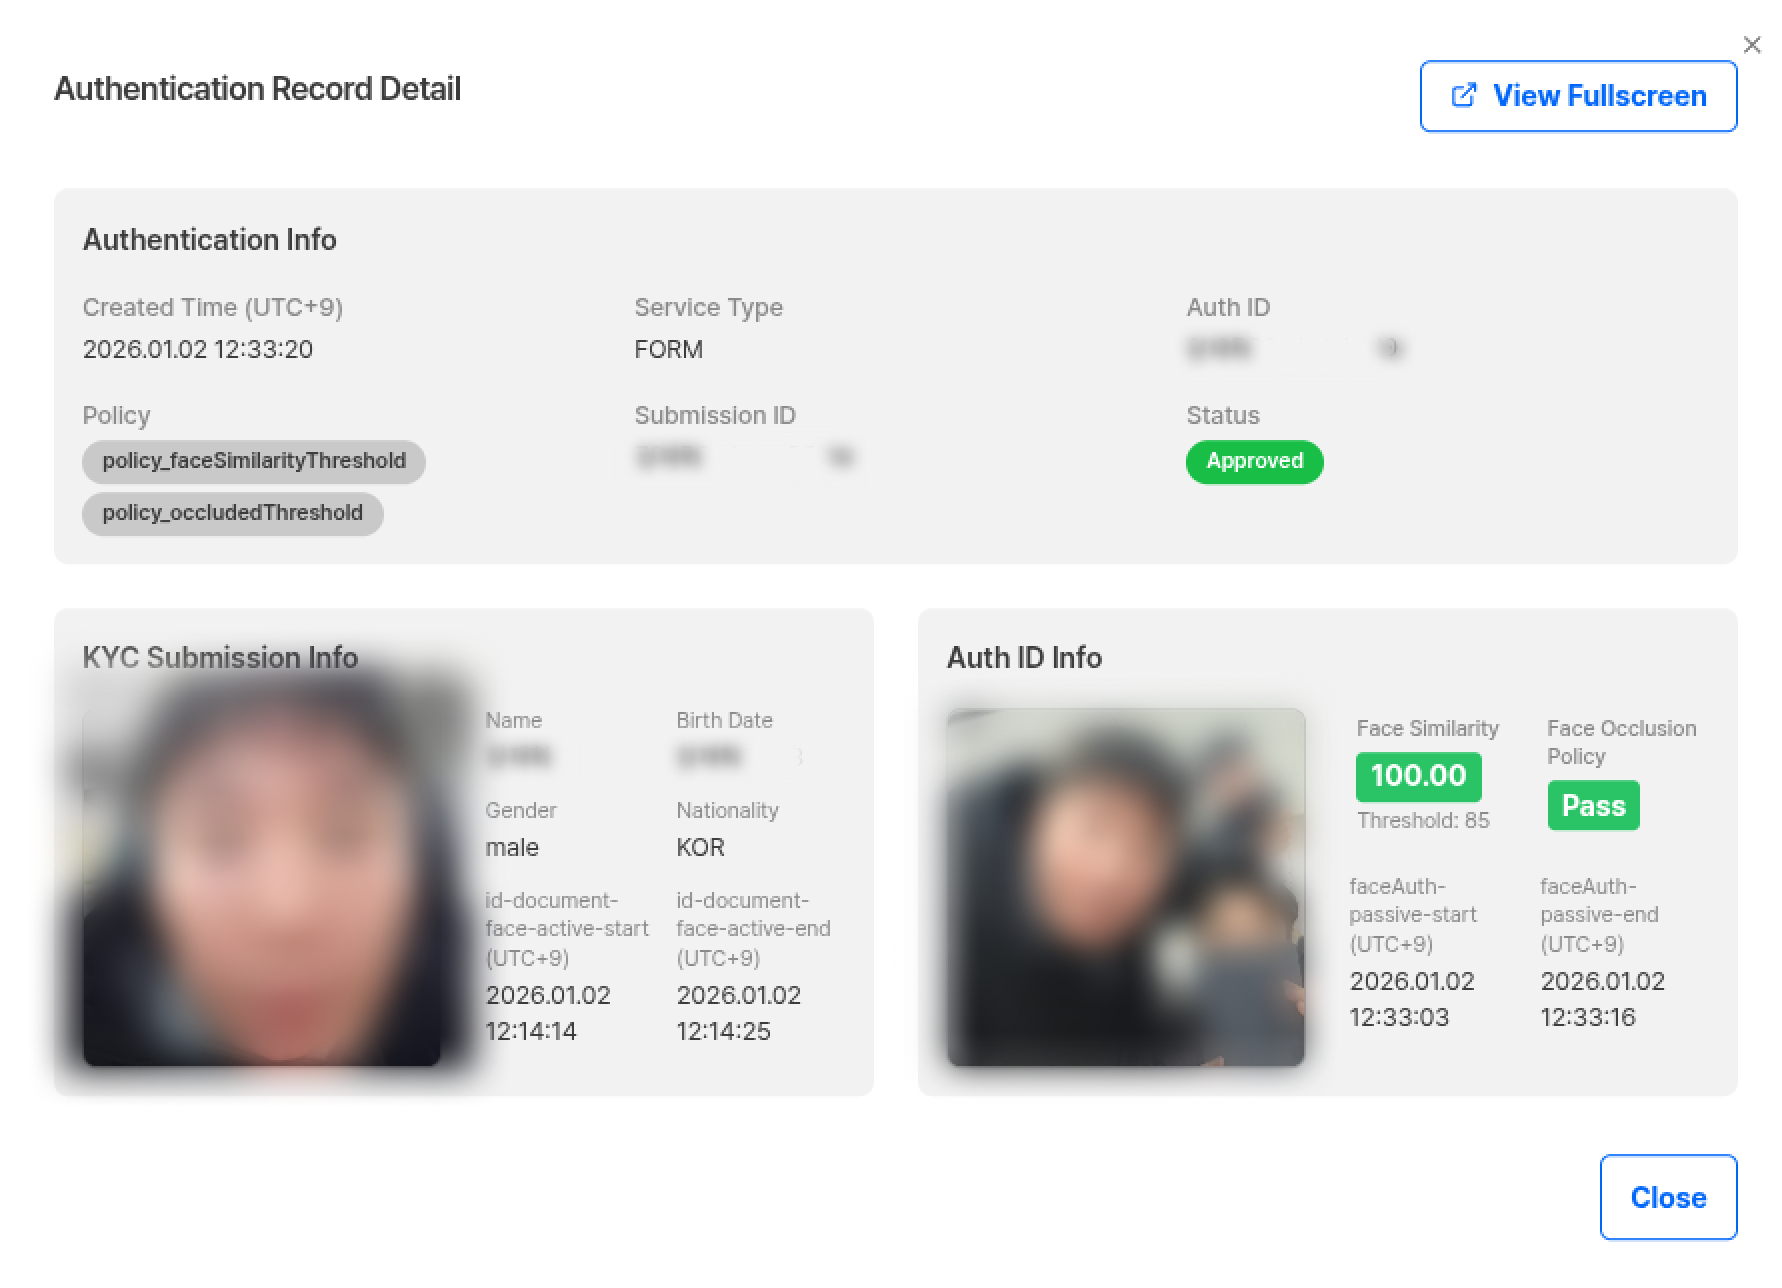
**Information viewable in detail screen:**
* Policy snapshot
* Score/threshold
* Liveness·occlusion results
* Comparison images
* Logs
***
## AUTH ID - Authentication Result Verification
Auth ID refers to one result (submission) of FACE AUTH (add-on). Same-person judgment comparing registered copy (face approved from eKYC previously) with this selfie (verified copy), applied policy snapshot, and processing timeline are recorded together.
### View Results in Dashboard
```
Dashboard > Add-On (FACE AUTH) Project > Submission (Auth ID) List > Detail View
```
**Information viewable in list screen:**
* Time
* AUTH ID (TARGET)
* Submission ID (Reference)
* Status
**Information viewable in detail screen:**
* Policy snapshot
* Score/threshold
* Liveness·occlusion results
* Comparison images
* Logs
 ### Auth ID Detail Information
| Field | Description |
| --------------------- | -------------------------------------------------------------------------------- |
| **Authentication ID** | Unique identifier for the submission |
| **Submission ID** | Previously approved submission referenced as comparison target during submission |
| **Status** | Displays authentication result as Approved, Rejected |
| **Policy** | Project options applied when the submission was processed |
| **FACE Similarity** | Similarity between selfie images measured during authentication |
| **Liveness** | Liveness score of submitted selfie |
| **Face Occluded** | Result judging if face is occluded as Pass / Fail |
Reference information prioritizes Selfie comparison, and if Selfie is not available, calls ID portrait as secondary for comparison.
### Auth ID Detail Information
| Field | Description |
| --------------------- | -------------------------------------------------------------------------------- |
| **Authentication ID** | Unique identifier for the submission |
| **Submission ID** | Previously approved submission referenced as comparison target during submission |
| **Status** | Displays authentication result as Approved, Rejected |
| **Policy** | Project options applied when the submission was processed |
| **FACE Similarity** | Similarity between selfie images measured during authentication |
| **Liveness** | Liveness score of submitted selfie |
| **Face Occluded** | Result judging if face is occluded as Pass / Fail |
Reference information prioritizes Selfie comparison, and if Selfie is not available, calls ID portrait as secondary for comparison.
 ***
## Real-time Integration via Webhook
When FACE AUTH is completed and final results are available, results are **automatically sent to the Webhook URL** registered in the existing ID Check project.
Trigger type: `"faceAuth"`
```json theme={null}
{
"webhook_trigger": "faceAuth",
"Authentication_id": "AUTH_...",
"data": {
"Submission_id": "SUB_...",
"Auth_Status": "approved | rejected",
"Create_Time": "UTC+0",
"User_id": "optional",
"cf1": "optional",
"cf2": "optional",
"cf3": "optional",
"reference": {
"userid": "optional",
"email": "optional",
"cf": { "cf1": "optional", "cf2": "optional", "cf3": "optional" }
}
}
}
```
**Implementation Checklist**
* ✅ Register Webhook URL (project unit) and confirm receipt with 2xx response
* ✅ Duplicate receipt prevention: Check duplicates based on Authentication\_id
* ✅ Timezone processing: Create\_Time(UTC+0) → Convert to internal standard time if needed
* ✅ Key mapping: Map to internal users/requests with Submission\_id, User\_id, cf1\~3
* ✅ Audit logging: Store original payload and routing results together
Administrators can read operation-friendly through dashboard, and development teams can automate systems via webhook simultaneously. Consistently view status·score·policy·timeline by Auth ID unit, and immediately connect to internal system flow using Authentication\_id/Submission\_id from webhook.
***
## Checklist for Quick Adoption
Create FACE AUTH project in Dashboard → Add-On.
Set face match threshold / liveness / occlusion blocking (ON/OFF).
Approved eKYC Submission to use as Reference is required.
Include pid + Submission ID in Add-On URL (consider desktop→QR→mobile flow)
Monitor Auth ID (submission) status·policy·comparison results in dashboard.
### Operation Tips
* Start policy initial values somewhat **conservatively** → Gradually tune thresholds while viewing actual service data
* **Monitoring Metrics**: Re-authentication success rate, drop-off rate, average authentication time, risk event blocking rate, reset/change completion rate
* **UX Design**: If desktop entry rate is high, clearly guide QR transition flow, and provide minimal text authentication guide for mobile users
***
## Related Documentation
View complete overview of Add-On service.
Learn how to integrate FACE AUTH via API.
Learn how to receive FACE AUTH results via webhook.
Learn URL encryption methods.
***
## Real-time Integration via Webhook
When FACE AUTH is completed and final results are available, results are **automatically sent to the Webhook URL** registered in the existing ID Check project.
Trigger type: `"faceAuth"`
```json theme={null}
{
"webhook_trigger": "faceAuth",
"Authentication_id": "AUTH_...",
"data": {
"Submission_id": "SUB_...",
"Auth_Status": "approved | rejected",
"Create_Time": "UTC+0",
"User_id": "optional",
"cf1": "optional",
"cf2": "optional",
"cf3": "optional",
"reference": {
"userid": "optional",
"email": "optional",
"cf": { "cf1": "optional", "cf2": "optional", "cf3": "optional" }
}
}
}
```
**Implementation Checklist**
* ✅ Register Webhook URL (project unit) and confirm receipt with 2xx response
* ✅ Duplicate receipt prevention: Check duplicates based on Authentication\_id
* ✅ Timezone processing: Create\_Time(UTC+0) → Convert to internal standard time if needed
* ✅ Key mapping: Map to internal users/requests with Submission\_id, User\_id, cf1\~3
* ✅ Audit logging: Store original payload and routing results together
Administrators can read operation-friendly through dashboard, and development teams can automate systems via webhook simultaneously. Consistently view status·score·policy·timeline by Auth ID unit, and immediately connect to internal system flow using Authentication\_id/Submission\_id from webhook.
***
## Checklist for Quick Adoption
Create FACE AUTH project in Dashboard → Add-On.
Set face match threshold / liveness / occlusion blocking (ON/OFF).
Approved eKYC Submission to use as Reference is required.
Include pid + Submission ID in Add-On URL (consider desktop→QR→mobile flow)
Monitor Auth ID (submission) status·policy·comparison results in dashboard.
### Operation Tips
* Start policy initial values somewhat **conservatively** → Gradually tune thresholds while viewing actual service data
* **Monitoring Metrics**: Re-authentication success rate, drop-off rate, average authentication time, risk event blocking rate, reset/change completion rate
* **UX Design**: If desktop entry rate is high, clearly guide QR transition flow, and provide minimal text authentication guide for mobile users
***
## Related Documentation
View complete overview of Add-On service.
Learn how to integrate FACE AUTH via API.
Learn how to receive FACE AUTH results via webhook.
Learn URL encryption methods.